
Insync APX Sophos
Summary: Sophos operating instructions w/ Sophos overview
Download article(s)
![]() sophos-central-device-encryption-technical-brief.pdf
sophos-central-device-encryption-technical-brief.pdf
![]() Insync-sophos-wireless-ds.pdf
Insync-sophos-wireless-ds.pdf
![]() Insync-sophos-encryption-central-device-encryption-ds.pdf
Insync-sophos-encryption-central-device-encryption-ds.pdf
![]() Insync-sophos-operating-instructions-apx-120-oi.pdf
Insync-sophos-operating-instructions-apx-120-oi.pdf
sophos-central-device-encryption-technical-brief


Insync-sophos-wireless-ds
Insync-sophos-encryption-central-device-encryption-ds
Insync-sophos-operating-instructions-apx-120-oi
A Sophos white paper July 2020
SOPHOS CENTRAL
DEVICE ENCRYPTION –
TECH BRIEF
Sophos Central Device Encryption – Tech Brief
1
A Sophos whitepaper July 2020
Contents
Overview
2
Windows
2
Encryption Process - Windows
2
BitLocker Protectors
3
Login Protectors
3
Other Protectors
3
macOS
4
Encryption Process - macOS
4
Key Storage
4
Recovery Process
5
Administrator-Assisted Recovery
5
User Self-Help Recovery
5
Secure File Sharing
5
Sophos Central Device Encryption – Tech Brief
2
A Sophos whitepaper July 2020
Overview
This document provides an overview of the Sophos Central Device Encryption technical
concepts, including the encryption process, protectors used, and how keys are handled. The
encryption process differs between Windows (BitLocker) and macOS (FileVault) devices. The
document is not intended as a replacement for the Central Device Encryption administration
guide, which is available at Sophos.com
Windows
To encrypt a Windows device, the Sophos Central Device Encryption agent needs to be deployed
to the computer, and an encryption policy assigned in Sophos Central. The device will receive
this policy and begin the encryption process.
Encryption Process - Windows
1. The device receives an encryption policy from Sophos Central. The policy includes the
setting to enable device encryption.
Note: If the drive has not been prepared for BitLocker or the TPM on the machine not
activated, the user will be prompted to do these and restart. On most modern systems this
step is not necessary.
2. A recovery key is created for the device. This consists of a unique ID and a 48-digit password.
Note: The user’s PIN, Password or encryption key is never sent to Sophos Central. It is only
the recovery key that is stored.
3. The recovery key is obfuscated and sent securely via SSL to Sophos Central. Sophos
Central receives the recovery key, encrypts it, and stores it securely in a key manager virtual
appliance. Sophos Central sends a message to the device to confirm that the key has been
received and stored successfully.
4. Upon receipt of the confirmation message from Sophos Central that the key is stored, the
device proceeds to install a logon protector. There are four different logon protector types;
TPM+PIN, TPM-only, passphrase, and USB key, only one of which will be installed. The
protector that is installed depends on a combination of software and hardware factors. See
Attachmentssection ‘BitLocker Protectors’ for more information.
5. Once a logon protector is successfully installed, the user is prompted to restart the device.
When the device starts back up, the user will be prompted to enter their new BitLocker PIN/
Password or attach the USB key (depending on the protector used).
Note: If the ‘TPM only’ authentication method is used the user will not be prompted to enter
a PIN/Password.
6. After successfully authenticating at the pre-boot environment and logging into Windows,
the disk encryption process now begins. Users can check the status of the encryption
process by navigating to Control Panel -> System and Security -> BitLocker Drive Encryption.
The device reports its encryption status to Sophos Central and is visible in the upperSophos
Central admin console.
Sophos Central Device Encryption – Tech Brief
3
A Sophos whitepaper July 2020
BitLocker Protectors
BitLocker has the concept of ‘protectors’, which are different methods of accessing, or
“unlocking” encrypted devices and volumes.
Login Protectors
Central Device Encryption leverages the below protectors as part of the device boot process.
Ì TPM+PIN
Ì TPM only
Ì Passphrase
Ì USB key
Note that Central Device Encryption only enables one of these methods on each device.
The specific protector used is based on a combination of the device hardware and software.
Please see the Central Device Encryption admin guide for details.
TPM+PIN
This protector uses the Trusted Platform Module (TPM) plus a PIN for authentication. The
user must enter a PIN in the pre-boot environment every time the computer starts.
TPM-only
The TPM-only protector uses the TPM chip without requiring any PIN authentication. The
user does not have to enter anything in the pre-boot environment.
Note: If the Central Device Encryption policy option ‘Require startup authentication’ is
enabled, the TPM-only protector will not be used.
Passphrase
The passphrase protector uses only a passphrase as authentication and is suitable on
machines that do not have a TPM. The user enters a passphrase in the pre-boot environment
every time the computer starts. The passphrase protector requires Windows 8 or higher.
USB Key
The USB protector requires a key stored on a USB device. In this scenario, the USB key must
be connected to the device every time it starts.
Note: The USB protector is only used by Central Device Encryption on Windows 7 computers.
Other Protectors
The following BitLocker protectors are also leveraged by Sophos CDE.
Recovery Key
Before encryption starts on the computer, a recovery key is created by Windows. The
recovery key consists of a unique ID and a 48-digit password. The recovery key is stored
securely in Sophos Central, and it lets users that have forgotten their BitLocker PIN or
password log back into their machine. The admin gives the user the 48-digit password which
they enter into the BitLocker pre-boot authentication page.
Once a recovery key password is displayed in Sophos Central, the key is considered expired
as it is now in the open. When the device next synchronizes with Sophos Central it learns
that the key is expired, generates a new one and sends the new recovery key to Sophos
Central. Therefore, after the next successful log in, the original recovery key is no longer valid.
Note: Sophos Central does not delete old recovery keys. Recovery keys that have been
subsequently refreshed can be found by searching by volume ID.
Sophos Central Device Encryption – Tech Brief
4
A Sophos whitepaper July 2020
Auto-Unlock
An auto-unlock protector will be installed for all fixed data volumes. This means that after
the user has logged on to a device, the data volumes (i.e. not the operating system volume)
can be accessed without any further user interaction.
Note: Fixed data volumes will not be encrypted if the Central Device Encryption policy
setting ‘Encrypt boot volume only’ is enabled
Note: Removable data volumes (e.g. USB keys) will not be encrypted by Central Device
Encryption
macOS
To encrypt a macOS device, the Sophos Central Device Encryption agent needs to be
deployed to the computer, and an encryption policy assigned in Sophos Central. The device
will receive this policy and begin the encryption process.
Encryption Process - macOS
1. The device receives an encryption policy from Sophos Central. The policy includes the
setting to enable device encryption.
2. The user is prompted to start encryption on the device or postpone it to a later time.
Note: The FileVault recovery key cannot be sent to Sophos Central until disk encryption
has been started. Ensure the device has internet connectivity while performing
encryption so that the recovery key can be sent to Sophos Central.
3. Encryption takes place in the background, and the user receives a notification once it is
complete. The device recovery key is obfuscated and sent securely via SSL to Sophos
Central. Sophos Central receives the recovery key, encrypts it, and stores it securely in a
key manager virtual appliance.
Note: The user’s password is never sent to Sophos Central. It is only the recovery key
that is stored.
Key Storage
Sophos Central stores device recovery keys for situations when a user forgets their PIN/
Password or locks themselves out. As part of the encryption process, a device generates
a new recovery key and sends this via SSL to Sophos Central. The recovery key is stored
securely in a virtual key manager.
It is important to note that Sophos Central never collects a user’s actual pre-boot PIN or
password details, it is only the recovery key that is stored.
United Kingdom and Worldwide Sales
Tel: +44 (0)8447 671131
Email: sales@sophos.com
North American Sales
Toll Free: 1-866-866-2802
Email: nasales@sophos.com
Australia and New Zealand Sales
Tel: +61 2 9409 9100
Email: sales@sophos.com.au
Asia Sales
Tel: +65 62244168
Email: salesasia@sophos.com
© Copyright 2020. Sophos Ltd. All rights reserved.
Registered in England and Wales No. 2096520, The Pentagon, Abingdon Science Park, Abingdon, OX14 3YP, UK
Sophos is the registered trademark of Sophos Ltd. All other product and company names mentioned are
trademarks or registered trademarks of their respective owners.
200712 WPEN (NP)
Recovery Process
The recovery process enables users that have forgotten their logon credentials to regain
access to their machine. Recovery can be done with assistance from an administrator, or
via the user Sophos Self Service Portal.
Administrator-Assisted Recovery
Administrators can find the recovery key for a specific device in the Sophos Central Admin
console. There are two methods to locate the recovery key:
1. Retrieve the Recovery Key directly from the Sophos Central console.
This is useful when the admin knows the user or computer name. From the Devices
or Computers page in Sophos Central, find the relevant machine and go to the Device
Encryption section. Clicking ‘Retrieve Recovery Key’ to display the Recovery Key, a
48-digit password that the user can enter at the BitLocker pre-boot environment to
regain access to their device.
2. Search for a Recovery Key using a Recovery Key ID or Volume ID.
This method is useful to manually search for a specific Recovery Key. The Recovery Key
ID is displayed to users at the pre-boot authentication screen and searching using this
enables an admin to locate the associated recovery password. Searching by Volume ID
may also be useful if the admin has a list of disk details and needs to locate the recovery
password. As recovery keys are never deleted in Sophos Central, a recovery key that may
have been subsequently refreshed can be found by a manual search.
Note: Once an admin views a recovery key, the client device is instructed to create a fresh
recovery key and share it with Sophos Central. If the computer is offline, it will generate a
new recovery key when it comes back online.
User Self-Help Recovery
The Sophos Central Self-Service Portal (https://www.sophos.com/ssp) is available for
users to retrieve recovery keys without having to contact the IT Admin or Helpdesk. Users
in Sophos Central must be configured for Self-Service Portal access, please see the Sophos
Central help for more information.
After logging into the Sophos Central Self-Service Portal, the ‘Device Encryption’ tab lists
the user’s devices. Clicking the ‘Retrieve’ button under the Recovery Key column provides
the Recovery Key.
Secure File Sharing
The Secure File Sharing feature enables users to encrypt files up to 50mb in size and
share them with colleagues or external recipients. The user must specify a password when
encrypting a file, and the recipient needs this password in order to access the file. Files are
encrypted using 256-bit AES encryption.
Note: Currently Secure File Sharing is only available on Windows
Sophos Wireless
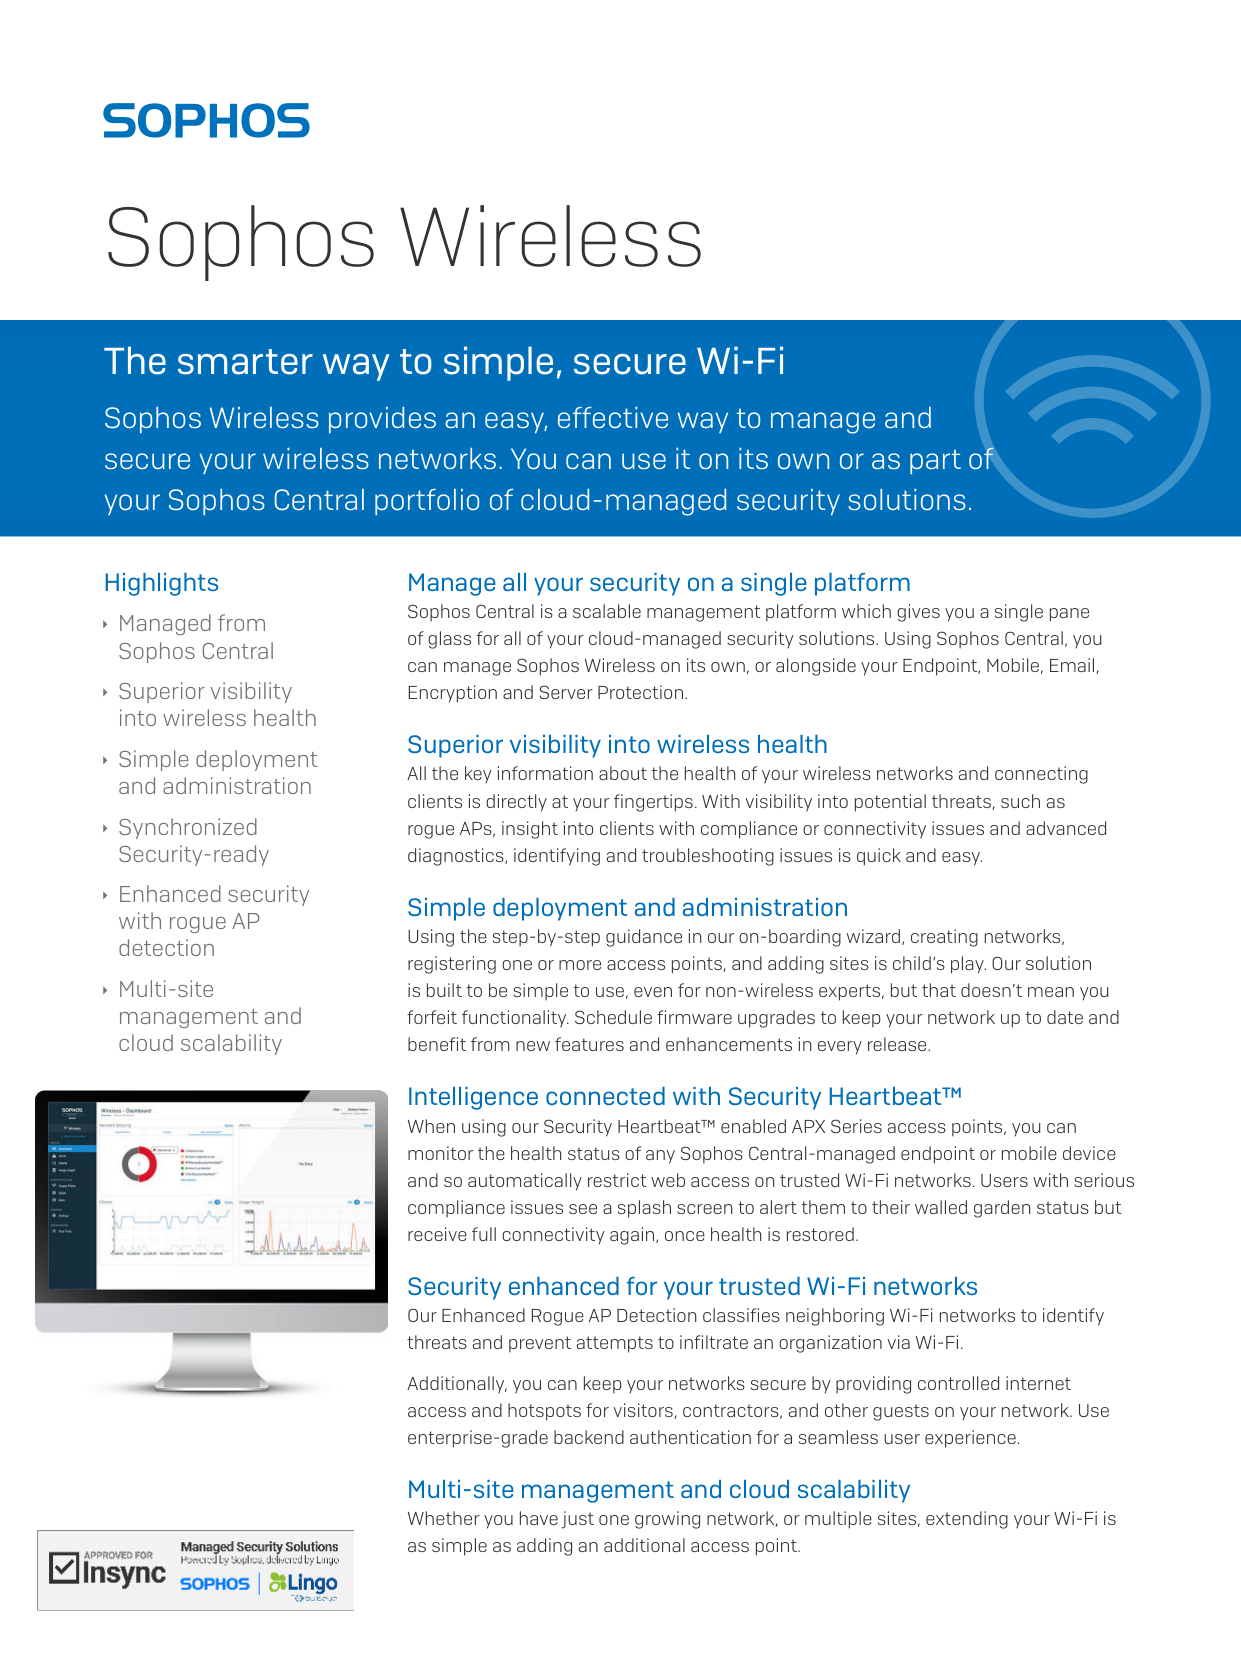
The smarter way to simple, secure Wi-Fi
Sophos Wireless provides an easy, effective way to manage and
secure your wireless networks. You can use it on its own or as part of
your Sophos Central portfolio of cloud-managed security solutions.
Highlights
Ì Managed from
Sophos Central
Ì Superior visibility
into wireless health
Ì Simple deployment
and administration
Ì Synchronized
Security-ready
Ì Enhanced security
with rogue AP
detection
Ì Multi-site
management and
cloud scalability
Manage all your security on a single platform
Sophos Central is a scalable management platform which gives you a single pane
of glass for all of your cloud-managed security solutions. Using Sophos Central, you
can manage Sophos Wireless on its own, or alongside your Endpoint, Mobile, Email,
Encryption and Server Protection.
Superior visibility into wireless health
All the key information about the health of your wireless networks and connecting
clients is directly at your fingertips. With visibility into potential threats, such as
rogue APs, insight into clients with compliance or connectivity issues and advanced
diagnostics, identifying and troubleshooting issues is quick and easy.
Simple deployment and administration
Using the step-by-step guidance in our on-boarding wizard, creating networks,
registering one or more access points, and adding sites is child’s play. Our solution
is built to be simple to use, even for non-wireless experts, but that doesn’t mean you
forfeit functionality. Schedule firmware upgrades to keep your network up to date and
benefit from new features and enhancements in every release.
Intelligence connected with Security Heartbeat™
When using our Security Heartbeat™ enabled APX Series access points, you can
monitor the health status of any Sophos Central-managed endpoint or mobile device
and so automatically restrict web access on trusted Wi-Fi networks. Users with serious
compliance issues see a splash screen to alert them to their walled garden status but
receive full connectivity again, once health is restored.
Security enhanced for your trusted Wi-Fi networks
Our Enhanced Rogue AP Detection classifies neighboring Wi-Fi networks to identify
threats and prevent attempts to infiltrate an organization via Wi-Fi.
Additionally, you can keep your networks secure by providing controlled internet
access and hotspots for visitors, contractors, and other guests on your network. Use
enterprise-grade backend authentication for a seamless user experience.
Multi-site management and cloud scalability
Whether you have just one growing network, or multiple sites, extending your Wi-Fi is
as simple as adding an additional access point.
Sophos Wireless
Interested in a free trial?*
Contact us to ask about a 30-day evaluation
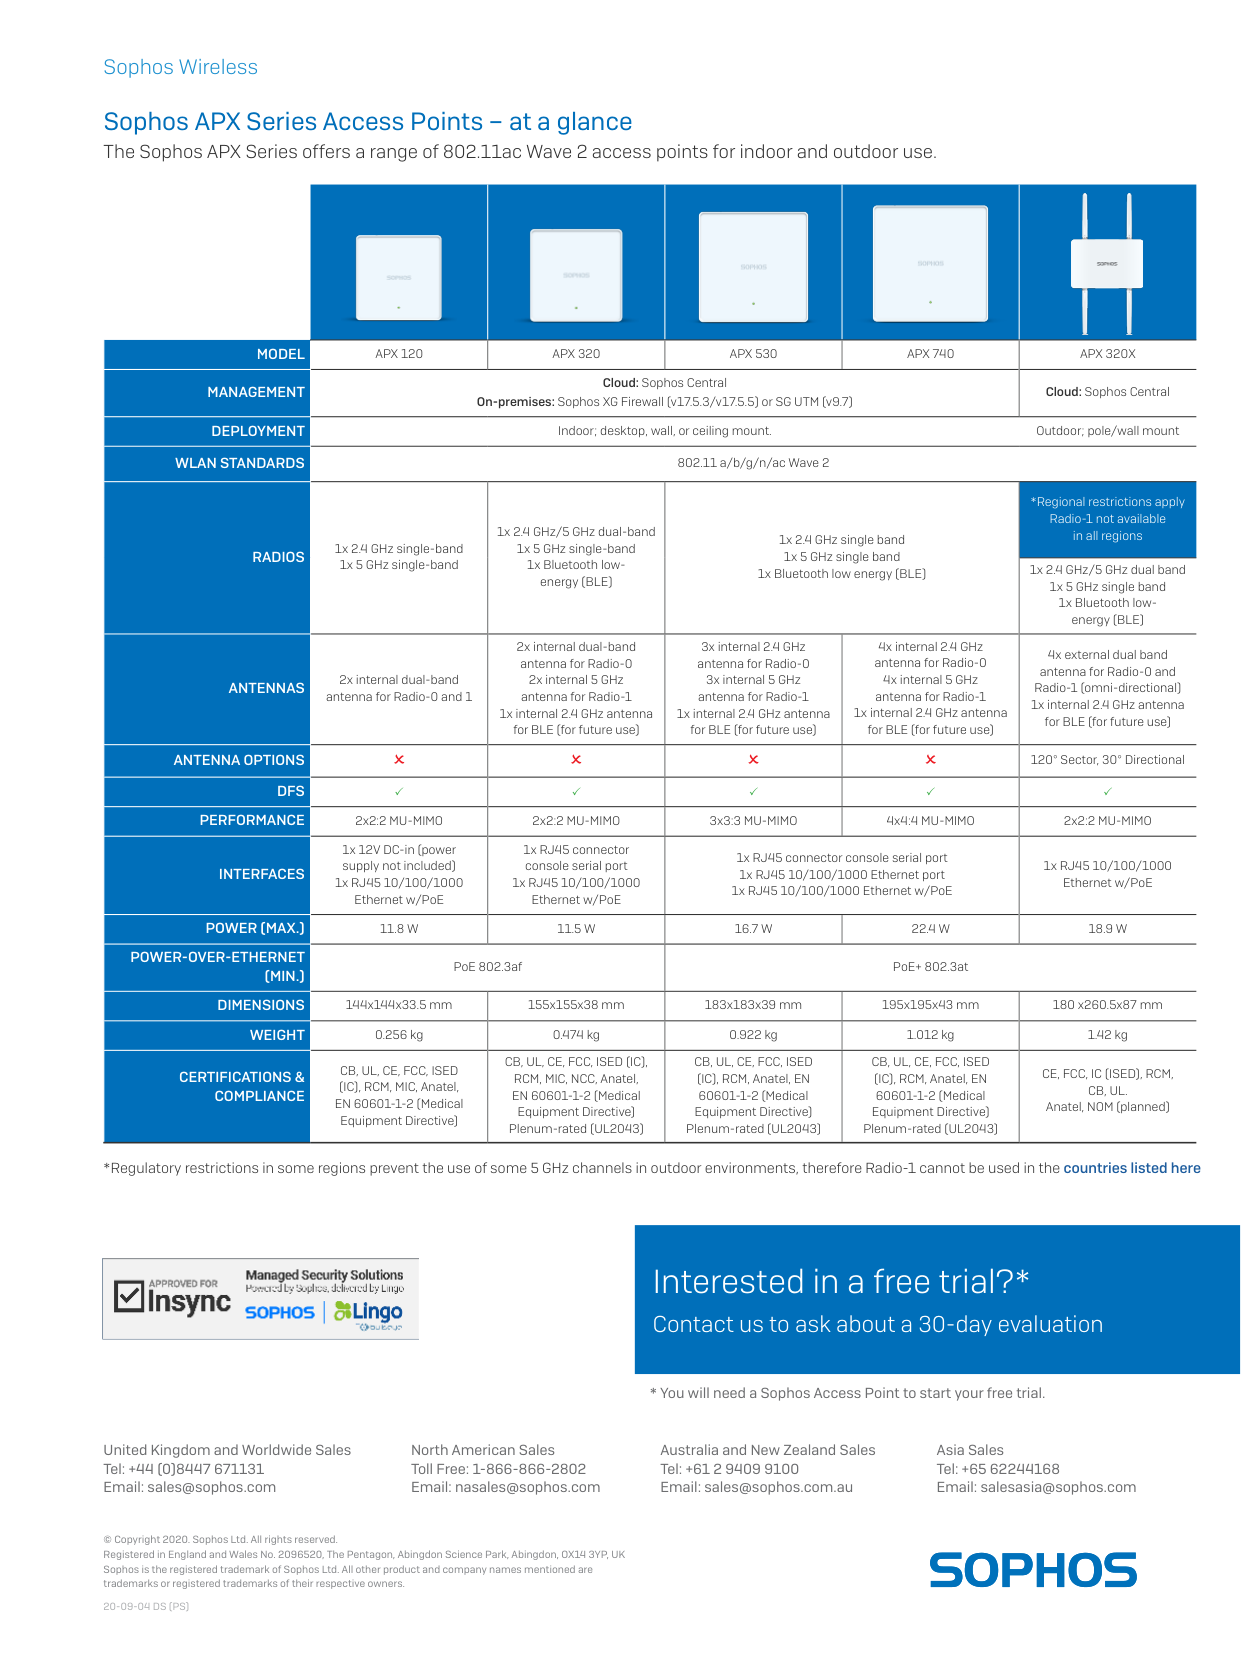
Sophos APX Series Access Points – at a glance
The Sophos APX Series offers a range of 802.11ac Wave 2 access points for indoor and outdoor use.
MODEL
APX 120
APX 320
APX 530
APX 740
APX 320X
MANAGEMENT
Cloud: Sophos Central
On-premises: Sophos XG Firewall (v17.5.3/v17.5.5) or SG UTM (v9.7)
Cloud: Sophos Central
DEPLOYMENT
Indoor; desktop, wall, or ceiling mount.
Outdoor; pole/wall mount
WLAN STANDARDS
802.11 a/b/g/n/ac Wave 2
RADIOS
1x 2.4 GHz single-band
1x 5 GHz single-band
1x 2.4 GHz/5 GHz dual-band
1x 5 GHz single-band
1x Bluetooth low-
energy (BLE)
1x 2.4 GHz single band
1x 5 GHz single band
1x Bluetooth low energy (BLE)
*Regional restrictions apply
Radio-1 not available
in all regions
1x 2.4 GHz/5 GHz dual band
1x 5 GHz single band
1x Bluetooth low-
energy (BLE)
ANTENNAS
2x internal dual-band
antenna for Radio-0 and 1
2x internal dual-band
antenna for Radio-0
2x internal 5 GHz
antenna for Radio-1
1x internal 2.4 GHz antenna
for BLE (for future use)
3x internal 2.4 GHz
antenna for Radio-0
3x internal 5 GHz
antenna for Radio-1
1x internal 2.4 GHz antenna
for BLE (for future use)
4x internal 2.4 GHz
antenna for Radio-0
4x internal 5 GHz
antenna for Radio-1
1x internal 2.4 GHz antenna
for BLE (for future use)
4x external dual band
antenna for Radio-0 and
Radio-1 (omni-directional)
1x internal 2.4 GHz antenna
for BLE (for future use)
ANTENNA OPTIONS
O
O
O
O
120° Sector, 30° Directional
DFS
PERFORMANCE
2x2:2 MU-MIMO
2x2:2 MU-MIMO
3x3:3 MU-MIMO
4x4:4 MU-MIMO
2x2:2 MU-MIMO
INTERFACES
1x 12V DC-in (power
supply not included)
1x RJ45 10/100/1000
Ethernet w/PoE
1x RJ45 connector
console serial port
1x RJ45 10/100/1000
Ethernet w/PoE
1x RJ45 connector console serial port
1x RJ45 10/100/1000 Ethernet port
1x RJ45 10/100/1000 Ethernet w/PoE
1x RJ45 10/100/1000
Ethernet w/PoE
POWER (MAX.)
11.8 W
11.5 W
16.7 W
22.4 W
18.9 W
POWER-OVER-ETHERNET
(MIN.)
PoE 802.3af
PoE+ 802.3at
DIMENSIONS
144x144x33.5 mm
155x155x38 mm
183x183x39 mm
195x195x43 mm
180 x260.5x87 mm
WEIGHT
0.256 kg
0.474 kg
0.922 kg
1.012 kg
1.42 kg
CERTIFICATIONS &
COMPLIANCE
CB, UL, CE, FCC, ISED
(IC), RCM, MIC, Anatel,
EN 60601-1-2 (Medical
Equipment Directive)
CB, UL, CE, FCC, ISED (IC),
RCM, MIC, NCC, Anatel,
EN 60601-1-2 (Medical
Equipment Directive)
Plenum-rated (UL2043)
CB, UL, CE, FCC, ISED
(IC), RCM, Anatel, EN
60601-1-2 (Medical
Equipment Directive)
Plenum-rated (UL2043)
CB, UL, CE, FCC, ISED
(IC), RCM, Anatel, EN
60601-1-2 (Medical
Equipment Directive)
Plenum-rated (UL2043)
CE, FCC, IC (ISED), RCM,
CB, UL.
Anatel, NOM (planned)
*Regulatory restrictions in some regions prevent the use of some 5 GHz channels in outdoor environments, therefore Radio-1 cannot be used in the countries listed here
United Kingdom and Worldwide Sales
Tel: +44 (0)8447 671131
Email: sales@sophos.com
North American Sales
Toll Free: 1-866-866-2802
Email: nasales@sophos.com
Australia and New Zealand Sales
Tel: +61 2 9409 9100
Email: sales@sophos.com.au
Asia Sales
Tel: +65 62244168
Email: salesasia@sophos.com
* You will need a Sophos Access Point to start your free trial.
© Copyright 2020. Sophos Ltd. All rights reserved.
Registered in England and Wales No. 2096520, The Pentagon, Abingdon Science Park, Abingdon, OX14 3YP, UK
Sophos is the registered trademark of Sophos Ltd. All other product and company names mentioned are
trademarks or registered trademarks of their respective owners.
20-09-04 DS (PS)
Highlights
Ì Manage Windows BitLocker
and macOS FileVault full disk
encryption centrally from a
single console
Ì Secure document sharing
Ì Proof-of-compliance reporting
Ì Self-service key recovery
Ì Per-user pricing
Ì Quick deployment
Securing data and staying compliant
The majority of mobile professionals carry laptops containing confidential company
information. Passwords alone do not protect data. The best way to make sure your data
is secure at rest is by encrypting the computer’s hard drive. As a part of compliance
requirements, you are likely to be able to verify which computers in your organization are
encrypted. And in the case of lost or stolen laptops, organizations also need to provide
proof that these missing devices are encrypted.
Quick deployment
Sophos Central Device Encryption lets you centrally manage Windows BitLocker
and macOS FileVault native device encryption. With Sophos Central’s web-based
management, there is no server to deploy and no need to configure back-end key servers.
You can deploy and start securing data in minutes. For existing Sophos Central Intercept
X customers, there is no additional agent required. Over-the-air deployment means it
takes only a couple of clicks to push out the new encryption policy. And, it lets you easily
secure data on remote laptops.
Secure document sharing
Effortlessly share files, safe in the knowledge they remain secure. With a few clicks, users
can create a password-protected file securely contained within an HTML 5 wrapper.
Encrypted files can only be opened by a recipient with the correct password, they simply
need a web browser and valid password to access the documents. Furthermore, an
Outlook add-in enables users to encrypt email attachments before sharing them with
internal or external colleagues.
Sophos Encryption
Sophos Central Device Encryption - Easily manage full disk encryption
Each year, millions of laptop computers are misplaced, stolen, or lost; many
of them containing important and sensitive data. Full disk encryption is the
essential first line of defense to protect your data in any of these events.
Sophos Central gives you the ability to manage full disk encryption from a
single, integrated, web-based management center.
United Kingdom and Worldwide Sales
Tel: +44 (0)8447 671131
Email: sales@sophos.com
North American Sales
Toll Free: 1-866-866-2802
Email: nasales@sophos.com
Australia and New Zealand Sales
Tel: +61 2 9409 9100
Email: sales@sophos.com.au
Asia Sales
Tel: +65 62244168
Email: salesasia@sophos.com
© Copyright 2021. Sophos Ltd. All rights reserved.
Registered in England and Wales No. 2096520, The Pentagon, Abingdon Science Park, Abingdon, OX14 3YP, UK
Sophos is the registered trademark of Sophos Ltd. All other product and company names mentioned are
trademarks or registered trademarks of their respective owners.
21-10-29 DS-EN (DD)
Sophos Encryption
Unified management interface
Manage your encryption policy, encryption keys, as well as all your essential security
policies using Sophos Central, a web-based integrated management console. Sophos
Central provides an intuitive view for all your Sophos security products.
Secure key recovery via our self-service portal
Sophos Central Self Service lets users retrieve their own full disk encryption recovery
keys. This helps users get back to work faster without needing to contact the help desk,
saving both time and IT resources.
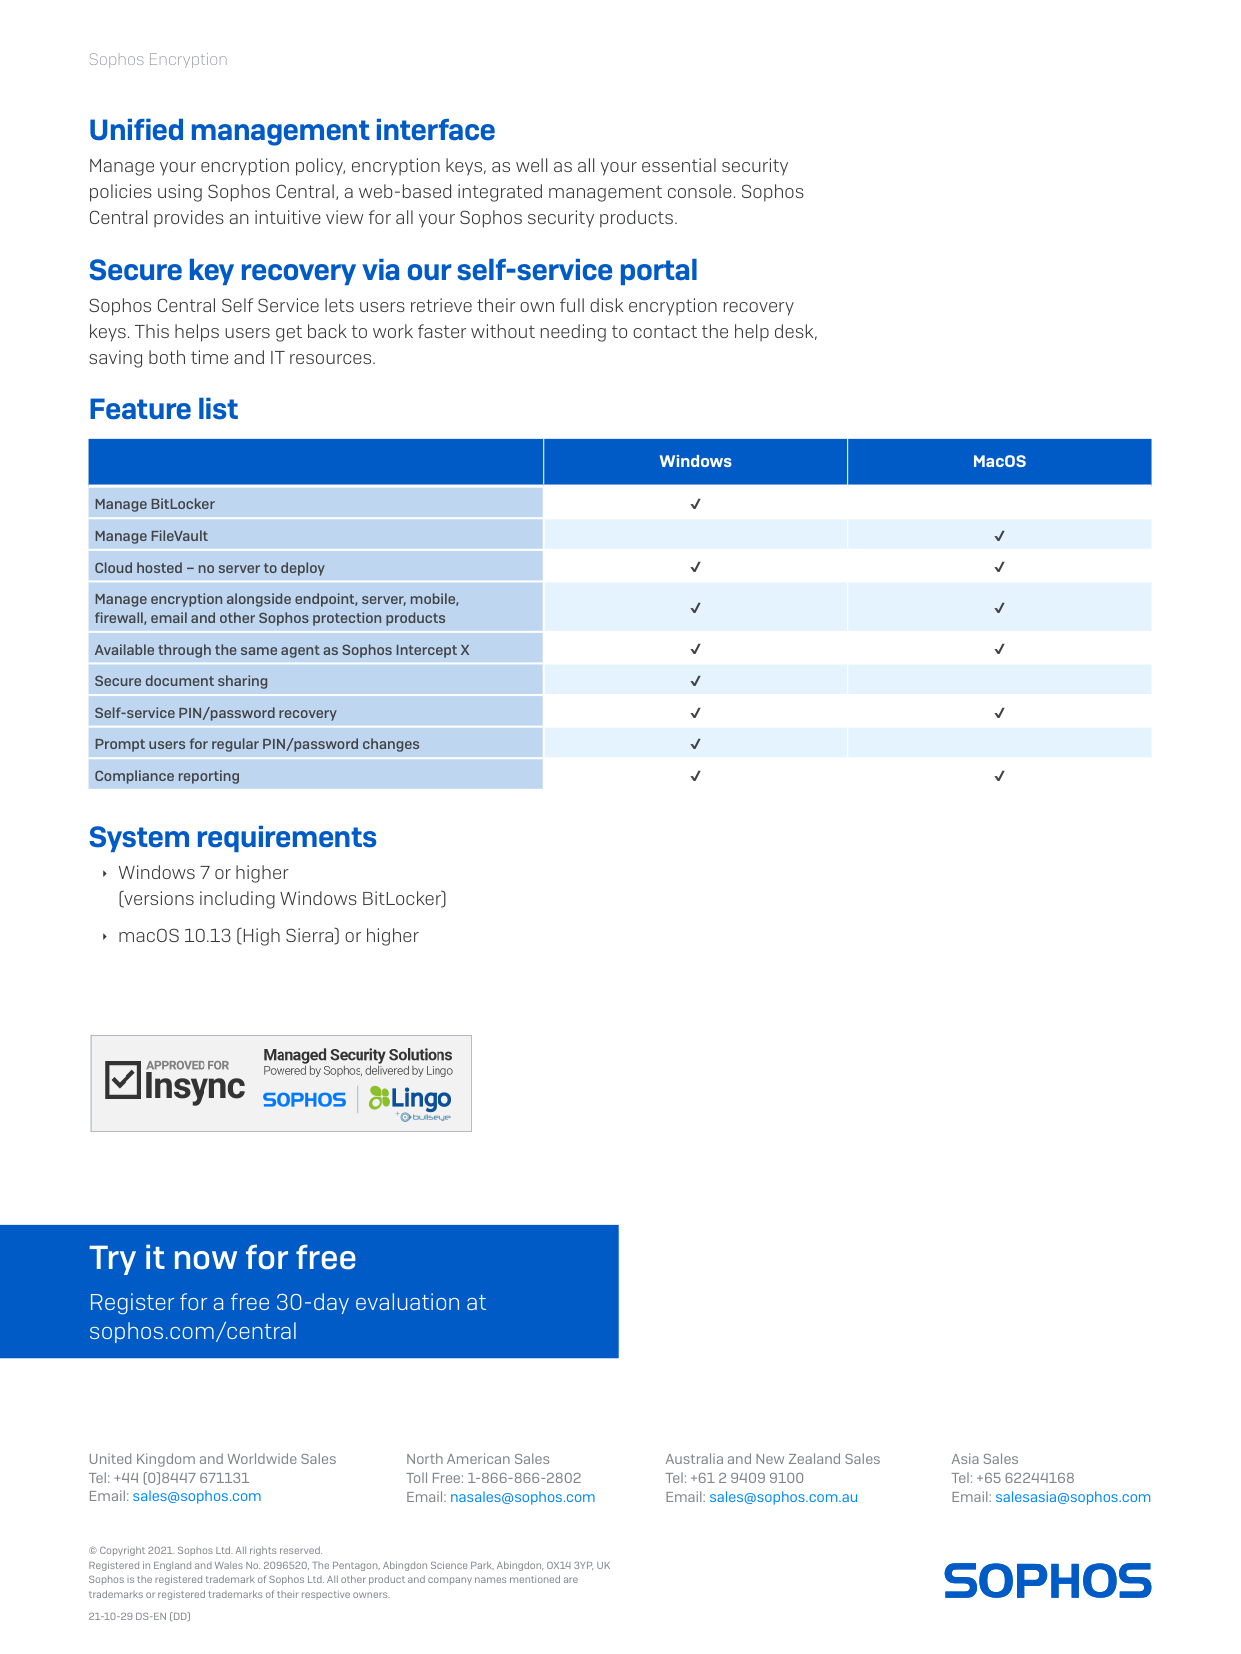
Feature list
Windows
MacOS
Manage BitLocker
✔
Manage FileVault
✔
Cloud hosted – no server to deploy
✔
✔
Manage encryption alongside endpoint, server, mobile,
firewall, email and other Sophos protection products
✔
✔
Available through the same agent as Sophos Intercept X
✔
✔
Secure document sharing
✔
Self-service PIN/password recovery
✔
✔
Prompt users for regular PIN/password changes
✔
Compliance reporting
✔
✔
System requirements
Ì Windows 7 or higher
(versions including Windows BitLocker)
Ì macOS 10.13 (High Sierra) or higher
Try it now for free
Register for a free 30-day evaluation at
sophos.com/central
Operating Instructions
APX 120
1
APX 120
Operating Instructions
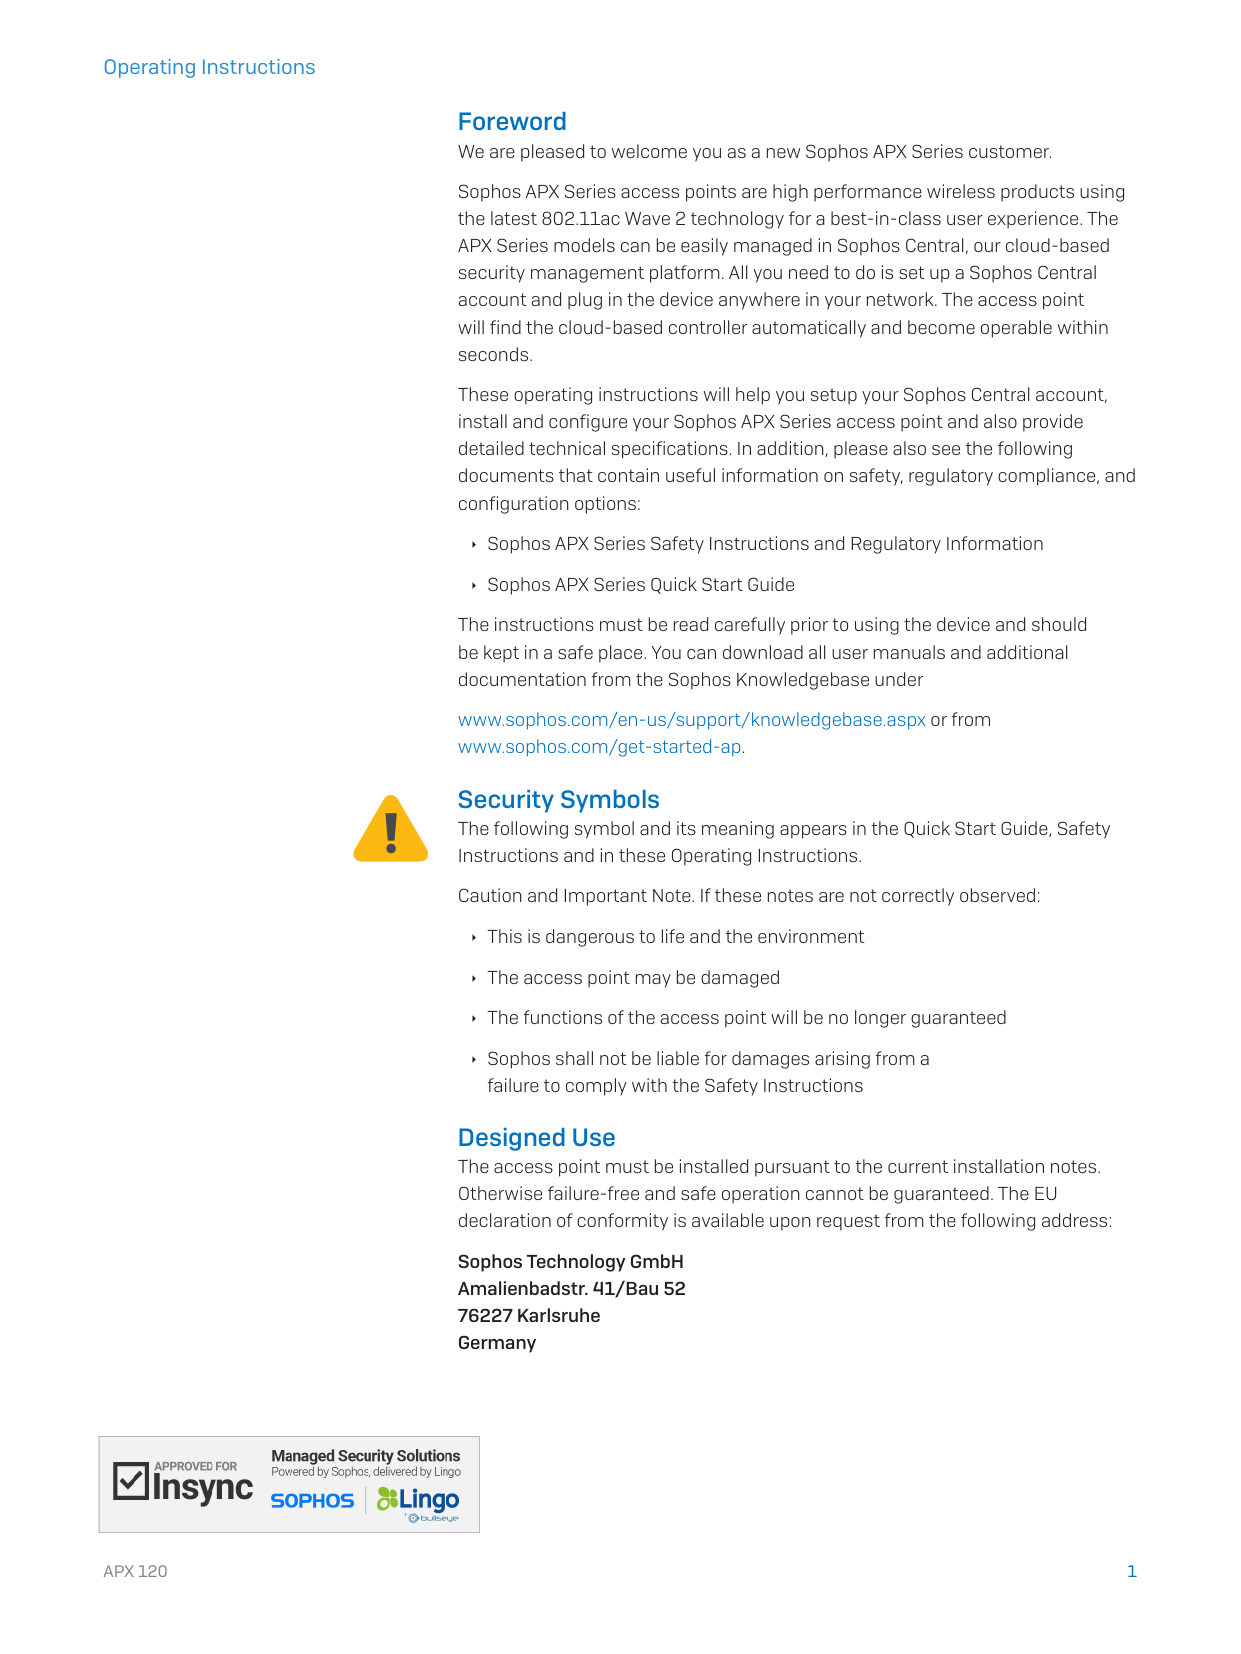
Foreword
We are pleased to welcome you as a new Sophos APX Series customer.
Sophos APX Series access points are high performance wireless products using
the latest 802.11ac Wave 2 technology for a best-in-class user experience. The
APX Series models can be easily managed in Sophos Central, our cloud-based
security management platform. All you need to do is set up a Sophos Central
account and plug in the device anywhere in your network. The access point
will find the cloud-based controller automatically and become operable within
seconds.
These operating instructions will help you setup your Sophos Central account,
install and configure your Sophos APX Series access point and also provide
detailed technical specifications. In addition, please also see the following
documents that contain useful information on safety, regulatory compliance, and
configuration options:
Ì Sophos APX Series Safety Instructions and Regulatory Information
Ì Sophos APX Series Quick Start Guide
The instructions must be read carefully prior to using the device and should
be kept in a safe place. You can download all user manuals and additional
documentation from the Sophos Knowledgebase under
www.sophos.com/en-us/support/knowledgebase.aspx or from
www.sophos.com/get-started-ap.
Security Symbols
The following symbol and its meaning appears in the Quick Start Guide, Safety
Instructions and in these Operating Instructions.
Caution and Important Note. If these notes are not correctly observed:
Ì This is dangerous to life and the environment
Ì The access point may be damaged
Ì The functions of the access point will be no longer guaranteed
Ì Sophos shall not be liable for damages arising from a
failure to comply with the Safety Instructions
Designed Use
The access point must be installed pursuant to the current installation notes.
Otherwise failure-free and safe operation cannot be guaranteed. The EU
declaration of conformity is available upon request from the following address:
Sophos Technology GmbH
Amalienbadstr. 41/Bau 52
76227 Karlsruhe
Germany
2
APX 120
Operating Instructions
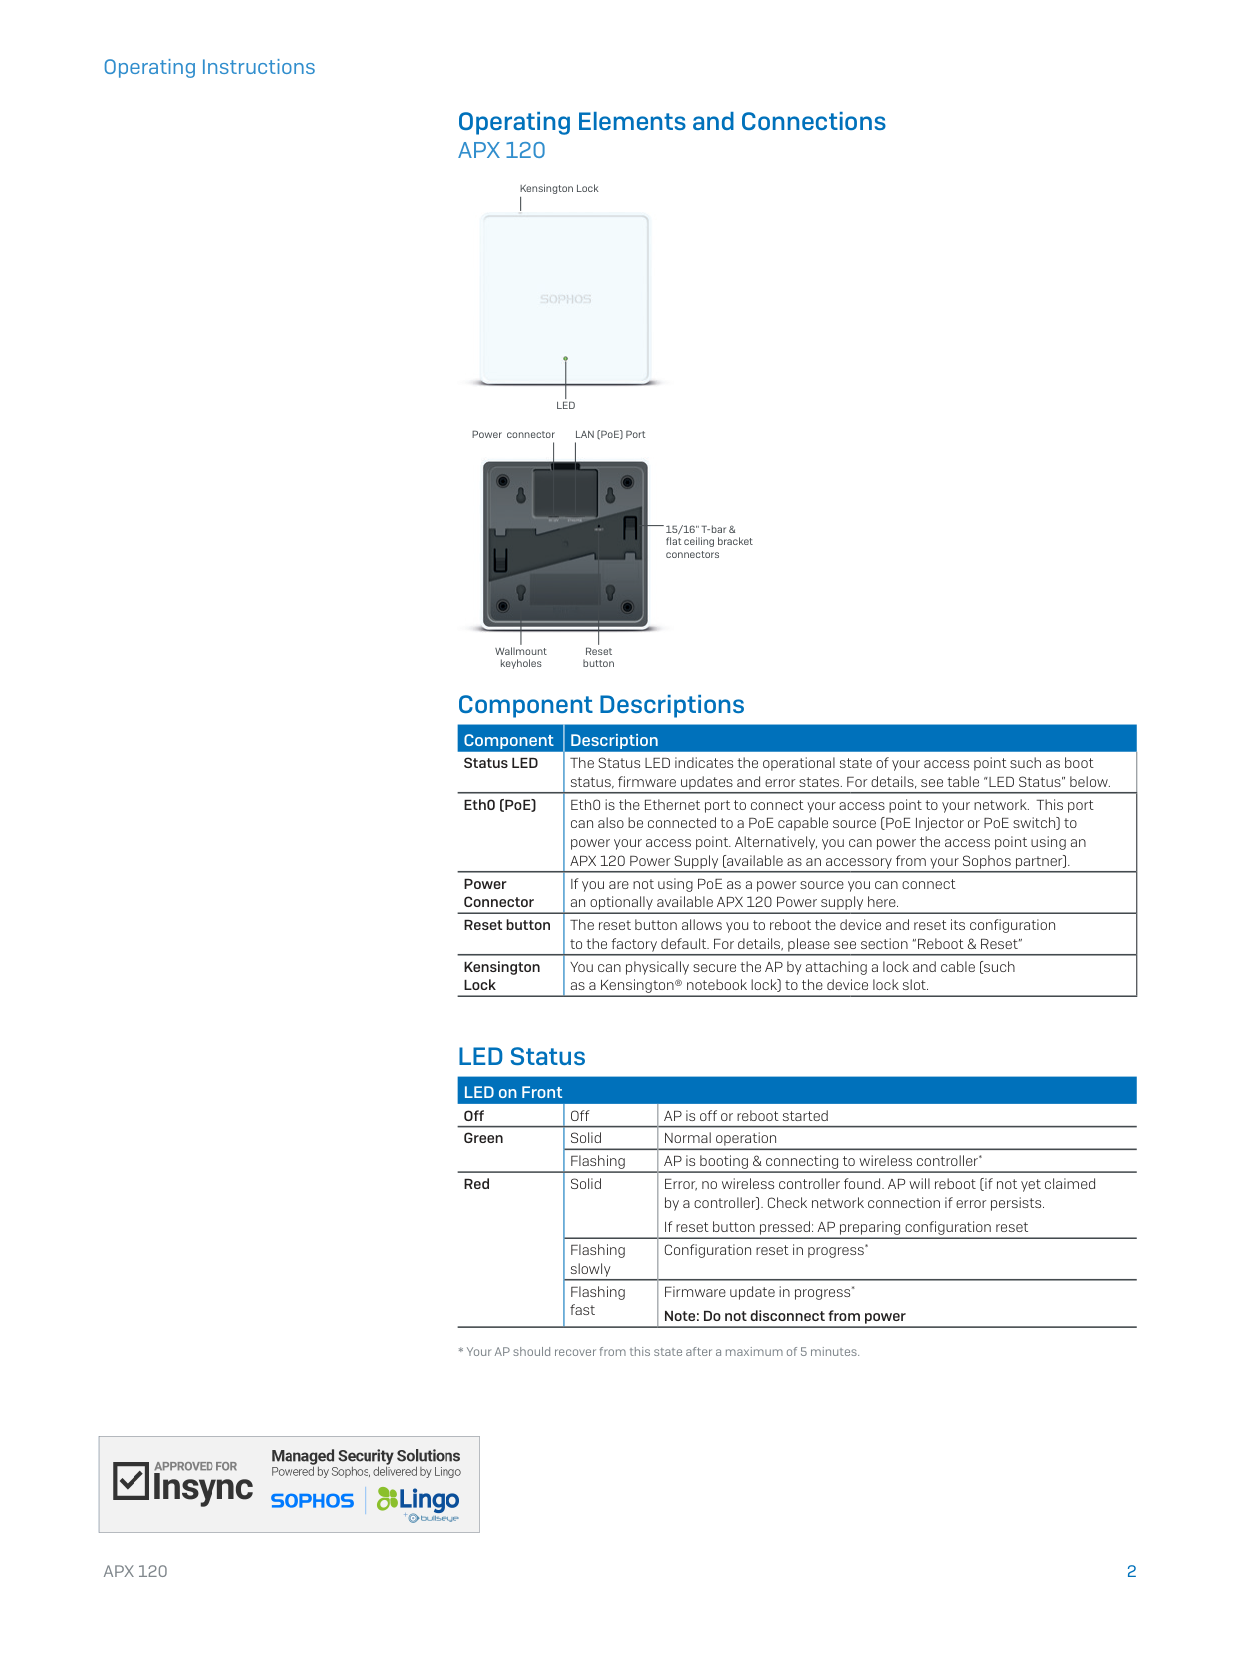
Operating Elements and Connections
APX 120
LED
Kensington Lock
Power connector
LAN (PoE) Port
15/16" T-bar &
flat ceiling bracket
connectors
Wallmount
keyholes
Reset
button
Component Descriptions
Component
Description
Status LED
The Status LED indicates the operational state of your access point such as boot
status, firmware updates and error states. For details, see table “LED Status” below.
Eth0 (PoE)
Eth0 is the Ethernet port to connect your access point to your network. This port
can also be connected to a PoE capable source (PoE Injector or PoE switch) to
power your access point. Alternatively, you can power the access point using an
APX 120 Power Supply (available as an accessory from your Sophos partner).
Power
Connector
If you are not using PoE as a power source you can connect
an optionally available APX 120 Power supply here.
Reset button
The reset button allows you to reboot the device and reset its configuration
to the factory default. For details, please see section “Reboot & Reset”
Kensington
Lock
You can physically secure the AP by attaching a lock and cable (such
as a Kensington® notebook lock) to the device lock slot.
LED Status
LED on Front
Off
Off
AP is off or reboot started
Green
Solid
Normal operation
Flashing
AP is booting & connecting to wireless controller*
Red
Solid
Error, no wireless controller found. AP will reboot (if not yet claimed
by a controller). Check network connection if error persists.
If reset button pressed: AP preparing configuration reset
Flashing
slowly
Configuration reset in progress*
Flashing
fast
Firmware update in progress*
Note: Do not disconnect from power
* Your AP should recover from this state after a maximum of 5 minutes.
3
APX 120
Operating Instructions
Connection and Configuration
The initial connection of your access point to your network and the wireless
controller is described in the APX Quick Start Guide which was been shipped with
your device or is available under www.sophos.com/get-started-ap.
For the access point to communicate with Sophos Central servers the following
ports will need to be open on your firewall:
Ì 443 (HTTPS)
Ì 80 (HTTP)
Ì 123 (NTP)
After successful connection you can start your initial configuration.
Setting up your access point in Sophos Central
You will need a Sophos Central account to manage your access points. Please
go to https://central.sophos.com to sign in under your account or create a new
account.
After signing in select Wireless from the popup screen or click on Wireless in the
left navigation to get started.
Follow the Onboarding Wizard to register your access point.
For more information, please see the Sophos Central Admin Help.
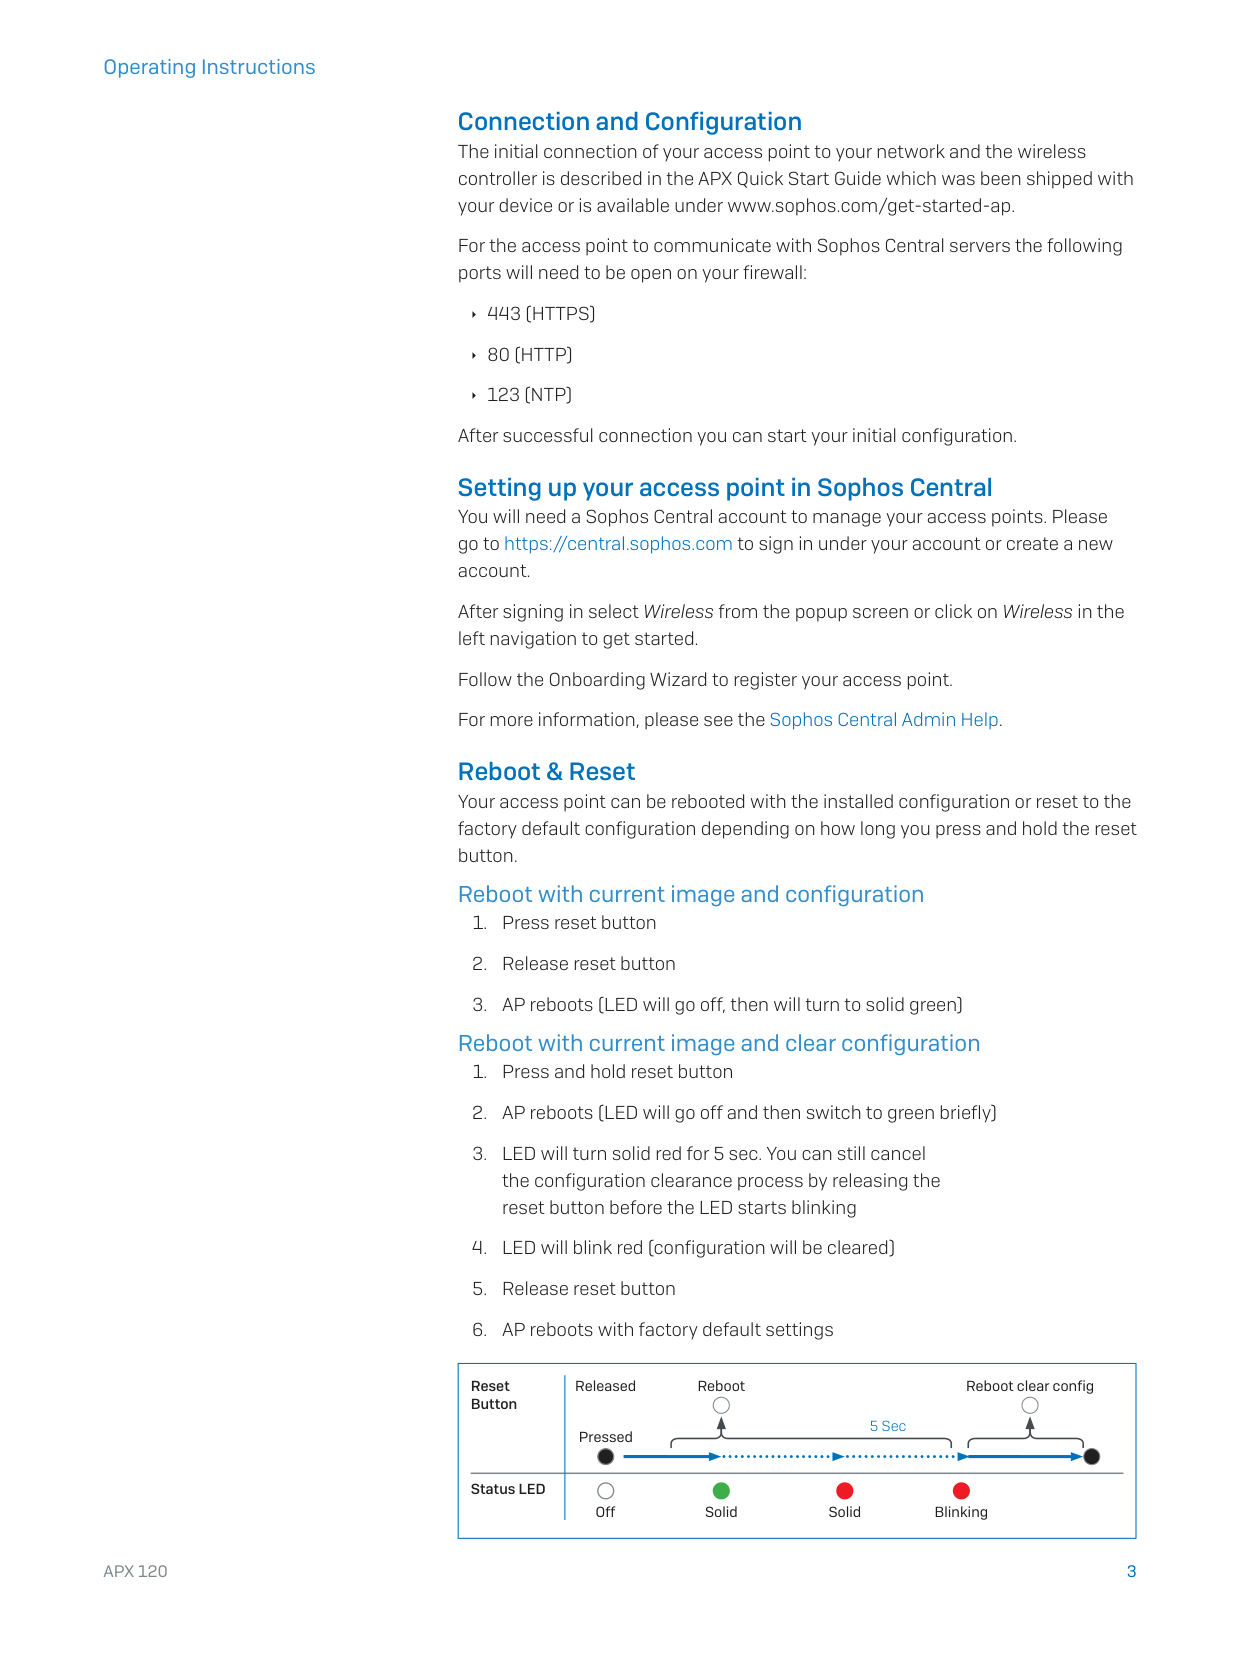
Reboot & Reset
Your access point can be rebooted with the installed configuration or reset to the
factory default configuration depending on how long you press and hold the reset
button.
Reboot with current image and configuration
1. Press reset button
2. Release reset button
3. AP reboots (LED will go off, then will turn to solid green)
Reboot with current image and clear configuration
1. Press and hold reset button
2. AP reboots (LED will go off and then switch to green briefly)
3. LED will turn solid red for 5 sec. You can still cancel
the configuration clearance process by releasing the
reset button before the LED starts blinking
4. LED will blink red (configuration will be cleared)
5. Release reset button
6. AP reboots with factory default settings
Reset
Button
Status LED
Released
Pressed
Solid
Solid
Blinking
Reboot
Reboot clear config
5 Sec
Off
4
APX 120
Operating Instructions
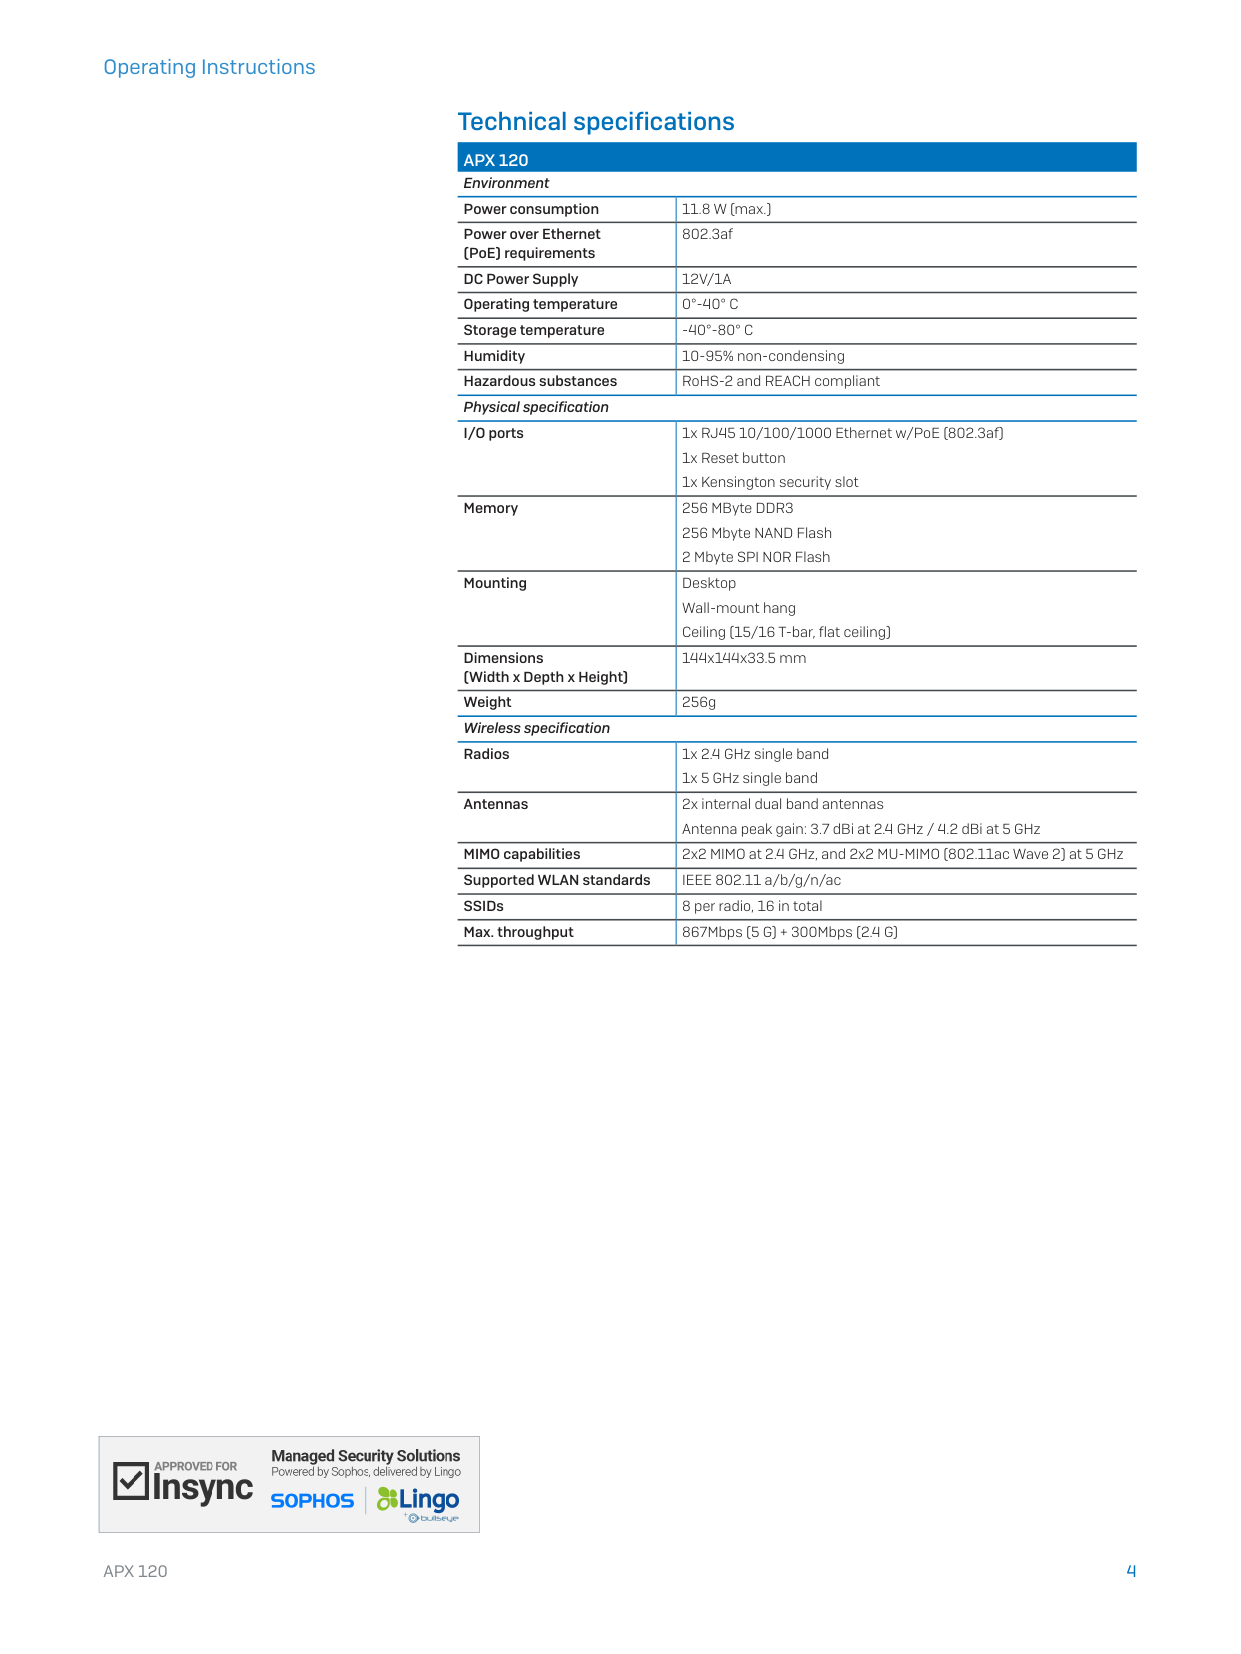
Technical specifications
APX 120
Environment
Power consumption
11.8 W (max.)
Power over Ethernet
(PoE) requirements
802.3af
DC Power Supply
12V/1A
Operating temperature
0°-40° C
Storage temperature
-40°-80° C
Humidity
10-95% non-condensing
Hazardous substances
RoHS-2 and REACH compliant
Physical specification
I/O ports
1x RJ45 10/100/1000 Ethernet w/PoE (802.3af)
1x Reset button
1x Kensington security slot
Memory
256 MByte DDR3
256 Mbyte NAND Flash
2 Mbyte SPI NOR Flash
Mounting
Desktop
Wall-mount hang
Ceiling (15/16 T-bar, flat ceiling)
Dimensions
(Width x Depth x Height)
144x144x33.5 mm
Weight
256g
Wireless specification
Radios
1x 2.4 GHz single band
1x 5 GHz single band
Antennas
2x internal dual band antennas
Antenna peak gain: 3.7 dBi at 2.4 GHz / 4.2 dBi at 5 GHz
MIMO capabilities
2x2 MIMO at 2.4 GHz, and 2x2 MU-MIMO (802.11ac Wave 2) at 5 GHz
Supported WLAN standards
IEEE 802.11 a/b/g/n/ac
SSIDs
8 per radio, 16 in total
Max. throughput
867Mbps (5 G) + 300Mbps (2.4 G)
5
APX 120
Operating Instructions
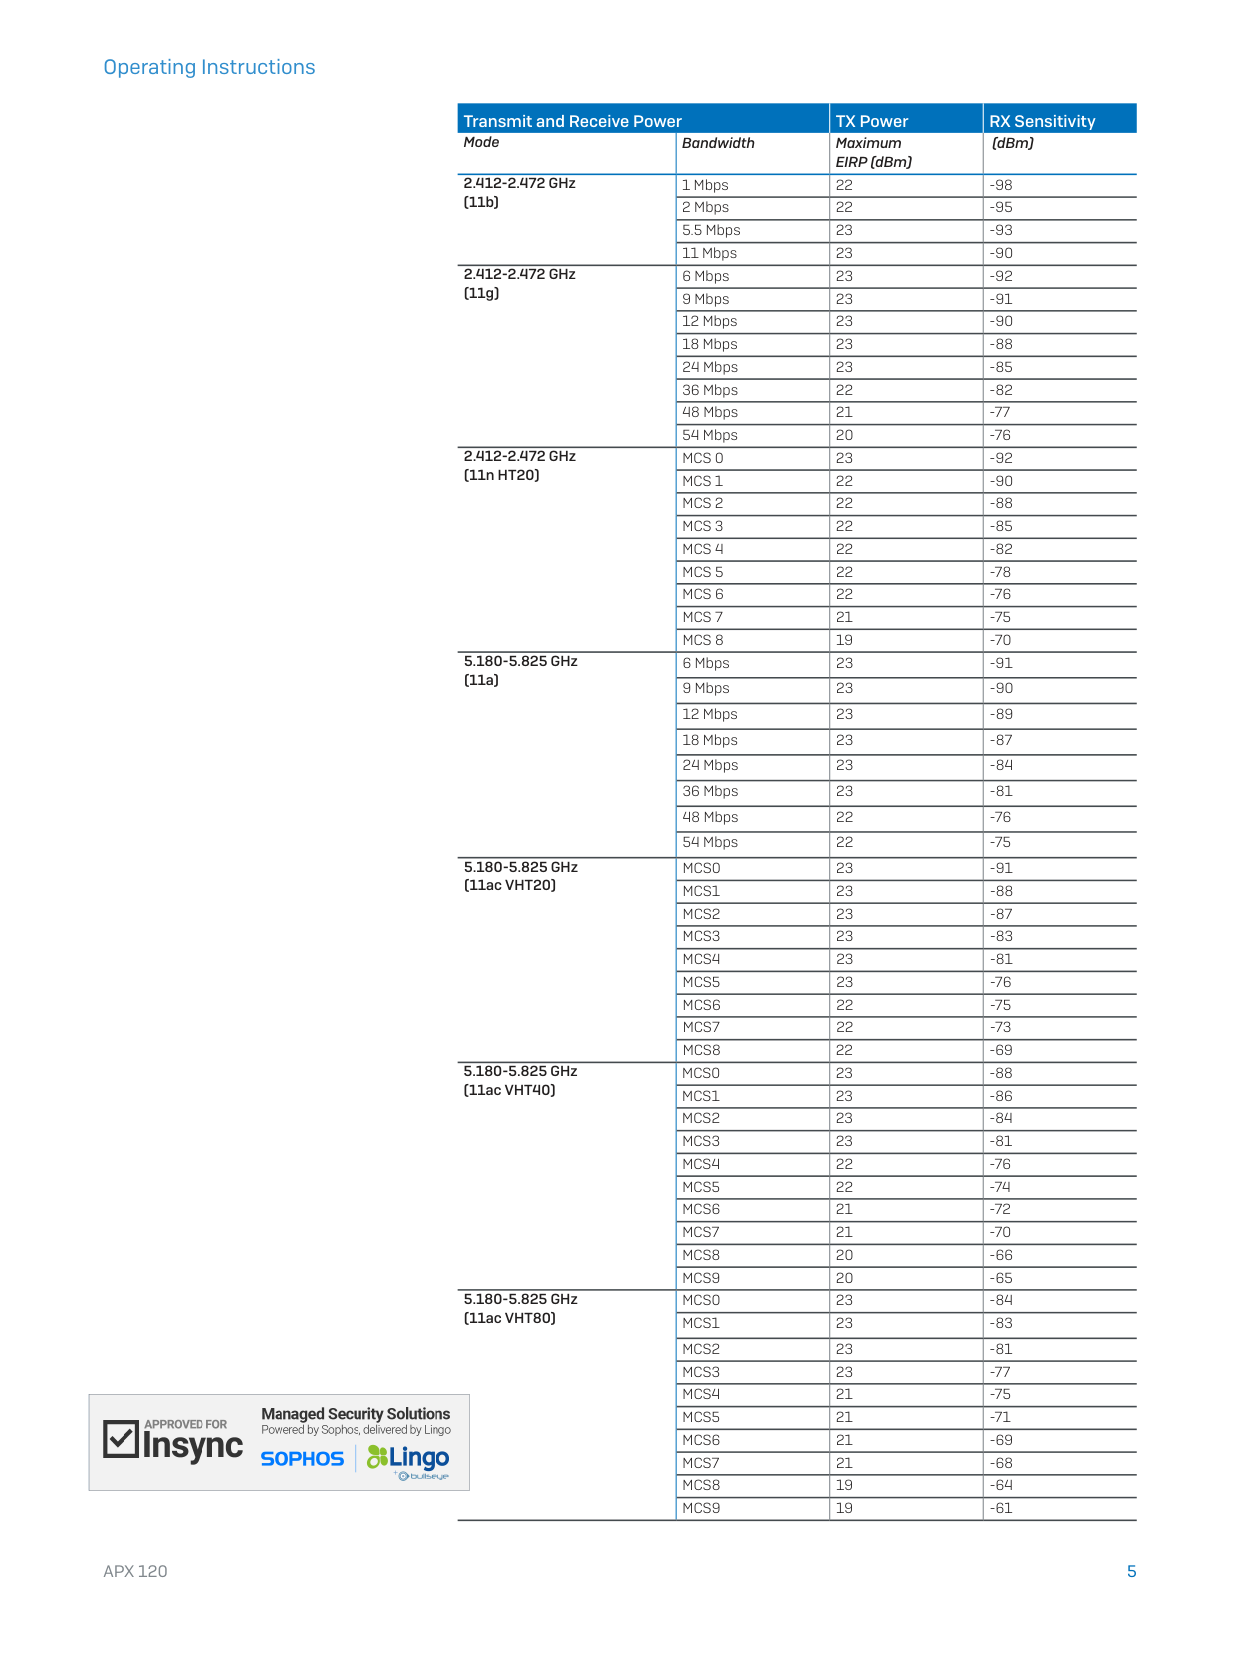
Transmit and Receive Power
TX Power
RX Sensitivity
Mode
Bandwidth
Maximum
EIRP (dBm)
(dBm)
2.412-2.472 GHz
(11b)
1 Mbps
22
-98
2 Mbps
22
-95
5.5 Mbps
23
-93
11 Mbps
23
-90
2.412-2.472 GHz
(11g)
6 Mbps
23
-92
9 Mbps
23
-91
12 Mbps
23
-90
18 Mbps
23
-88
24 Mbps
23
-85
36 Mbps
22
-82
48 Mbps
21
-77
54 Mbps
20
-76
2.412-2.472 GHz
(11n HT20)
MCS 0
23
-92
MCS 1
22
-90
MCS 2
22
-88
MCS 3
22
-85
MCS 4
22
-82
MCS 5
22
-78
MCS 6
22
-76
MCS 7
21
-75
MCS 8
19
-70
5.180-5.825 GHz
(11a)
6 Mbps
23
-91
9 Mbps
23
-90
12 Mbps
23
-89
18 Mbps
23
-87
24 Mbps
23
-84
36 Mbps
23
-81
48 Mbps
22
-76
54 Mbps
22
-75
5.180-5.825 GHz
(11ac VHT20)
MCS0
23
-91
MCS1
23
-88
MCS2
23
-87
MCS3
23
-83
MCS4
23
-81
MCS5
23
-76
MCS6
22
-75
MCS7
22
-73
MCS8
22
-69
5.180-5.825 GHz
(11ac VHT40)
MCS0
23
-88
MCS1
23
-86
MCS2
23
-84
MCS3
23
-81
MCS4
22
-76
MCS5
22
-74
MCS6
21
-72
MCS7
21
-70
MCS8
20
-66
MCS9
20
-65
5.180-5.825 GHz
(11ac VHT80)
MCS0
23
-84
MCS1
23
-83
MCS2
23
-81
MCS3
23
-77
MCS4
21
-75
MCS5
21
-71
MCS6
21
-69
MCS7
21
-68
MCS8
19
-64
MCS9
19
-61
6
APX 120
Operating Instructions
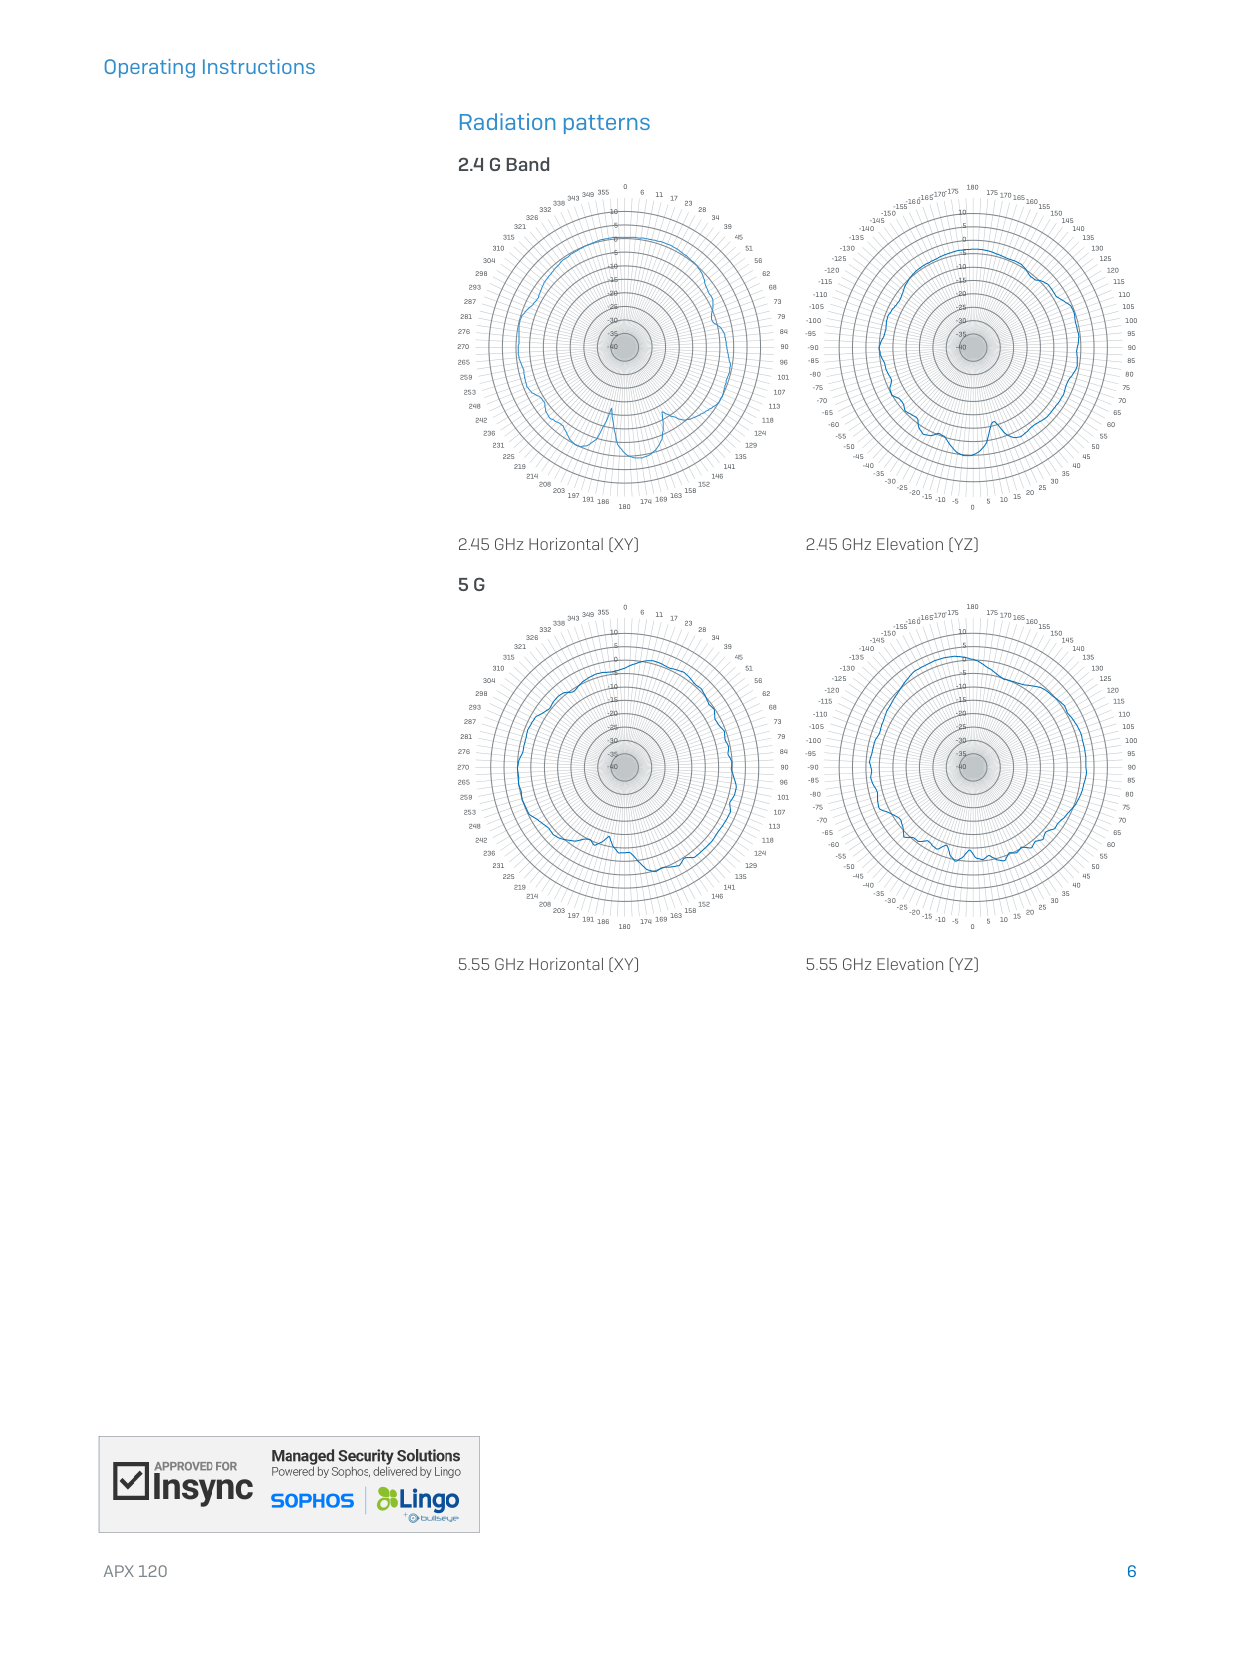
Radiation patterns
2.4 G Band
-15
-10
-5
0
5
10
-20
-25
-30
-35
-40
0
6
11
17
23
28
34
39
45
51
56
62
68
73
79
84
90
96
101
107
113
118
124
129
135
141
146
152
158
163
169
174
180
186
191
197
203
208
214
219
225
231
236
242
248
253
259
265
270
276
281
287
293
298
304
310
315
321
326
332
338 343 349 355
-15
-10
-5
0
5
10
-20
-25
-30
-35
-40
180
175 170 165 160155
-155
150
145
140
135
130
125
120
115
110
105
100
95
90
85
80
75
70
65
60
55
50
45
40
35
30
25
20
15
10
5
0
-5
-10
-15
-20
-25
-30
-35
-40
-45
-50
-55
-60
-65
-70
-75
-80
-85
-90
-95
-100
-105
-110
-115
-120
-125
-130
-135
-140
-145
-150
-160-165-170-175
2.45 GHz Horizontal (XY)
2.45 GHz Elevation (YZ)
5 G
-15
-10
-5
0
5
10
-20
-25
-30
-35
-40
0
6
11
17
23
28
34
39
45
51
56
62
68
73
79
84
90
96
101
107
113
118
124
129
135
141
146
152
158
163
169
174
180
186
191
197
203
208
214
219
225
231
236
242
248
253
259
265
270
276
281
287
293
298
304
310
315
321
326
332
338 343 349 355
-15
-10
-5
0
5
10
-20
-25
-30
-35
-40
180
175 170 165 160155
-155
150
145
140
135
130
125
120
115
110
105
100
95
90
85
80
75
70
65
60
55
50
45
40
35
30
25
20
15
10
5
0
-5
-10
-15
-20
-25
-30
-35
-40
-45
-50
-55
-60
-65
-70
-75
-80
-85
-90
-95
-100
-105
-110
-115
-120
-125
-130
-135
-140
-145
-150
-160-165-170-175
5.55 GHz Horizontal (XY)
5.55 GHz Elevation (YZ)
7
APX 120
Operating Instructions
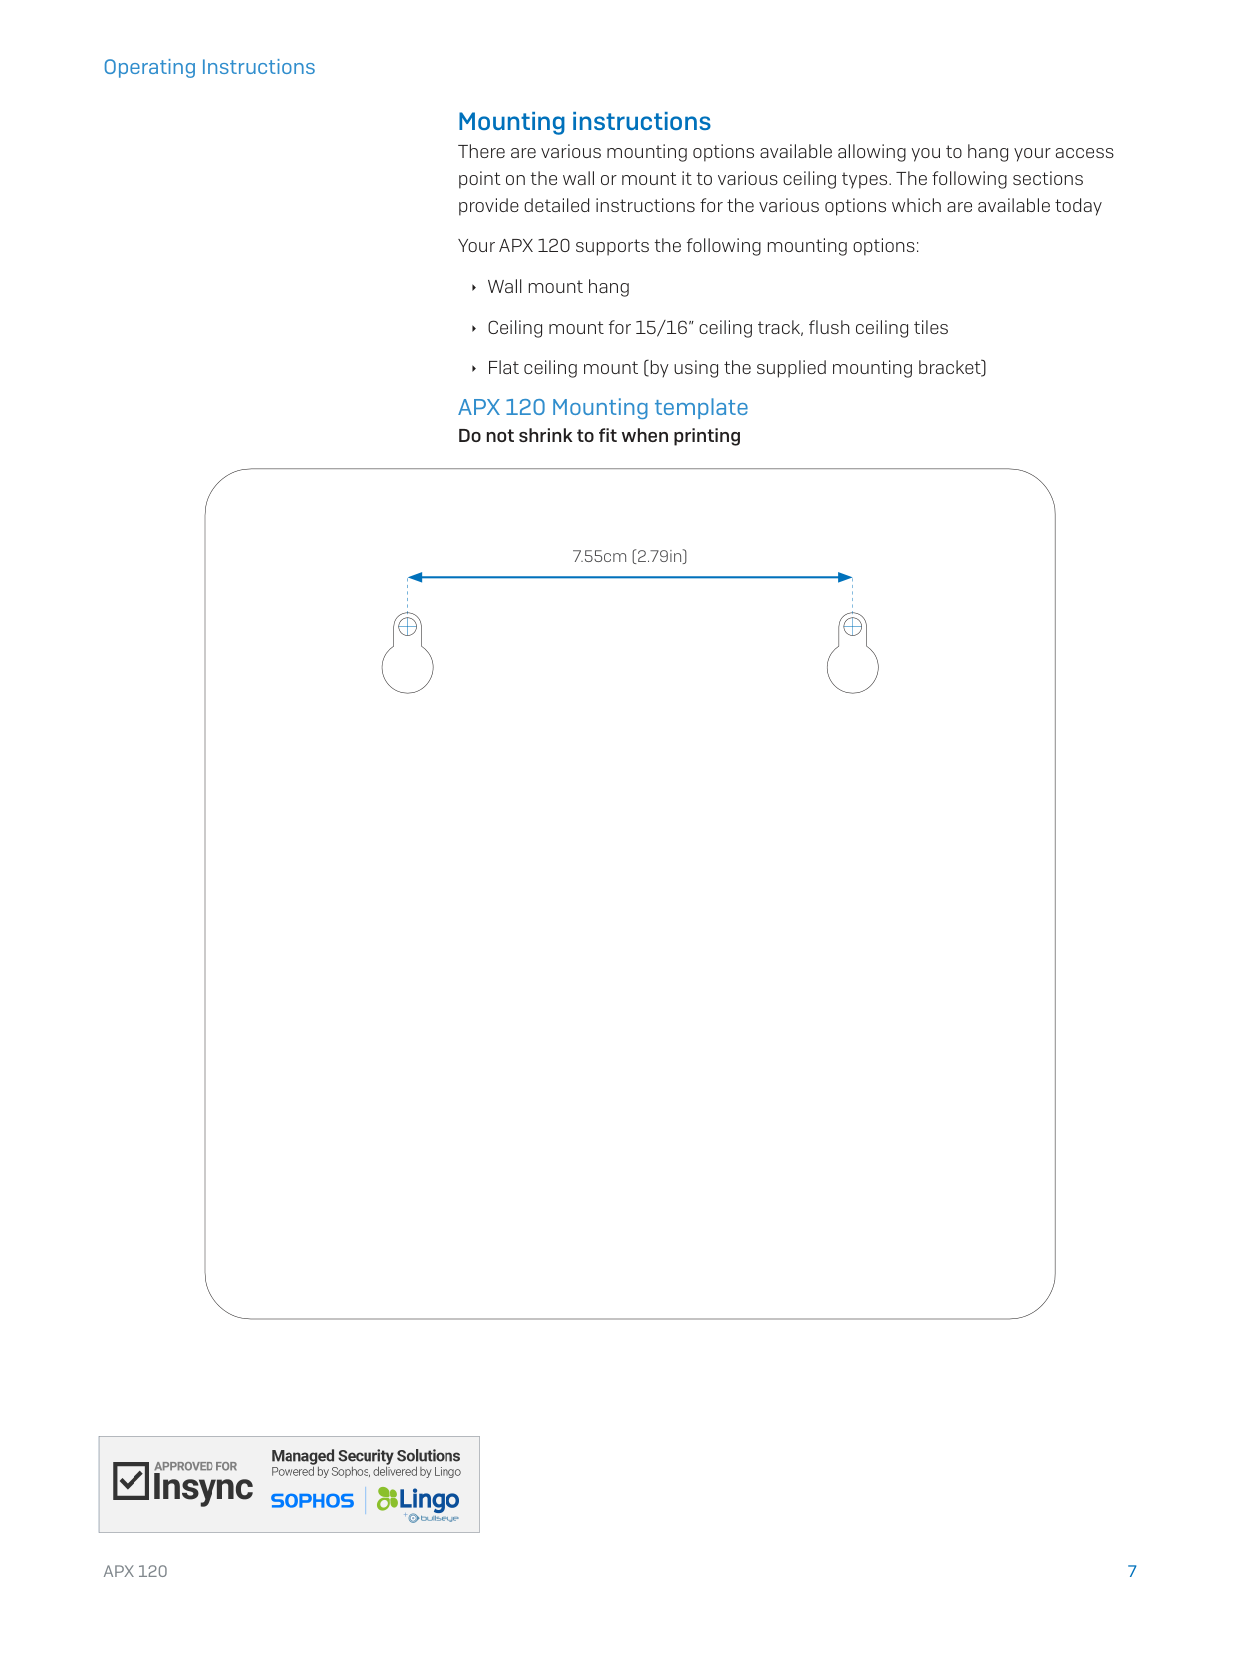
Mounting instructions
There are various mounting options available allowing you to hang your access
point on the wall or mount it to various ceiling types. The following sections
provide detailed instructions for the various options which are available today
Your APX 120 supports the following mounting options:
Ì Wall mount hang
Ì Ceiling mount for 15/16” ceiling track, flush ceiling tiles
Ì Flat ceiling mount (by using the supplied mounting bracket)
APX 120 Mounting template
Do not shrink to fit when printing
7.55cm (2.79in)
8
APX 120
Operating Instructions
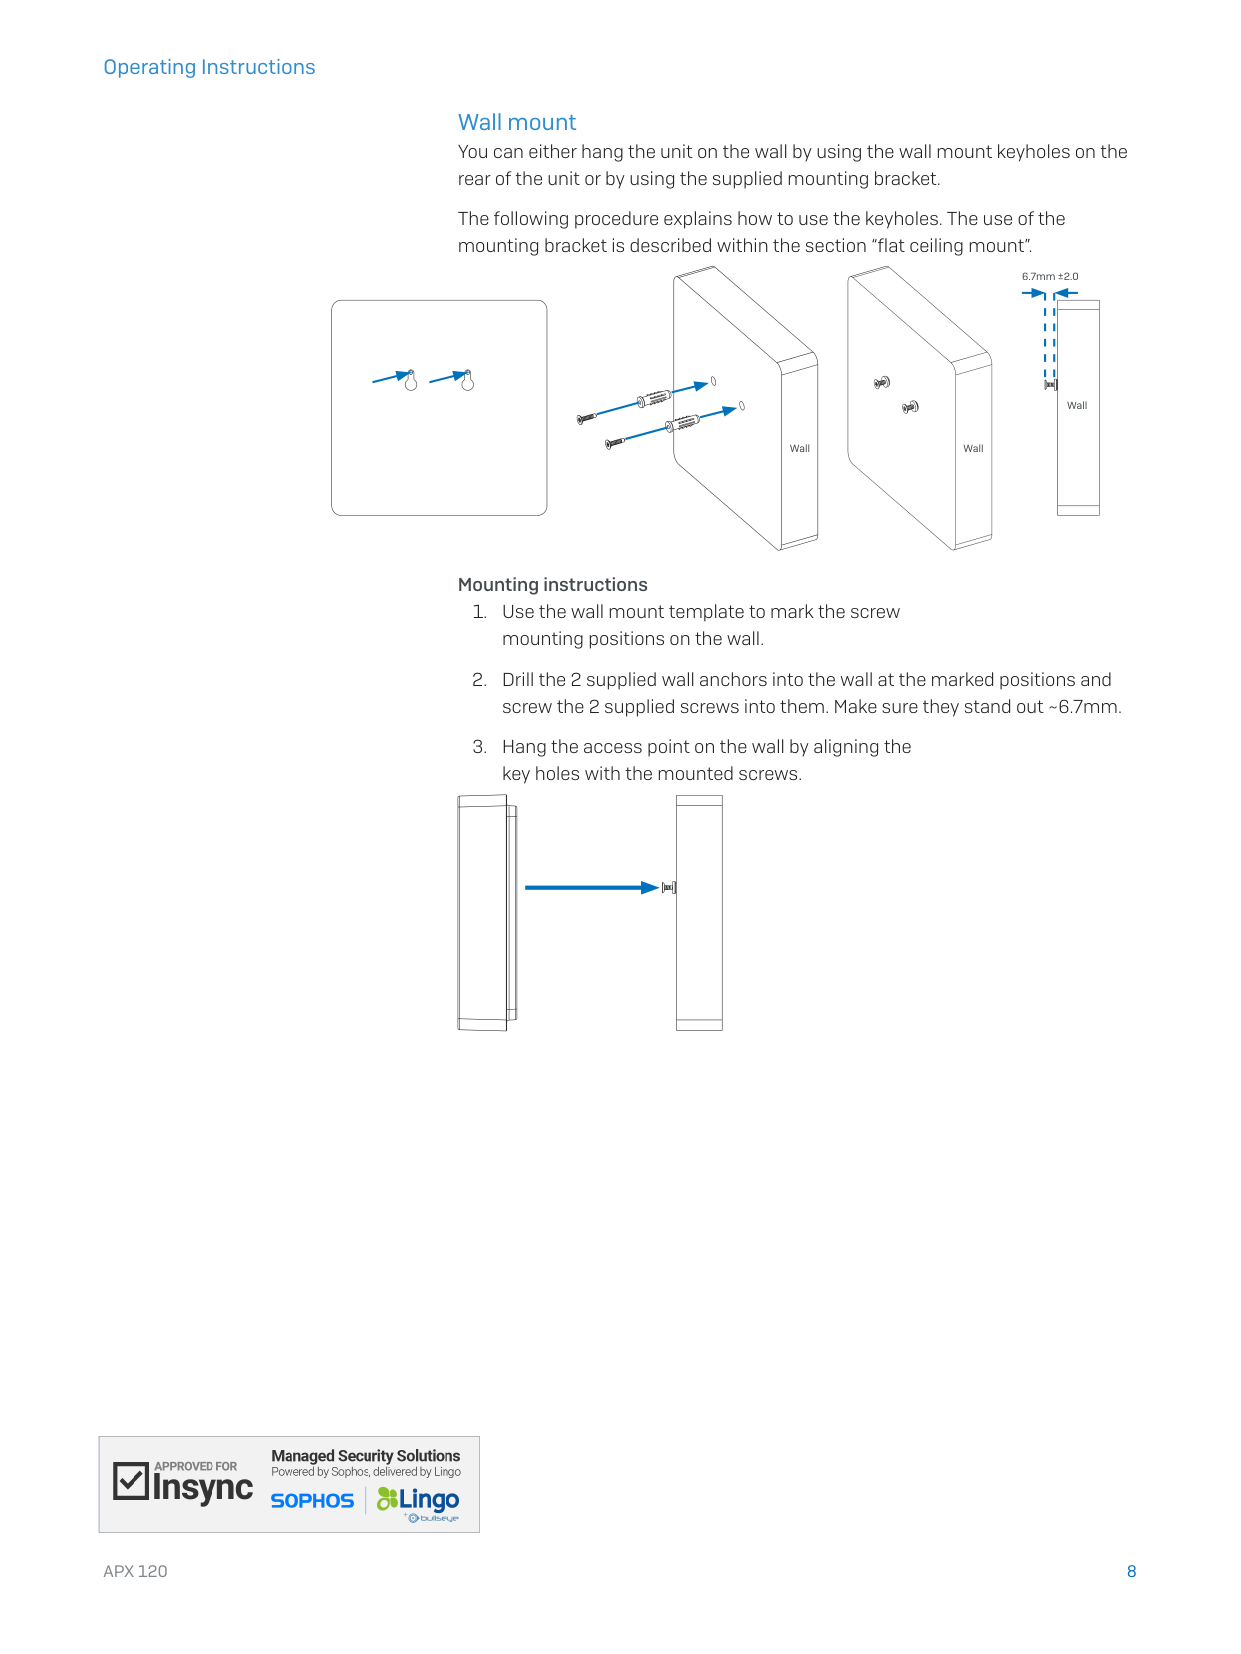
Wall mount
You can either hang the unit on the wall by using the wall mount keyholes on the
rear of the unit or by using the supplied mounting bracket.
The following procedure explains how to use the keyholes. The use of the
mounting bracket is described within the section “flat ceiling mount”.
Mounting instructions
1. Use the wall mount template to mark the screw
mounting positions on the wall.
2. Drill the 2 supplied wall anchors into the wall at the marked positions and
screw the 2 supplied screws into them. Make sure they stand out ~6.7mm.
3. Hang the access point on the wall by aligning the
key holes with the mounted screws.
Wall
Wall
Wall
6.7mm ±2.0
9
APX 120
Operating Instructions
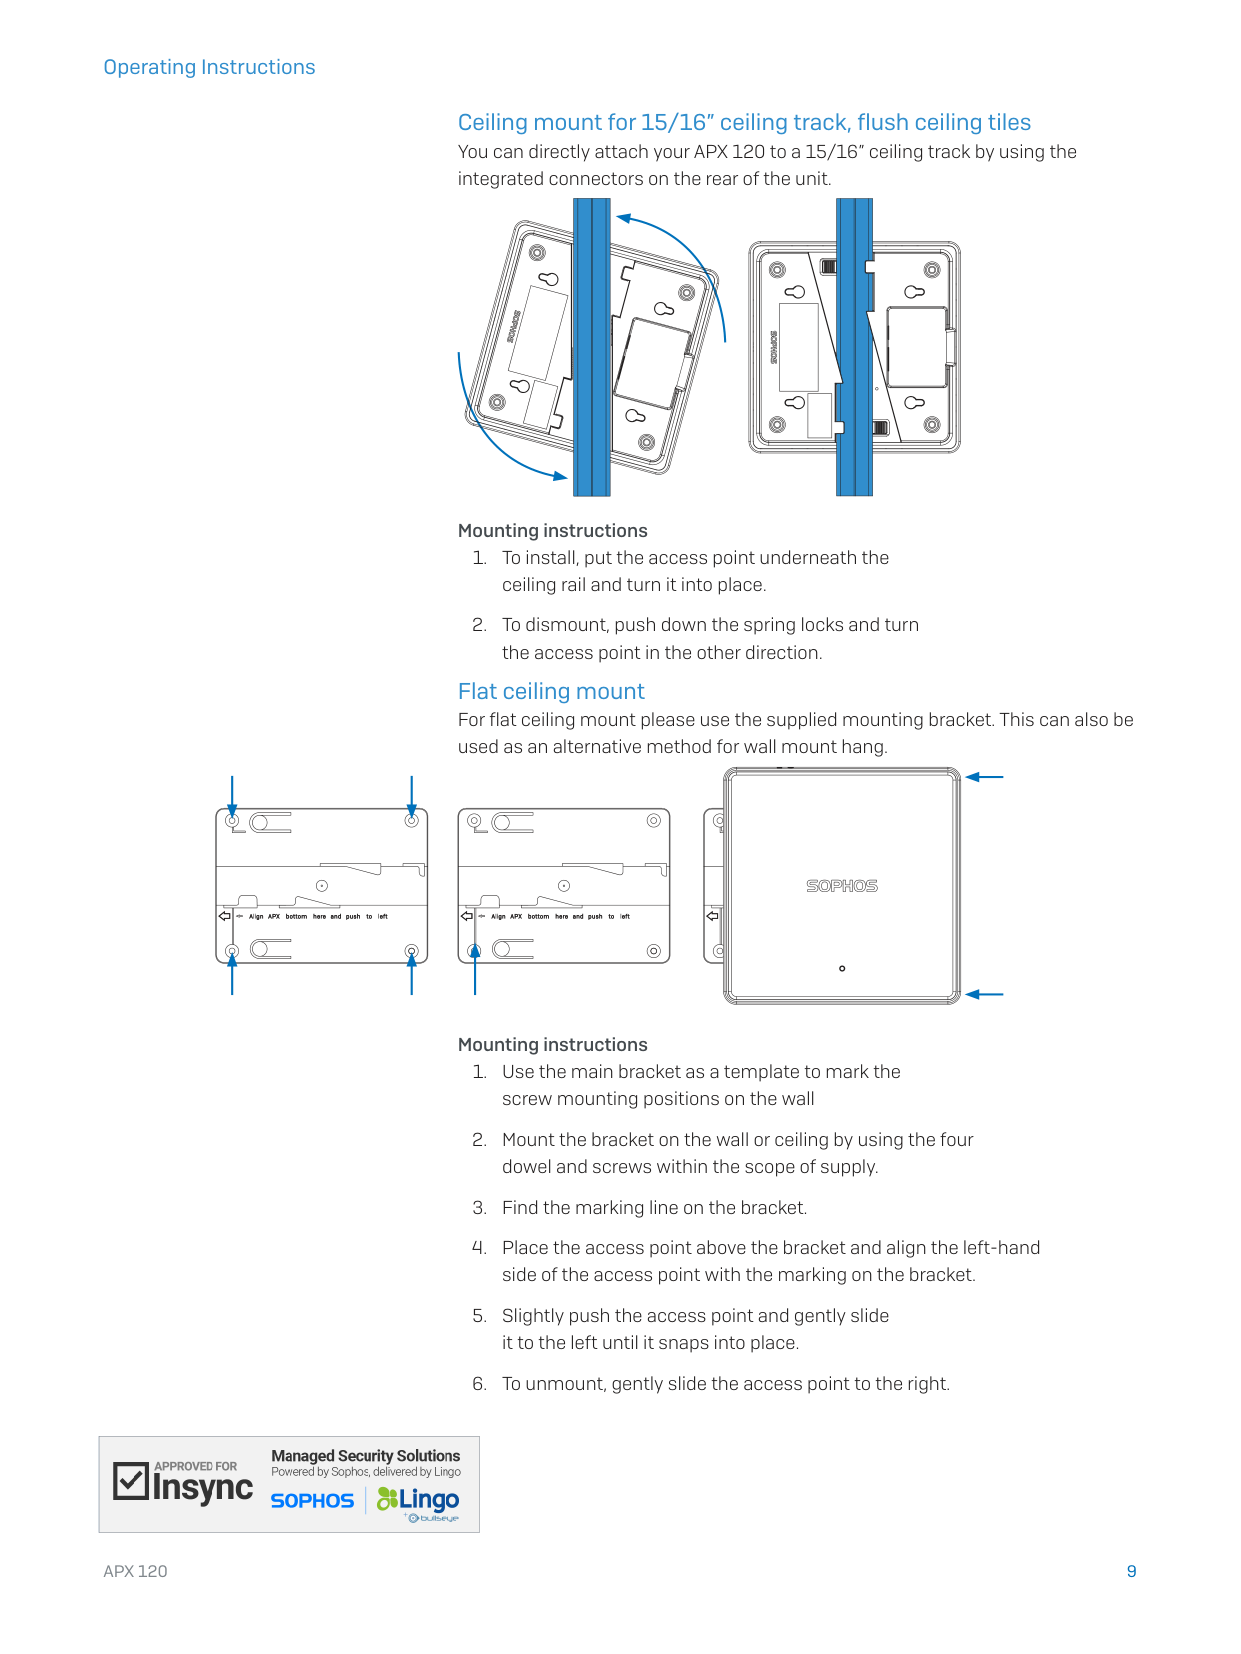
Ceiling mount for 15/16” ceiling track, flush ceiling tiles
You can directly attach your APX 120 to a 15/16” ceiling track by using the
integrated connectors on the rear of the unit.
Mounting instructions
1. To install, put the access point underneath the
ceiling rail and turn it into place.
2. To dismount, push down the spring locks and turn
the access point in the other direction.
Flat ceiling mount
For flat ceiling mount please use the supplied mounting bracket. This can also be
used as an alternative method for wall mount hang.
Mounting instructions
1. Use the main bracket as a template to mark the
screw mounting positions on the wall
2. Mount the bracket on the wall or ceiling by using the four
dowel and screws within the scope of supply.
3. Find the marking line on the bracket.
4. Place the access point above the bracket and align the left-hand
side of the access point with the marking on the bracket.
5. Slightly push the access point and gently slide
it to the left until it snaps into place.
6. To unmount, gently slide the access point to the right.
Operating Instructions
United Kingdom and Worldwide Sales
Tel: +44 (0)8447 671131
Email: sales@sophos.com
North American Sales
Toll Free: 1-866-866-2802
Email: nasales@sophos.com
Australia and New Zealand Sales
Tel: +61 2 9409 9100
Email: sales@sophos.com.au
Asia Sales
Tel: +65 62244168
Email: salesasia@sophos.com
© Copyright 2018. Sophos Ltd. All rights reserved.
Registered in England and Wales No. 2096520, The Pentagon, Abingdon Science Park, Abingdon, OX14 3YP, UK
Sophos is the registered trademark of Sophos Ltd. All other product and company names mentioned are
trademarks or registered trademarks of their respective owners.
18-11-22 OINA (DD)