
BullsEye Unified Communications Desktop Quick Guide for Customers
Summary: This quick guide provides details on using BullsEye Unified Communications Desktop version.
Download article(s)
![]() BullsEye Unified CommunicationsQuickGuideDesktop 041923.pdf
BullsEye Unified CommunicationsQuickGuideDesktop 041923.pdf
BullsEye Unified CommunicationsQuickGuideDesktop 041923

UNIFIED COMMUNICATIONS DESKTOP QUICK GUIDE
1
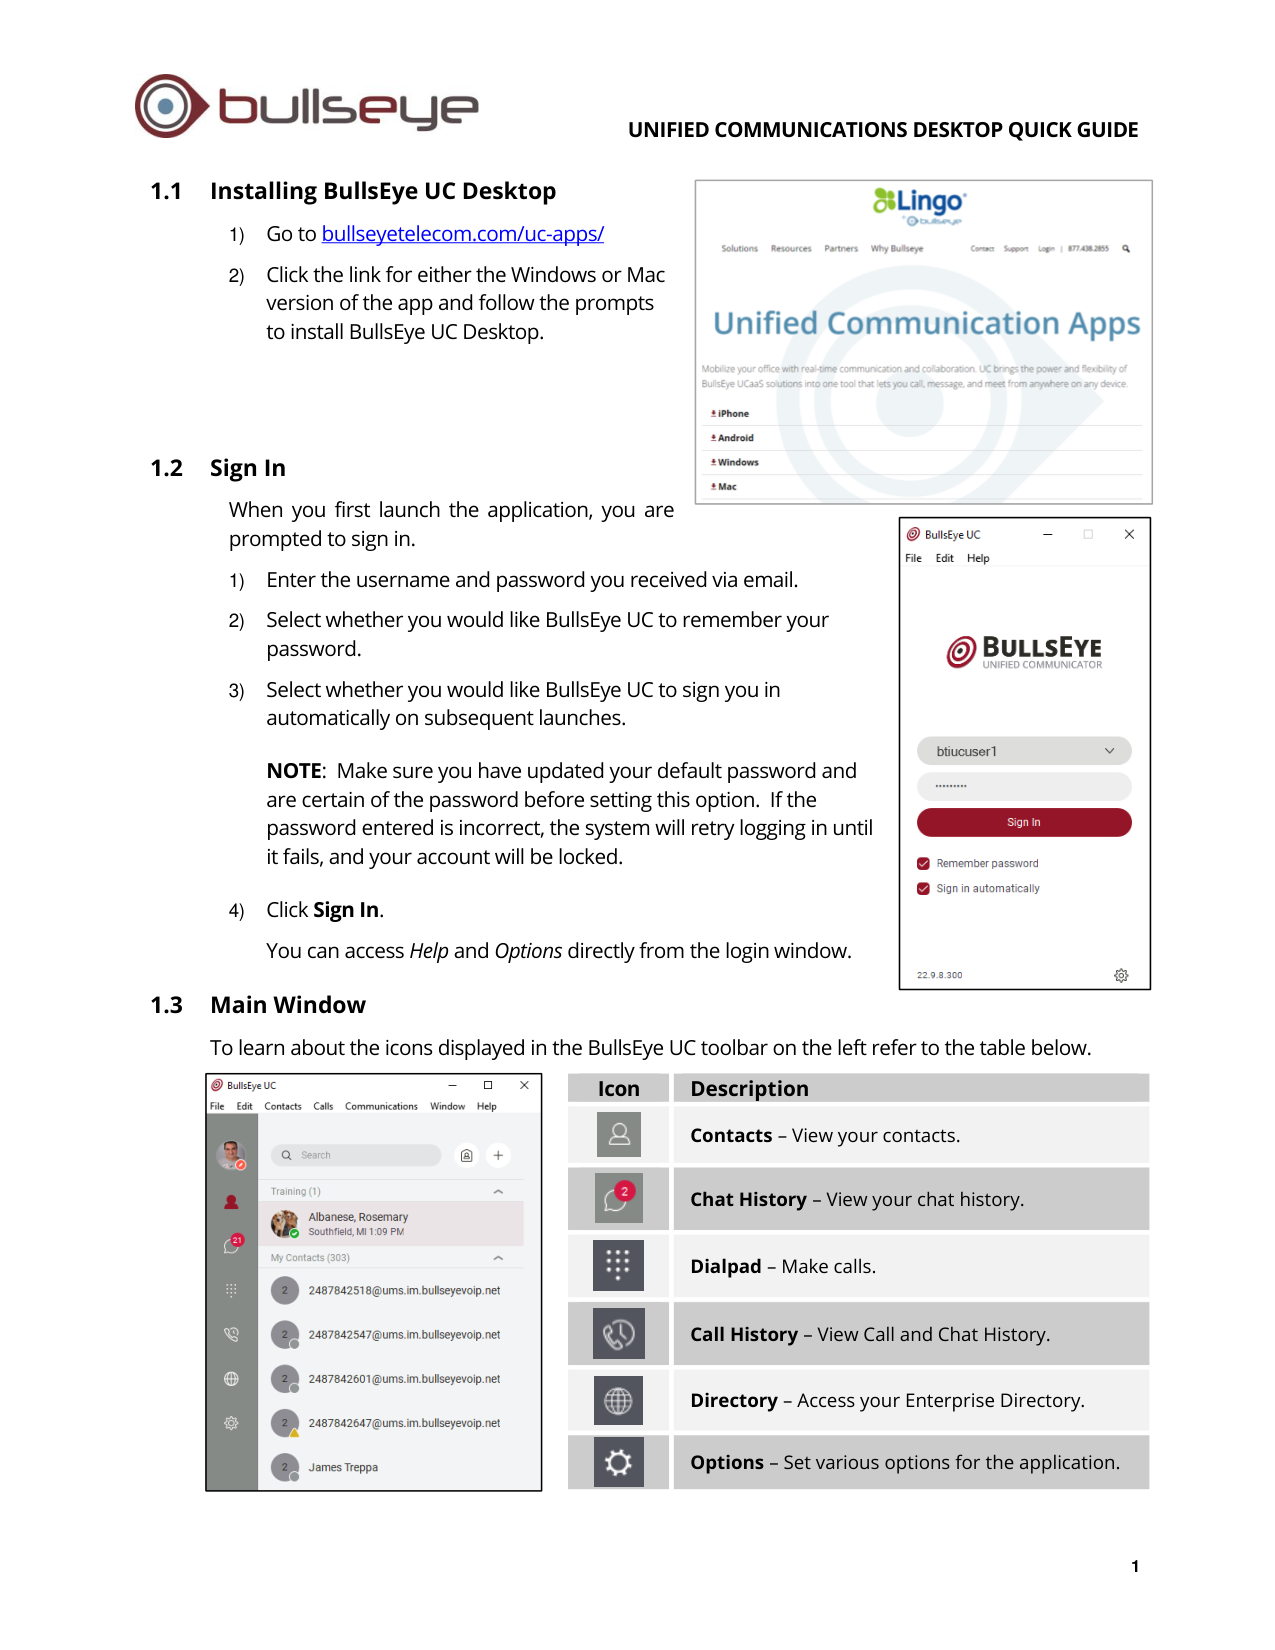
1.1
Installing BullsEye UC Desktop
1) Go to bullseyetelecom.com/uc-apps/
2) Click the link for either the Windows or Mac
version of the app and follow the prompts
to install BullsEye UC Desktop.
1.2
Sign In
When you first launch the application, you are
prompted to sign in.
1) Enter the username and password you received via email.
2) Select whether you would like BullsEye UC to remember your
password.
3) Select whether you would like BullsEye UC to sign you in
automatically on subsequent launches.
NOTE: Make sure you have updated your default password and
are certain of the password before setting this option. If the
password entered is incorrect, the system will retry logging in until
it fails, and your account will be locked.
4) Click Sign In.
You can access Help and Options directly from the login window.
1.3
Main Window
To learn about the icons displayed in the BullsEye UC toolbar on the left refer to the table below.
Icon
Description
Contacts – View your contacts.
Chat History – View your chat history.
Dialpad – Make calls.
Call History – View Call and Chat History.
Directory – Access your Enterprise Directory.
Options – Set various options for the application.
UNIFIED COMMUNICATIONS DESKTOP QUICK GUIDE
2
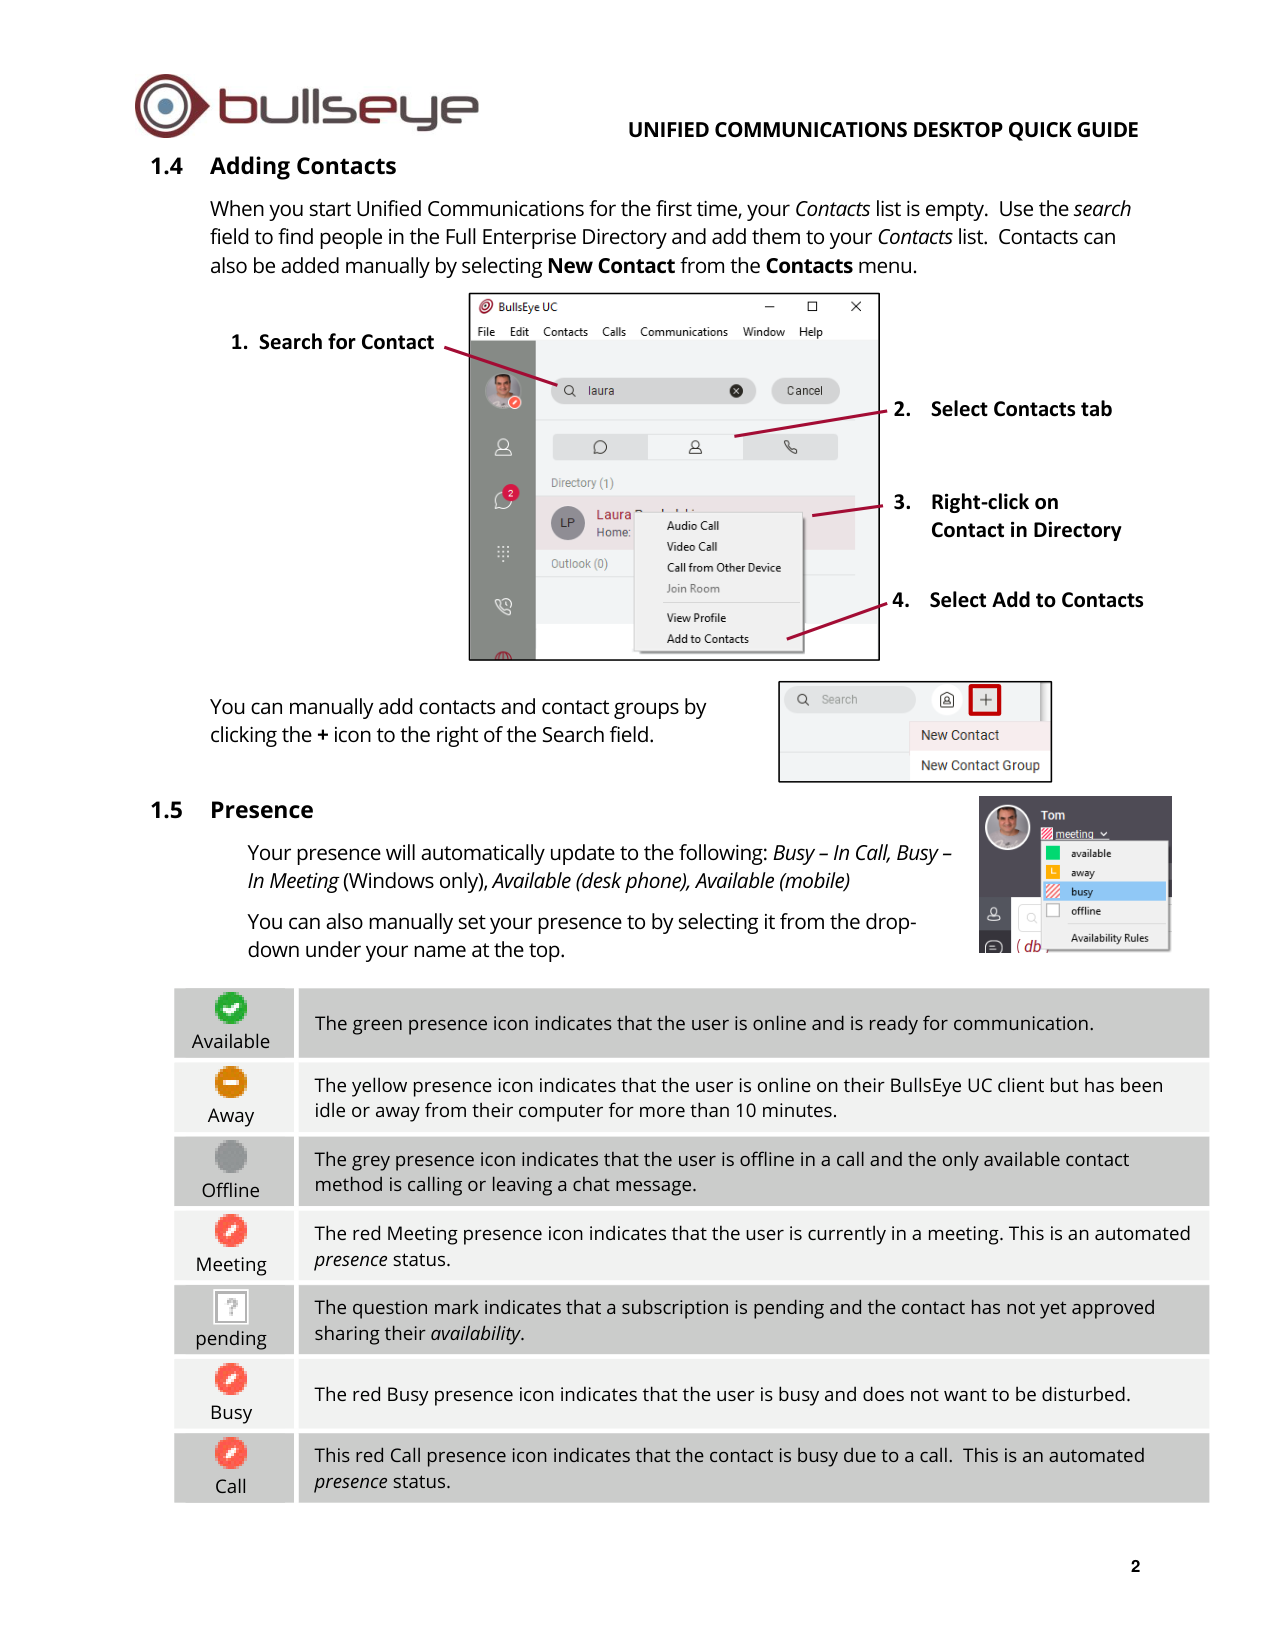
1.4
Adding Contacts
When you start Unified Communications for the first time, your Contacts list is empty. Use the search
field to find people in the Full Enterprise Directory and add them to your Contacts list. Contacts can
also be added manually by selecting New Contact from the Contacts menu.
You can manually add contacts and contact groups by
clicking the + icon to the right of the Search field.
1.5
Presence
Your presence will automatically update to the following: Busy – In Call, Busy –
In Meeting (Windows only), Available (desk phone), Available (mobile)
You can also manually set your presence to by selecting it from the drop-
down under your name at the top.
Available
The green presence icon indicates that the user is online and is ready for communication.
Away
The yellow presence icon indicates that the user is online on their BullsEye UC client but has been
idle or away from their computer for more than 10 minutes.
Offline
The grey presence icon indicates that the user is offline in a call and the only available contact
method is calling or leaving a chat message.
Meeting
The red Meeting presence icon indicates that the user is currently in a meeting. This is an automated
presence status.
pending
The question mark indicates that a subscription is pending and the contact has not yet approved
sharing their availability.
Busy
The red Busy presence icon indicates that the user is busy and does not want to be disturbed.
Call
This red Call presence icon indicates that the contact is busy due to a call. This is an automated
presence status.
1. Search for Contact
3. Right-click on
Contact in Directory
4. Select Add to Contacts
2. Select Contacts tab
UNIFIED COMMUNICATIONS DESKTOP QUICK GUIDE
3
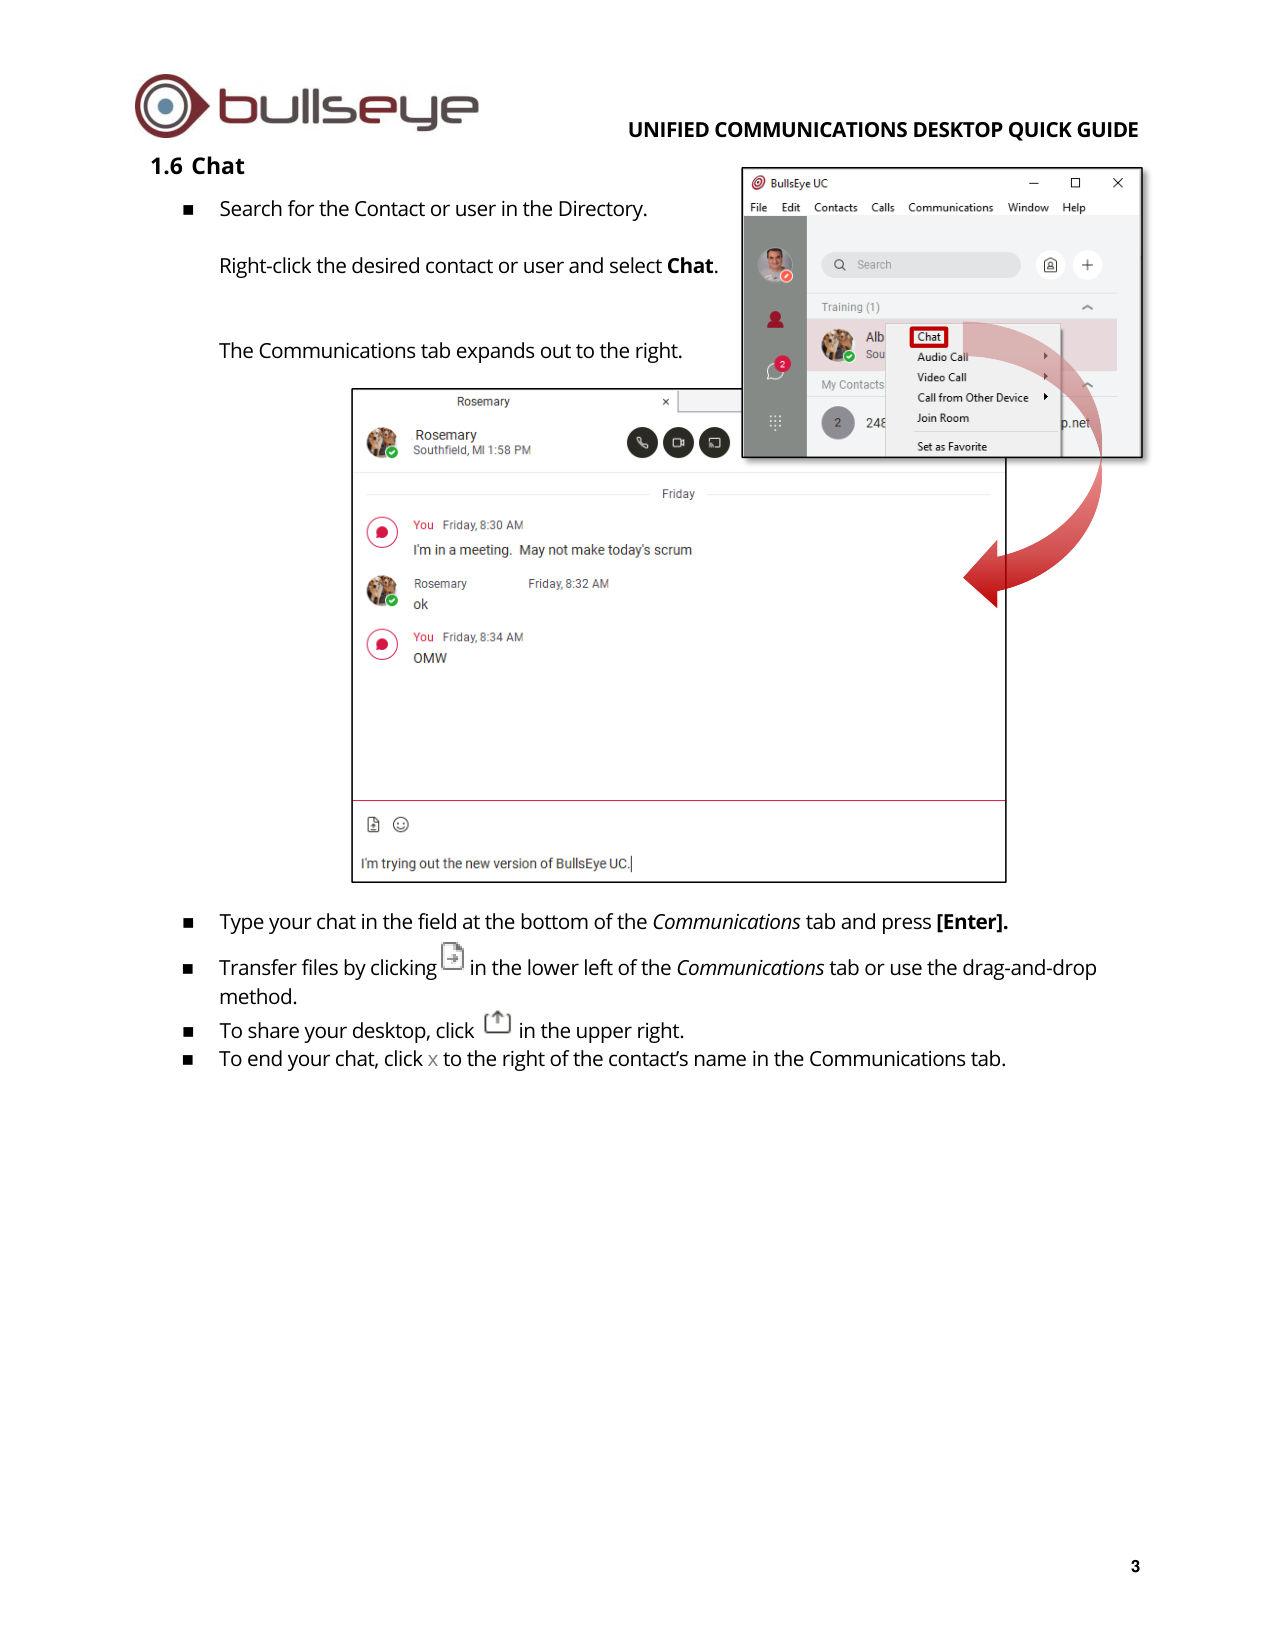
1.6 Chat
◼
Search for the Contact or user in the Directory.
Right-click the desired contact or user and select Chat.
The Communications tab expands out to the right.
◼
Type your chat in the field at the bottom of the Communications tab and press [Enter].
◼
Transfer files by clicking
in the lower left of the Communications tab or use the drag-and-drop
method.
◼
To share your desktop, click
in the upper right.
◼
To end your chat, click x to the right of the contact’s name in the Communications tab.
UNIFIED COMMUNICATIONS DESKTOP QUICK GUIDE
4
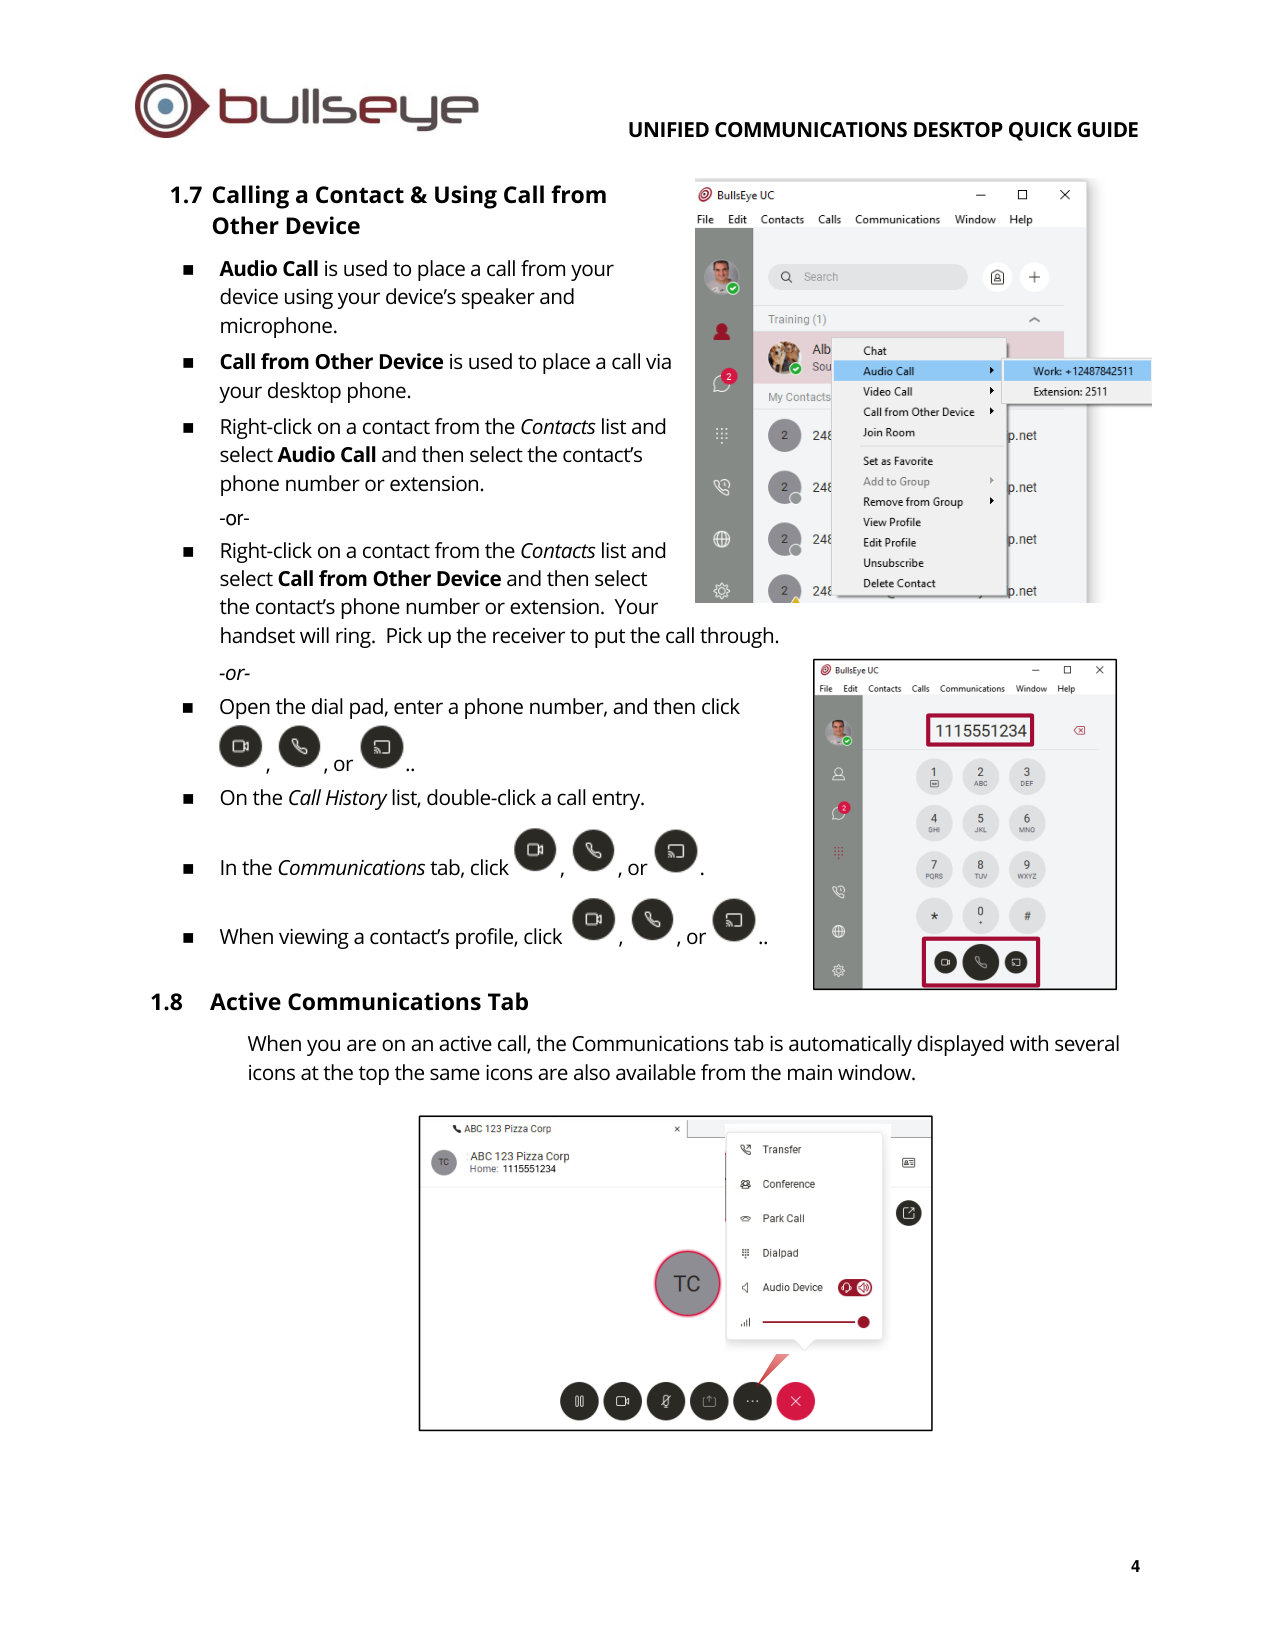
1.7 Calling a Contact & Using Call from
Other Device
◼
Audio Call is used to place a call from your
device using your device’s speaker and
microphone.
◼
Call from Other Device is used to place a call via
your desktop phone.
◼
Right-click on a contact from the Contacts list and
select Audio Call and then select the contact’s
phone number or extension.
-or-
◼
Right-click on a contact from the Contacts list and
select Call from Other Device and then select
the contact’s phone number or extension. Your
handset will ring. Pick up the receiver to put the call through.
-or-
◼
Open the dial pad, enter a phone number, and then click
,
, or
..
◼
On the Call History list, double-click a call entry.
◼
In the Communications tab, click
,
, or
.
◼
When viewing a contact’s profile, click
,
, or
..
1.8
Active Communications Tab
When you are on an active call, the Communications tab is automatically displayed with several
icons at the top the same icons are also available from the main window.
UNIFIED COMMUNICATIONS DESKTOP QUICK GUIDE
5
Icon
Description
Place the call on hold/resume call
Video call
Mute audio
Desktop share
Options – Access additional options for the call including transfer, conference, park call, etc.
End call. Park Call – Park the call on an extension.
For additional information on using features in the Active Communications tab such as video
conferencing or desktop sharing refer to topic 1.10, Group Chat, Audio Conferencing, Desktop Sharing
and Video Conferencing on page 6.
UNIFIED COMMUNICATIONS DESKTOP QUICK GUIDE
6
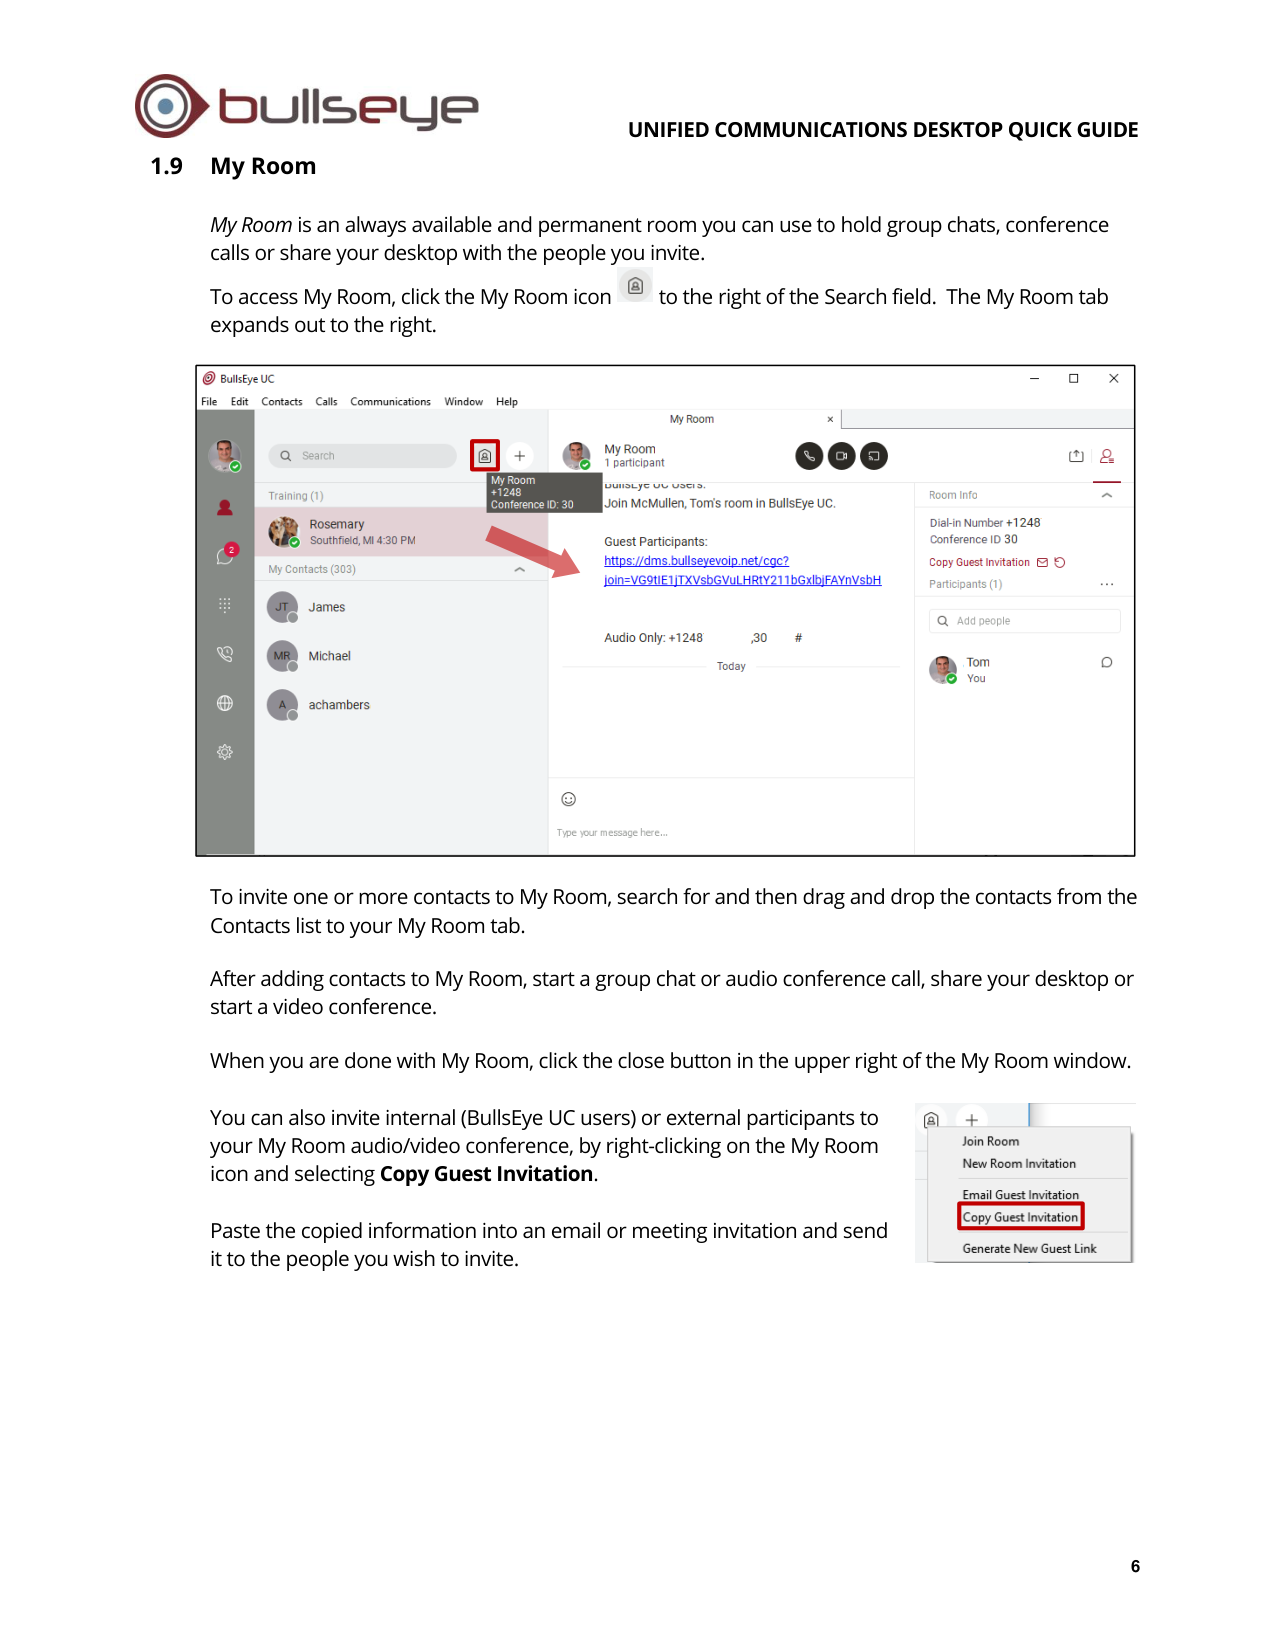
1.9
My Room
My Room is an always available and permanent room you can use to hold group chats, conference
calls or share your desktop with the people you invite.
To access My Room, click the My Room icon
to the right of the Search field. The My Room tab
expands out to the right.
To invite one or more contacts to My Room, search for and then drag and drop the contacts from the
Contacts list to your My Room tab.
After adding contacts to My Room, start a group chat or audio conference call, share your desktop or
start a video conference.
When you are done with My Room, click the close button in the upper right of the My Room window.
You can also invite internal (BullsEye UC users) or external participants to
your My Room audio/video conference, by right-clicking on the My Room
icon and selecting Copy Guest Invitation.
Paste the copied information into an email or meeting invitation and send
it to the people you wish to invite.
UNIFIED COMMUNICATIONS DESKTOP QUICK GUIDE
7
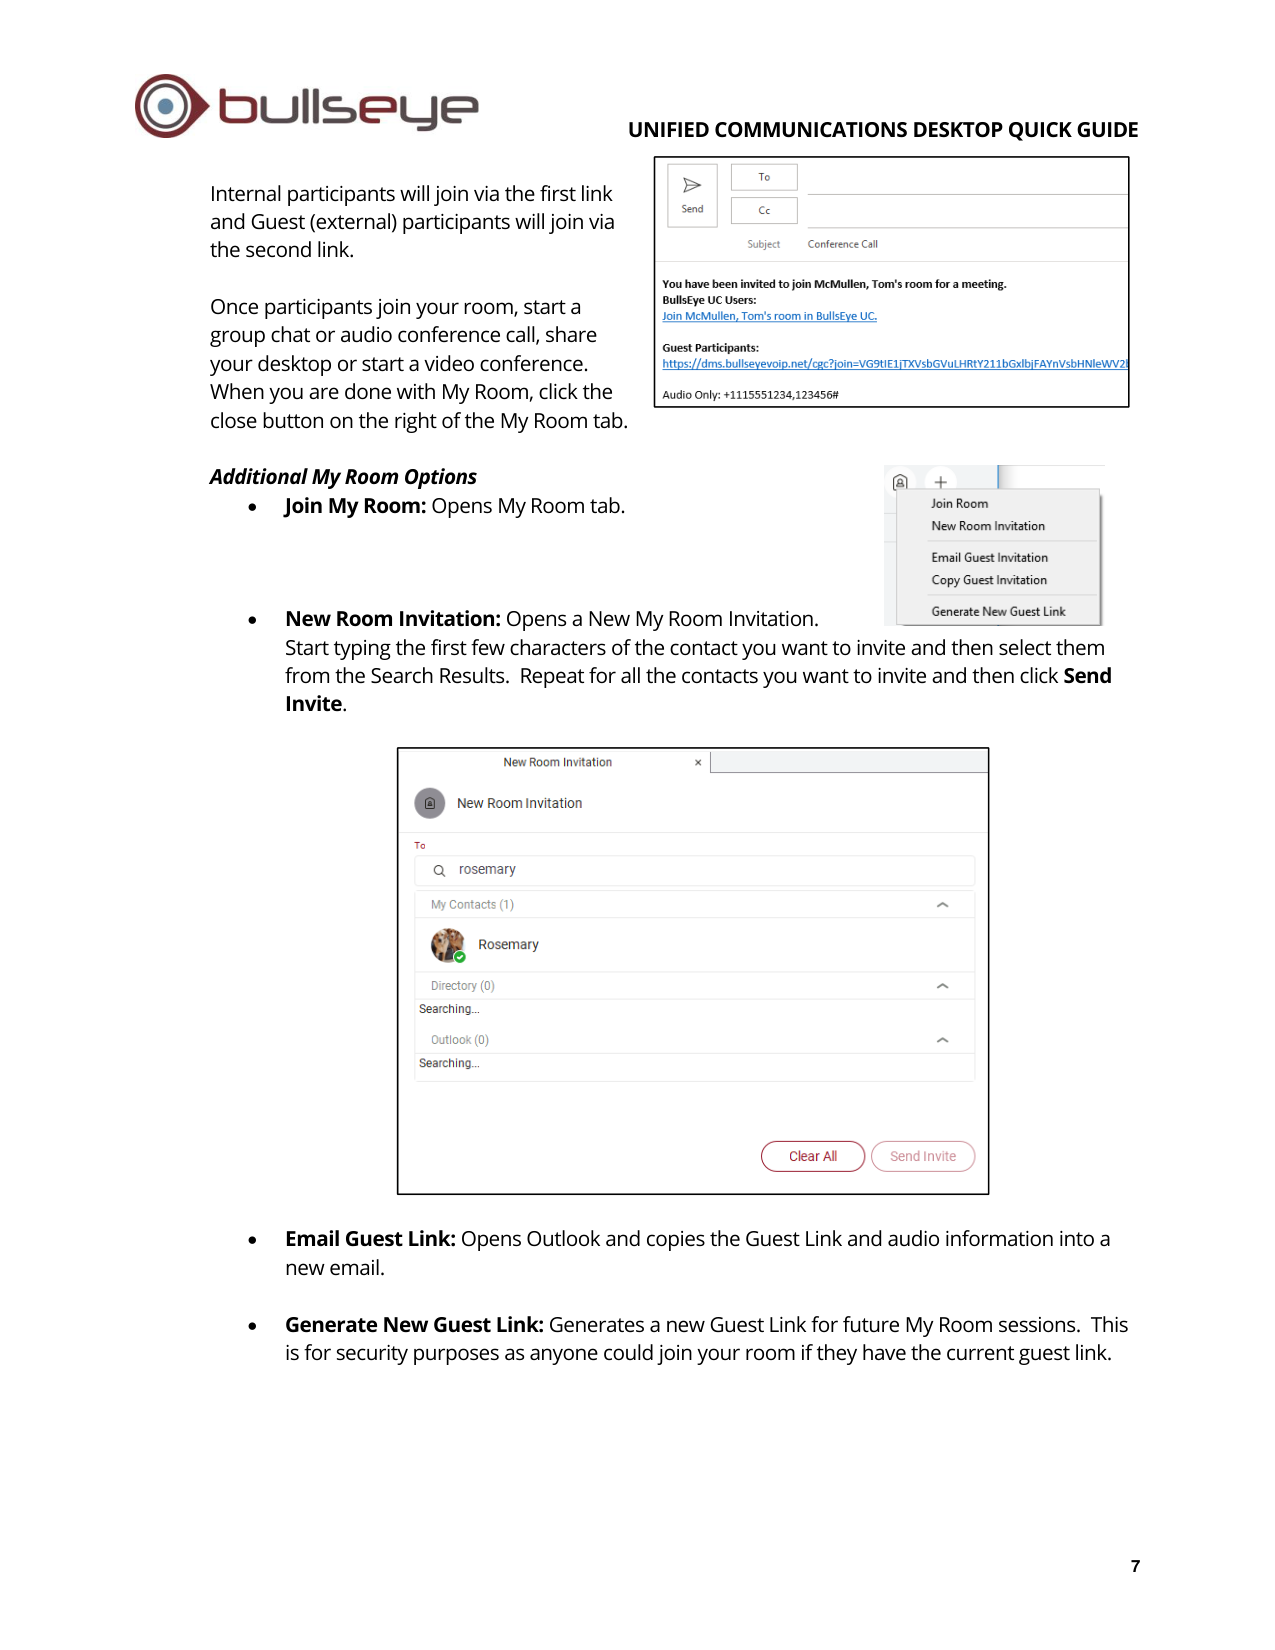
Internal participants will join via the first link
and Guest (external) participants will join via
the second link.
Once participants join your room, start a
group chat or audio conference call, share
your desktop or start a video conference.
When you are done with My Room, click the
close button on the right of the My Room tab.
Additional My Room Options
•
Join My Room: Opens My Room tab.
•
New Room Invitation: Opens a New My Room Invitation.
Start typing the first few characters of the contact you want to invite and then select them
from the Search Results. Repeat for all the contacts you want to invite and then click Send
Invite.
•
Email Guest Link: Opens Outlook and copies the Guest Link and audio information into a
new email.
•
Generate New Guest Link: Generates a new Guest Link for future My Room sessions. This
is for security purposes as anyone could join your room if they have the current guest link.
UNIFIED COMMUNICATIONS DESKTOP QUICK GUIDE
8
1.10 Group Chat, Audio Conferencing, Desktop Sharing and Video Conferencing
After inviting participants to My Room, you can hold group chats with your invitees or start an
audio or video conference call as well as share your desktop.
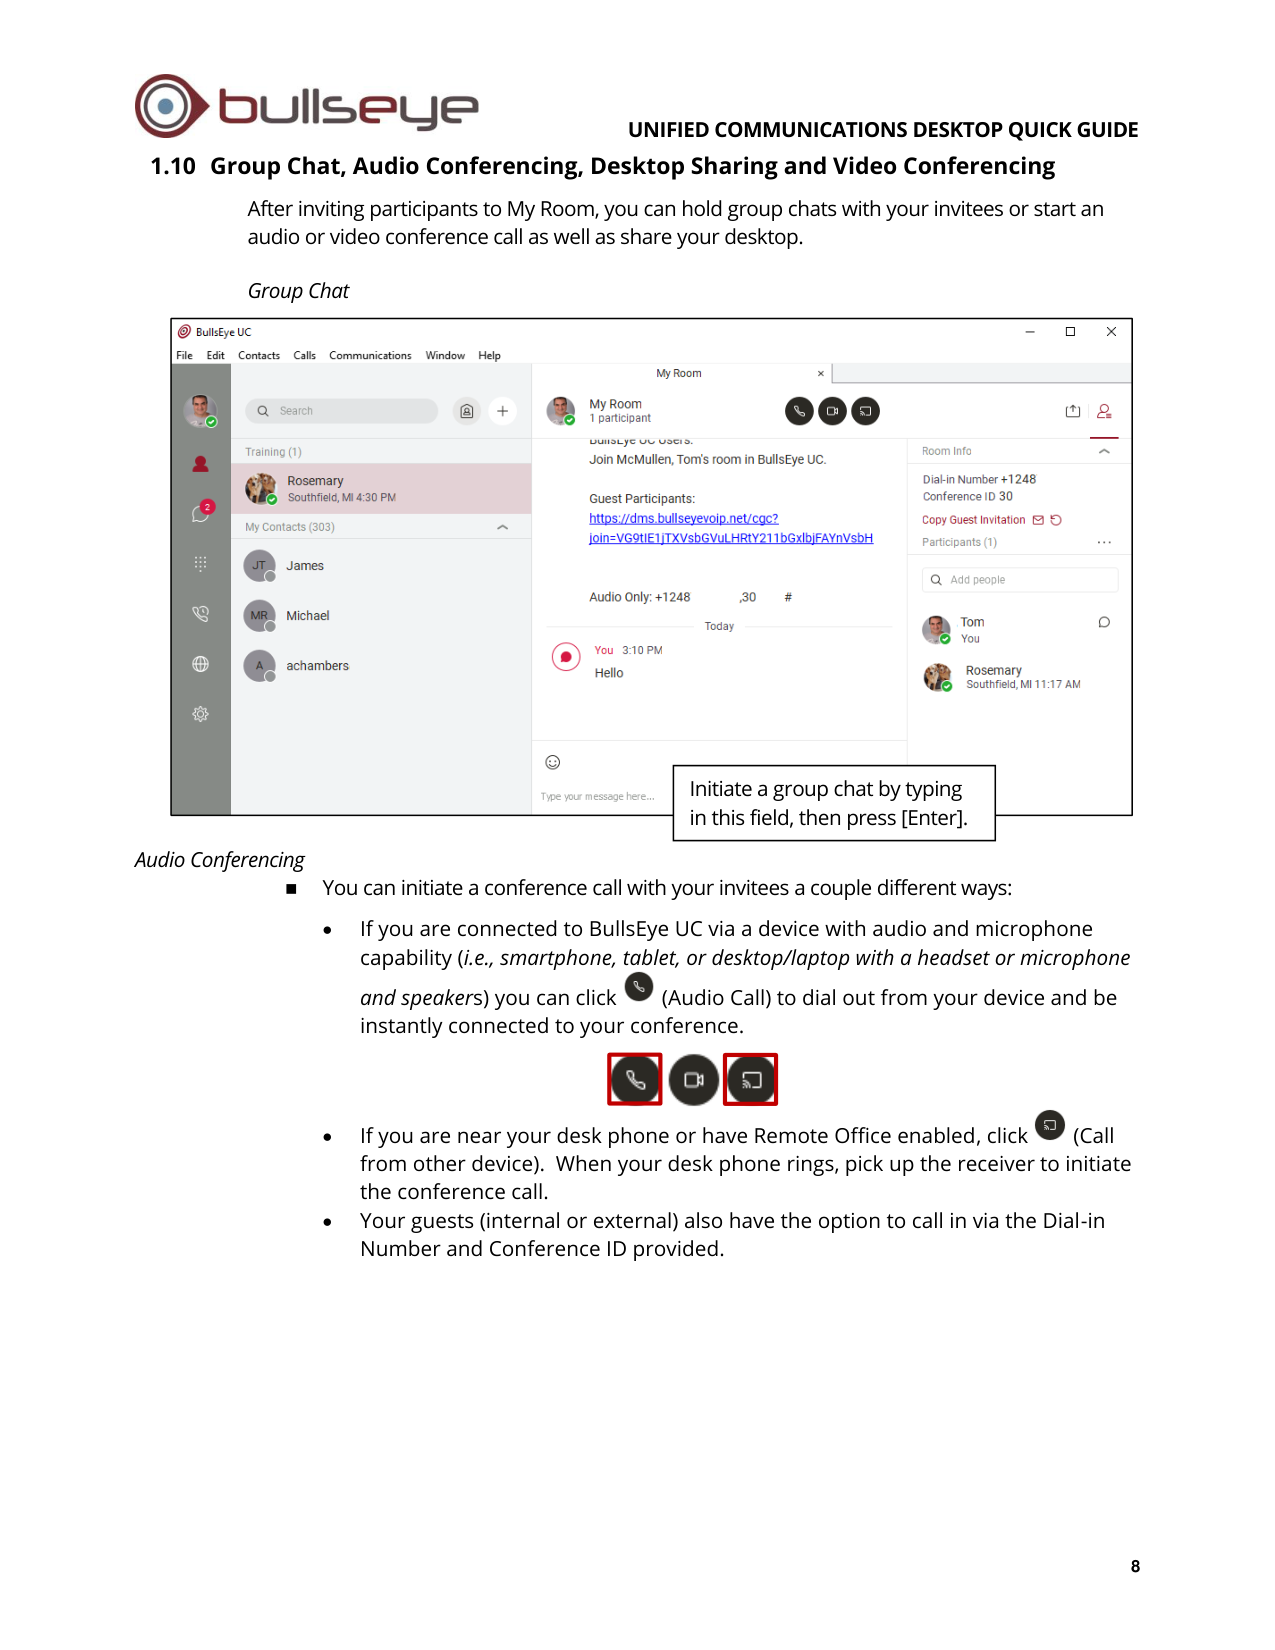
Group Chat
Audio Conferencing
◼
You can initiate a conference call with your invitees a couple different ways:
•
If you are connected to BullsEye UC via a device with audio and microphone
capability (i.e., smartphone, tablet, or desktop/laptop with a headset or microphone
and speakers) you can click
(Audio Call) to dial out from your device and be
instantly connected to your conference.
•
If you are near your desk phone or have Remote Office enabled, click
(Call
from other device). When your desk phone rings, pick up the receiver to initiate
the conference call.
•
Your guests (internal or external) also have the option to call in via the Dial-in
Number and Conference ID provided.
Initiate a group chat by typing
in this field, then press [Enter].
UNIFIED COMMUNICATIONS DESKTOP QUICK GUIDE
9
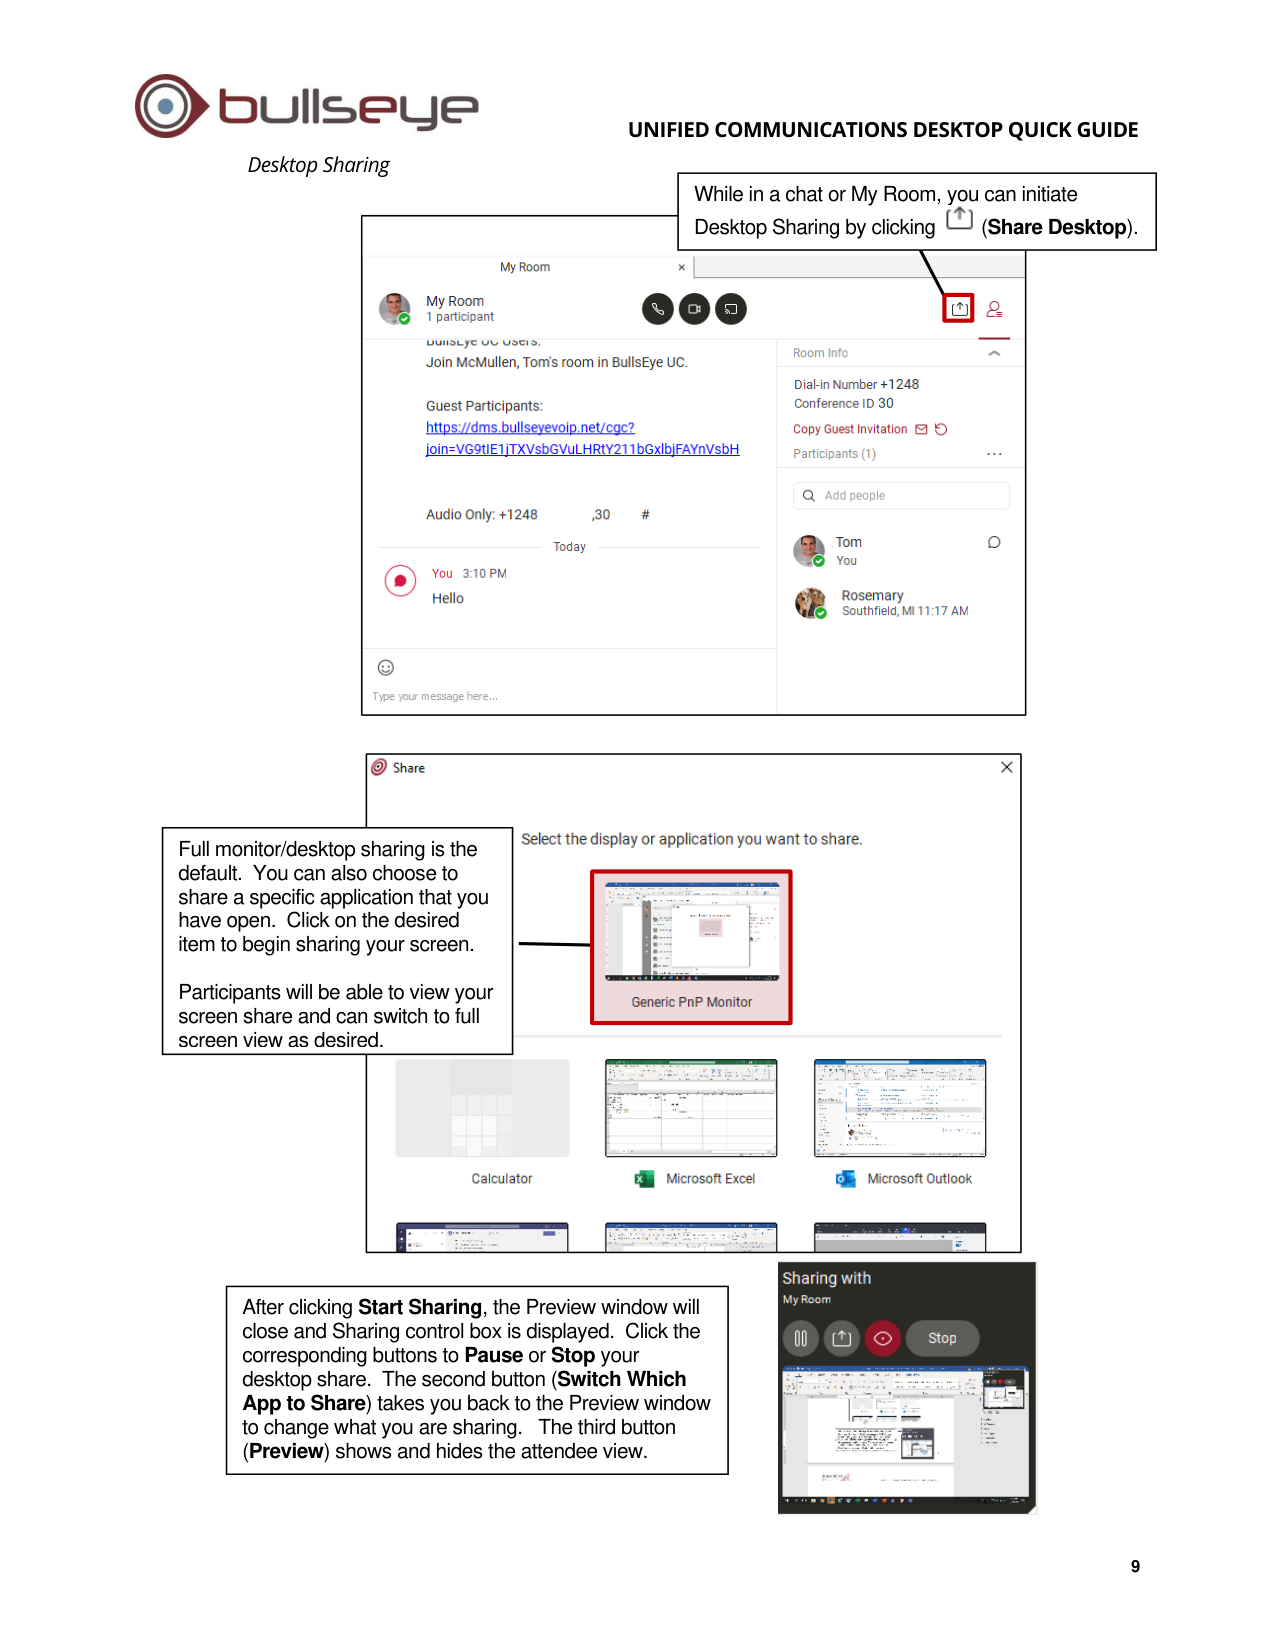
Desktop Sharing
While in a chat or My Room, you can initiate
Desktop Sharing by clicking
(Share Desktop).
Full monitor/desktop sharing is the
default. You can also choose to
share a specific application that you
have open. Click on the desired
item to begin sharing your screen.
Participants will be able to view your
screen share and can switch to full
screen view as desired.
After clicking Start Sharing, the Preview window will
close and Sharing control box is displayed. Click the
corresponding buttons to Pause or Stop your
desktop share. The second button (Switch Which
App to Share) takes you back to the Preview window
to change what you are sharing. The third button
(Preview) shows and hides the attendee view.
UNIFIED COMMUNICATIONS DESKTOP QUICK GUIDE
10
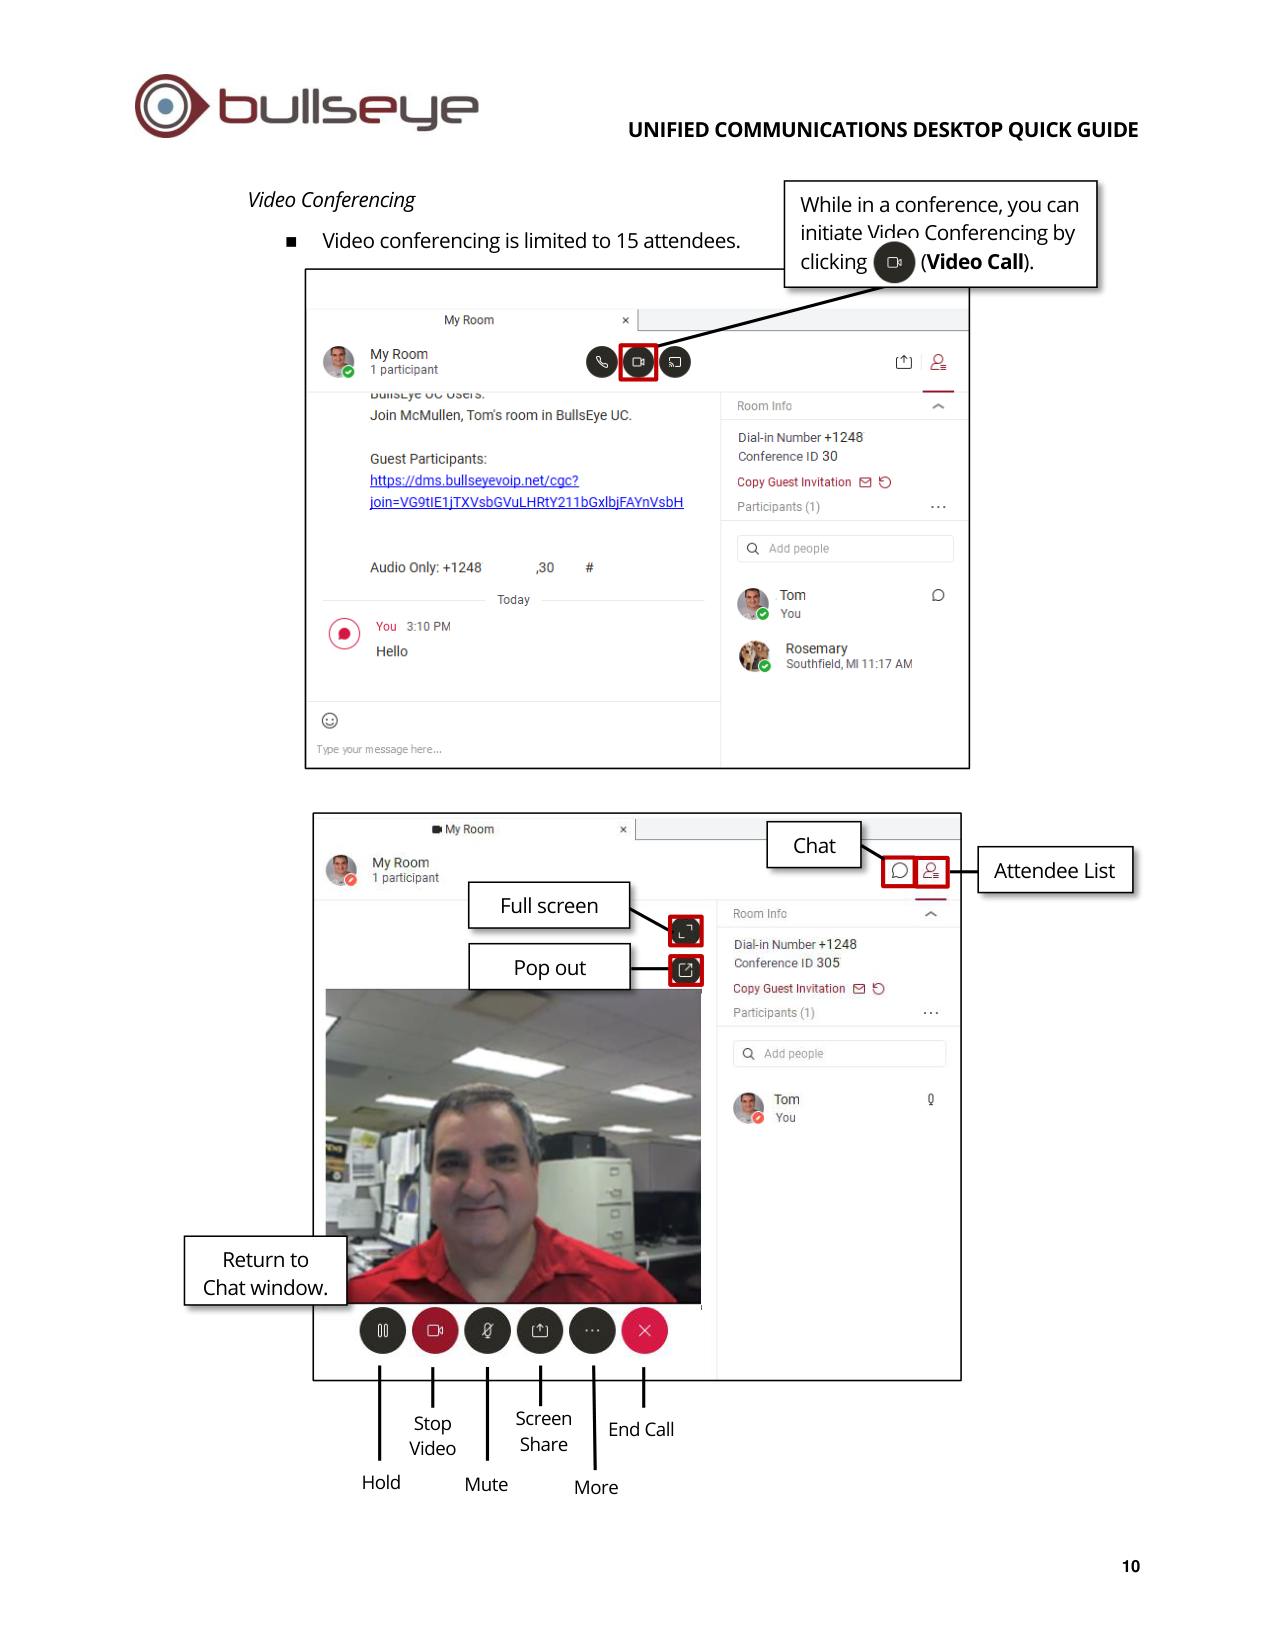
Video Conferencing
◼
Video conferencing is limited to 15 attendees.
End Call
Return to
Chat window.
Full screen
While in a conference, you can
initiate Video Conferencing by
clicking (Video Call).
Screen
Share
Stop
Video
Hold
Mute
More
Pop out
Chat
Attendee List
UNIFIED COMMUNICATIONS DESKTOP QUICK GUIDE
11
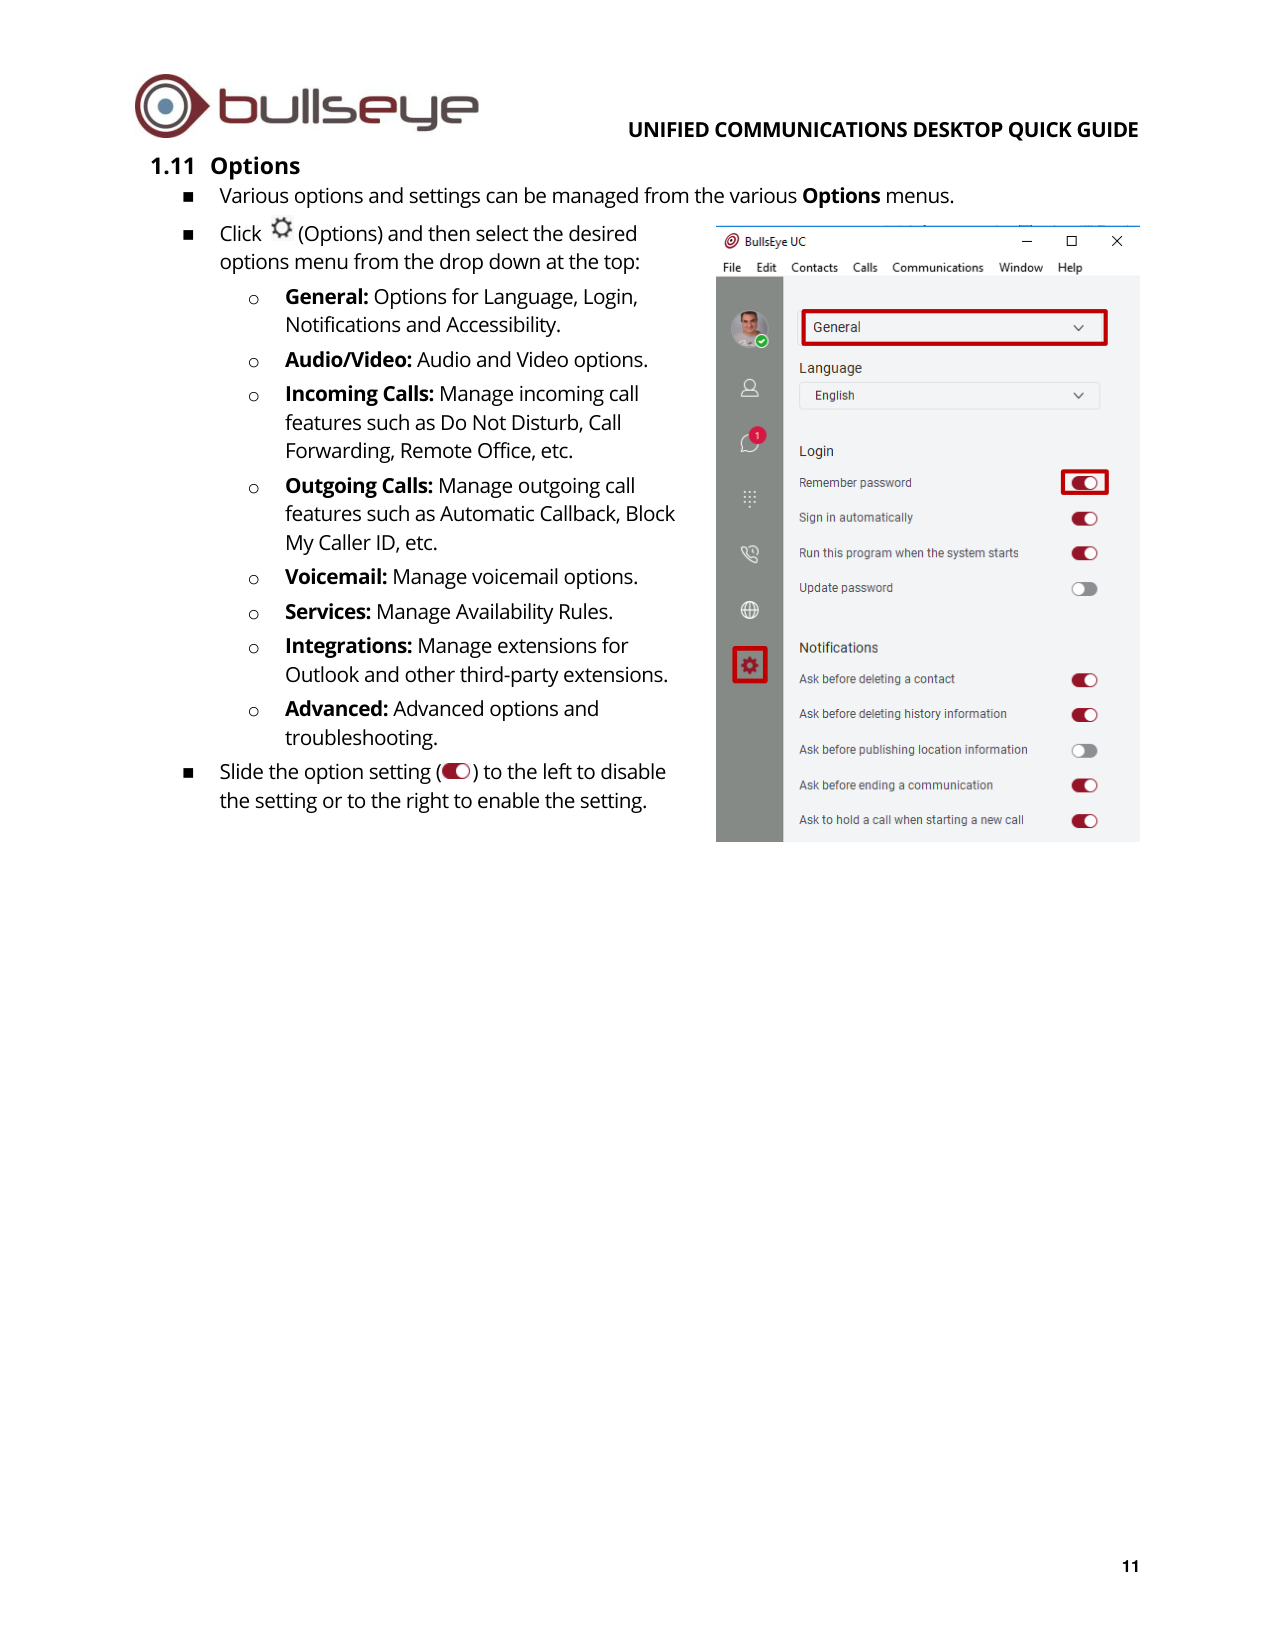
1.11 Options
◼
Various options and settings can be managed from the various Options menus.
◼
Click
(Options) and then select the desired
options menu from the drop down at the top:
o
General: Options for Language, Login,
Notifications and Accessibility.
o
Audio/Video: Audio and Video options.
o
Incoming Calls: Manage incoming call
features such as Do Not Disturb, Call
Forwarding, Remote Office, etc.
o
Outgoing Calls: Manage outgoing call
features such as Automatic Callback, Block
My Caller ID, etc.
o
Voicemail: Manage voicemail options.
o
Services: Manage Availability Rules.
o
Integrations: Manage extensions for
Outlook and other third-party extensions.
o
Advanced: Advanced options and
troubleshooting.
◼
Slide the option setting (
) to the left to disable
the setting or to the right to enable the setting.