
BullsEye UC for Android Quick Guide
Summary: BullsEye UC for Android Quick Guide
Download article(s)
![]() BullsEye UC for Android Quick Guide.pdf
BullsEye UC for Android Quick Guide.pdf
BullsEye UC for Android Quick Guide


UC FOR ANDROID QUICK GUIDE
1
1.1
Installing BullsEye UC for Android App
Search for, download and install the BullsEye UC app for Android from the Google Play Store.
1.2
Sign In
When you first launch the application, you are prompted to sign in.
1) Enter the username and password you received via email.
2) Click Sign In.
You can access Help directly from the login window by clicking
the gear icon
in the lower right.
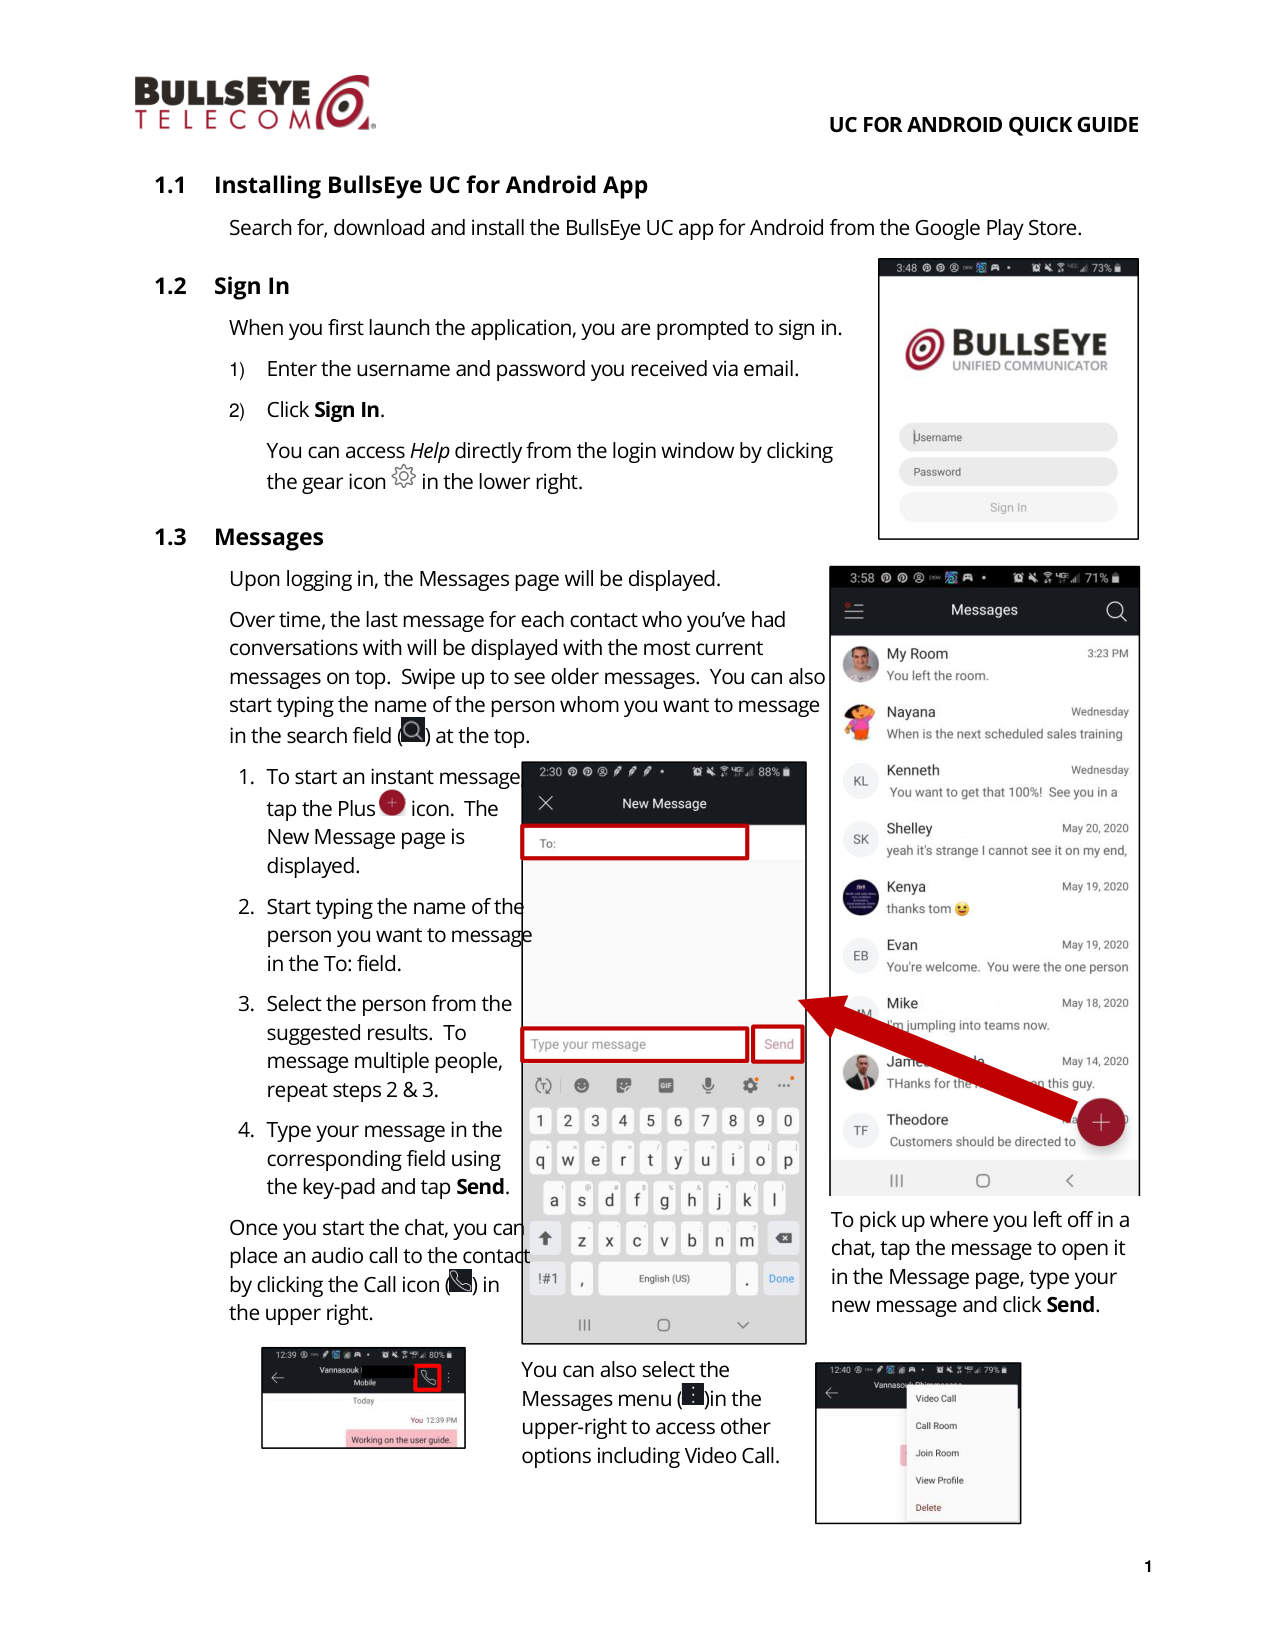
1.3
Messages
Upon logging in, the Messages page will be displayed.
Over time, the last message for each contact who you’ve had
conversations with will be displayed with the most current
messages on top. Swipe up to see older messages. You can also
start typing the name of the person whom you want to message
in the search field (
) at the top.
1. To start an instant message,
tap the Plus
icon. The
New Message page is
displayed.
2. Start typing the name of the
person you want to message
in the To: field.
3. Select the person from the
suggested results. To
message multiple people,
repeat steps 2 & 3.
4. Type your message in the
corresponding field using
the key-pad and tap Send.
Once you start the chat, you can
place an audio call to the contact
by clicking the Call icon (
) in
the upper right.
To pick up where you left off in a
chat, tap the message to open it
in the Message page, type your
new message and click Send.
You can also select the
Messages menu (
)in the
upper-right to access other
options including Video Call.
UC FOR ANDROID QUICK GUIDE
2
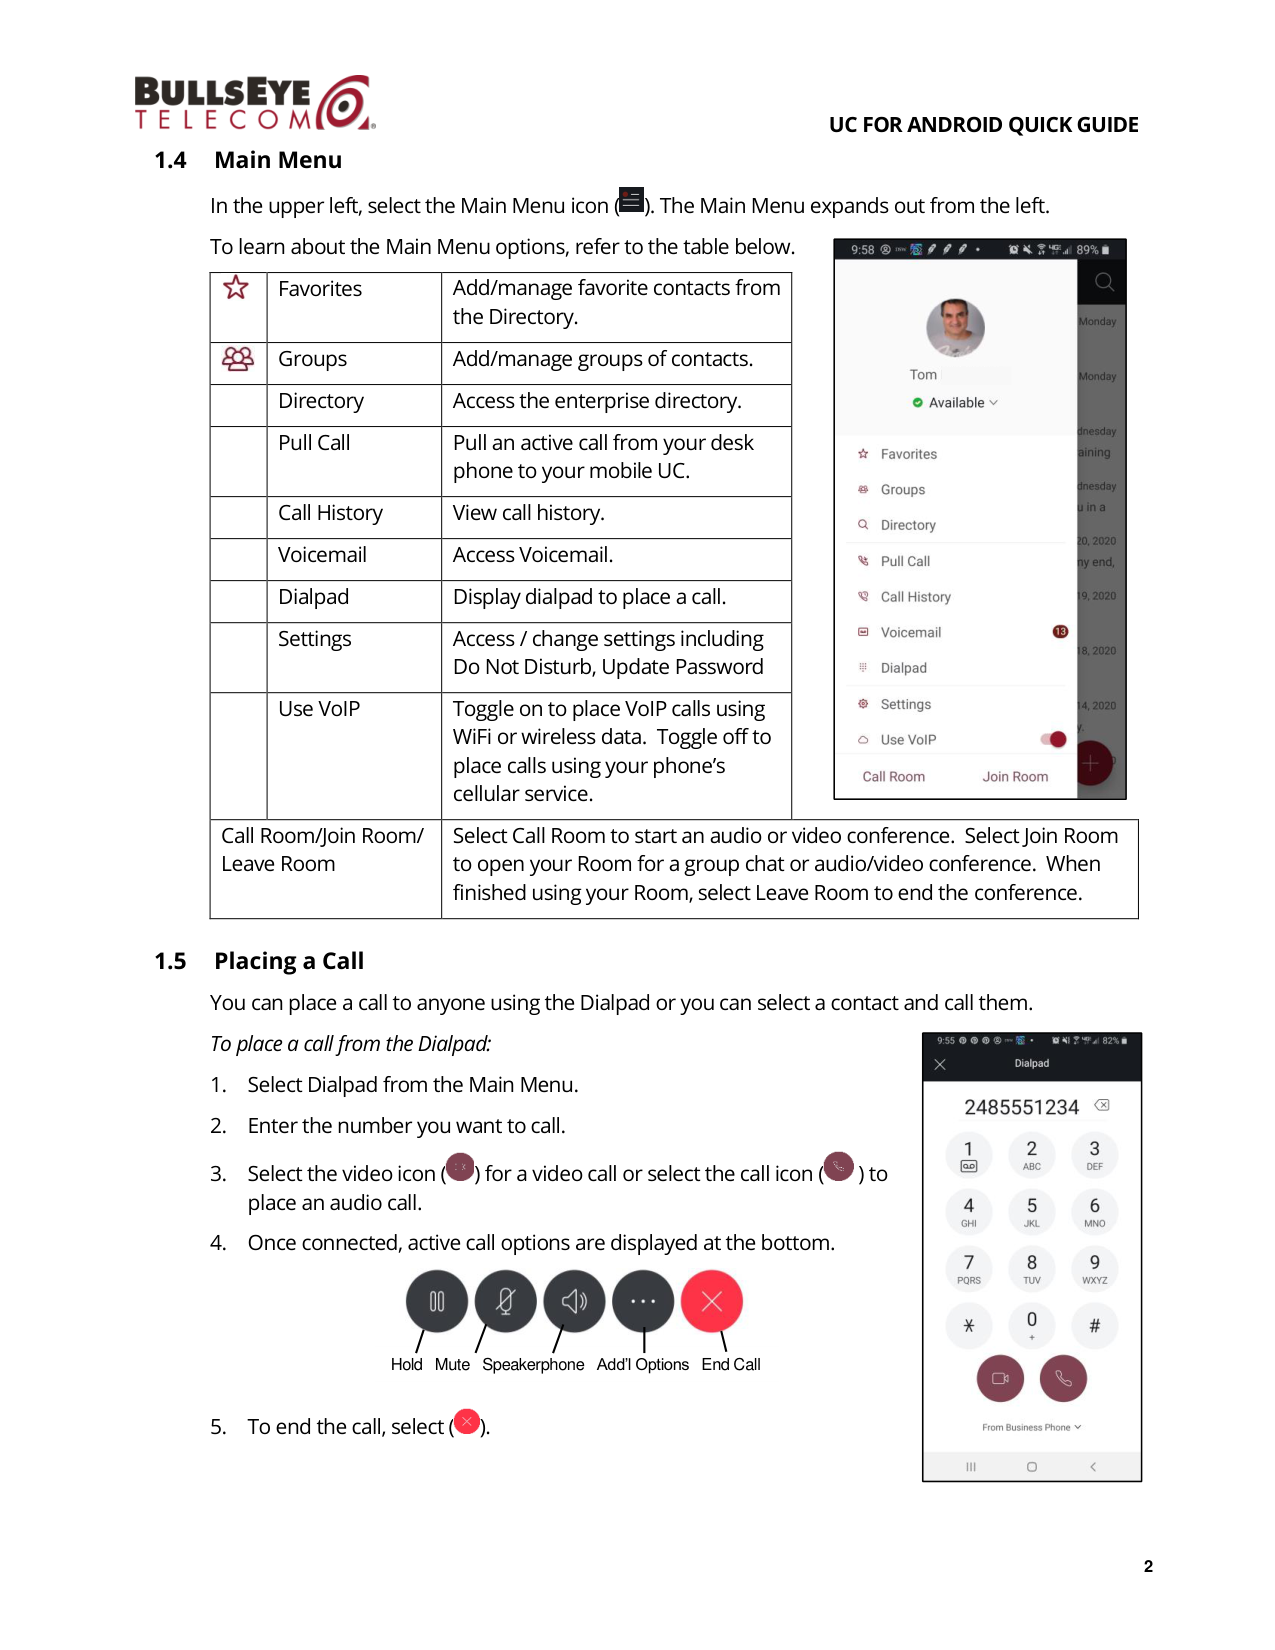
1.4
Main Menu
In the upper left, select the Main Menu icon (
). The Main Menu expands out from the left.
To learn about the Main Menu options, refer to the table below.
Favorites
Add/manage favorite contacts from
the Directory.
Groups
Add/manage groups of contacts.
Directory
Access the enterprise directory.
Pull Call
Pull an active call from your desk
phone to your mobile UC.
Call History
View call history.
Voicemail
Access Voicemail.
Dialpad
Display dialpad to place a call.
Settings
Access / change settings including
Do Not Disturb, Update Password
Use VoIP
Toggle on to place VoIP calls using
WiFi or wireless data. Toggle off to
place calls using your phone’s
cellular service.
Call Room/Join Room/
Leave Room
Select Call Room to start an audio or video conference. Select Join Room
to open your Room for a group chat or audio/video conference. When
finished using your Room, select Leave Room to end the conference.
1.5
Placing a Call
You can place a call to anyone using the Dialpad or you can select a contact and call them.
To place a call from the Dialpad:
1. Select Dialpad from the Main Menu.
2. Enter the number you want to call.
3. Select the video icon (
) for a video call or select the call icon (
) to
place an audio call.
4. Once connected, active call options are displayed at the bottom.
5. To end the call, select (
).
Hold Mute Speakerphone Add’l Options End Call
UC FOR ANDROID QUICK GUIDE
3
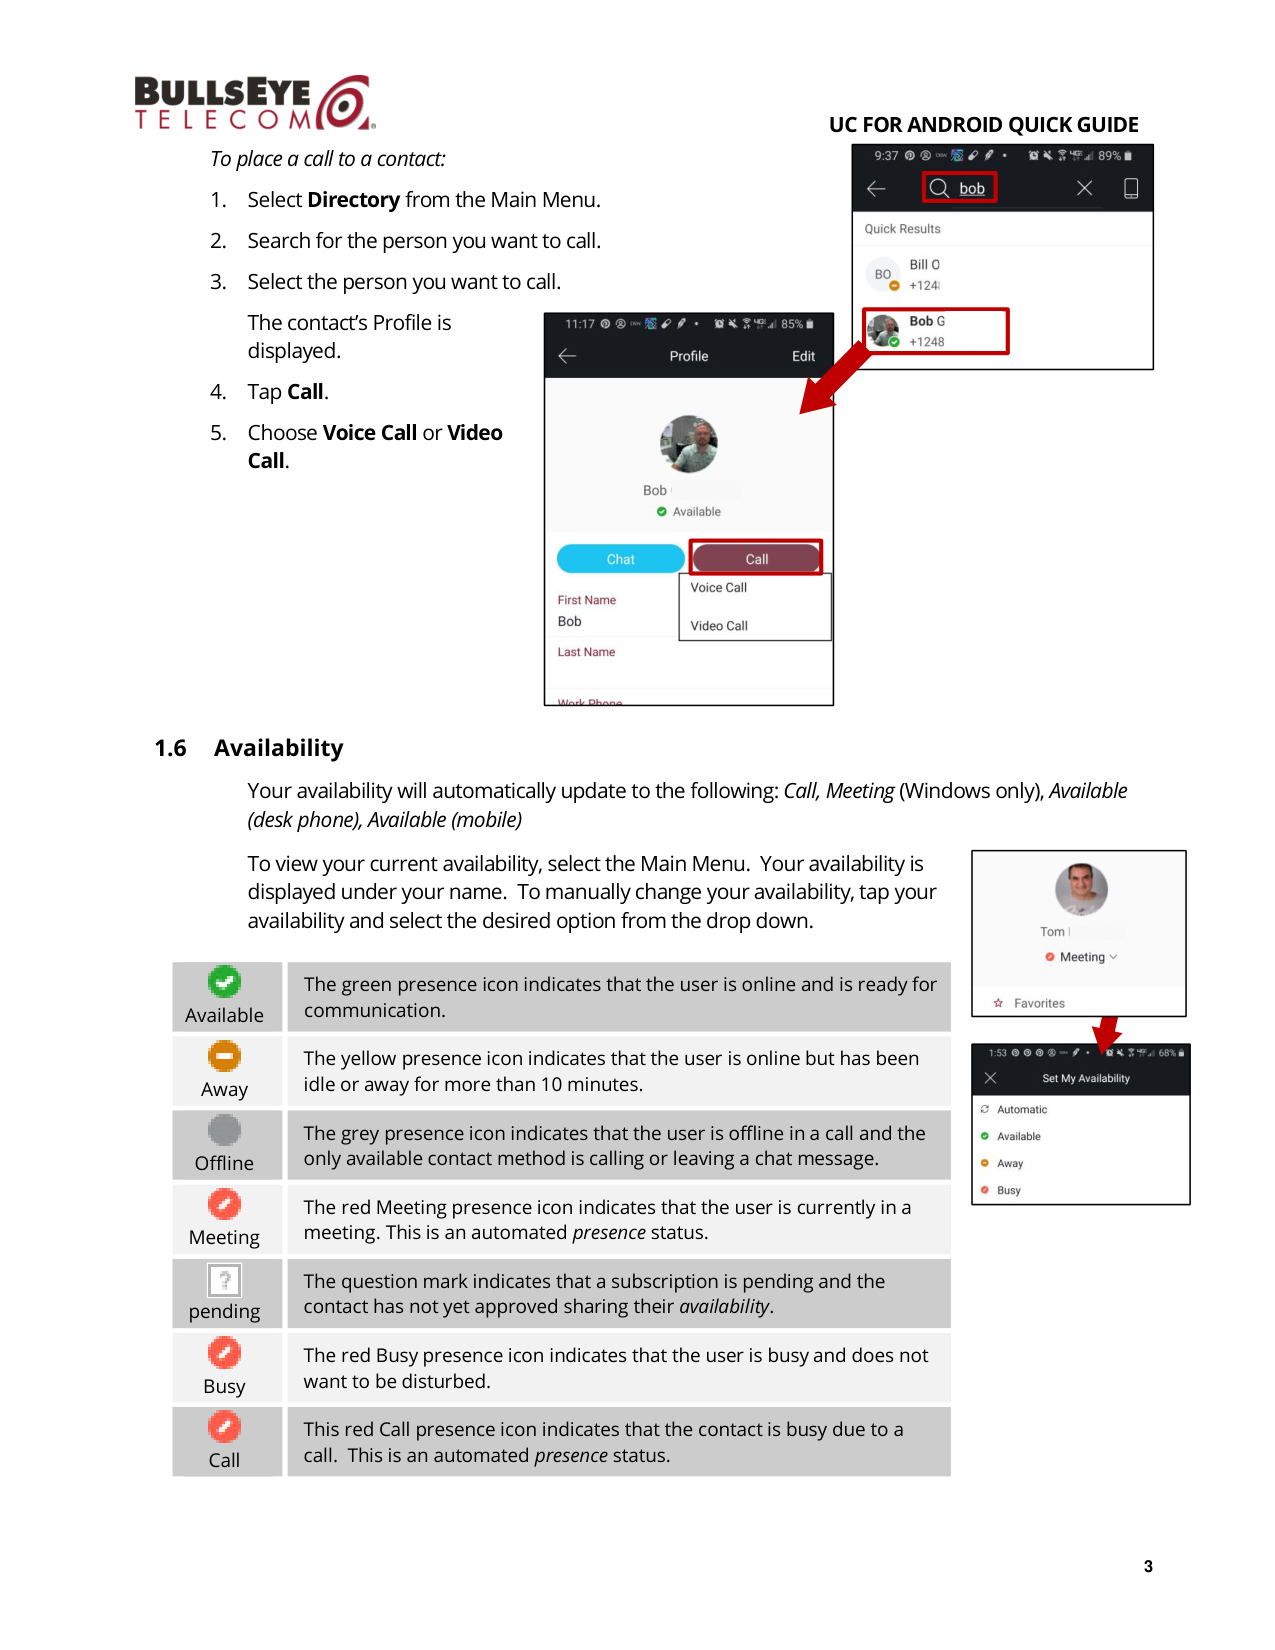
To place a call to a contact:
1. Select Directory from the Main Menu.
2. Search for the person you want to call.
3. Select the person you want to call.
The contact’s Profile is
displayed.
4. Tap Call.
5. Choose Voice Call or Video
Call.
1.6
Availability
Your availability will automatically update to the following: Call, Meeting (Windows only), Available
(desk phone), Available (mobile)
To view your current availability, select the Main Menu. Your availability is
displayed under your name. To manually change your availability, tap your
availability and select the desired option from the drop down.
Available
The green presence icon indicates that the user is online and is ready for
communication.
Away
The yellow presence icon indicates that the user is online but has been
idle or away for more than 10 minutes.
Offline
The grey presence icon indicates that the user is offline in a call and the
only available contact method is calling or leaving a chat message.
Meeting
The red Meeting presence icon indicates that the user is currently in a
meeting. This is an automated presence status.
pending
The question mark indicates that a subscription is pending and the
contact has not yet approved sharing their availability.
Busy
The red Busy presence icon indicates that the user is busy and does not
want to be disturbed.
Call
This red Call presence icon indicates that the contact is busy due to a
call. This is an automated presence status.
UC FOR ANDROID QUICK GUIDE
4
1.7
Adding Favorites
Favorites allows you to create a short list of people from the directory that you contact most
frequently, or you otherwise want to be able to quickly find and contact. When you start the BullsEye
UC app for the first time, your Favorites list is empty. To get started adding to Favorites, select
Favorites from the Main menu. The Favorites page is displayed.
1.8
Groups
Create groups of contacts to make it quick and easy to start group chats or group calls with your
teammates. To access Groups, select Groups from the Main Menu. To create a group:
1. Tap +.
3. Tap + to add members
to your group.
4. Search for and select each member
you want to add.
5. When finished, click Done.
3. Tap the Favorites icon
(
) to add the contact
to Favorites.
1. Tap +.
2. Enter the name of the
group and tap Create.
2. Start typing the first few
characters of the person’s
name in the search
field.
UC FOR ANDROID QUICK GUIDE
5
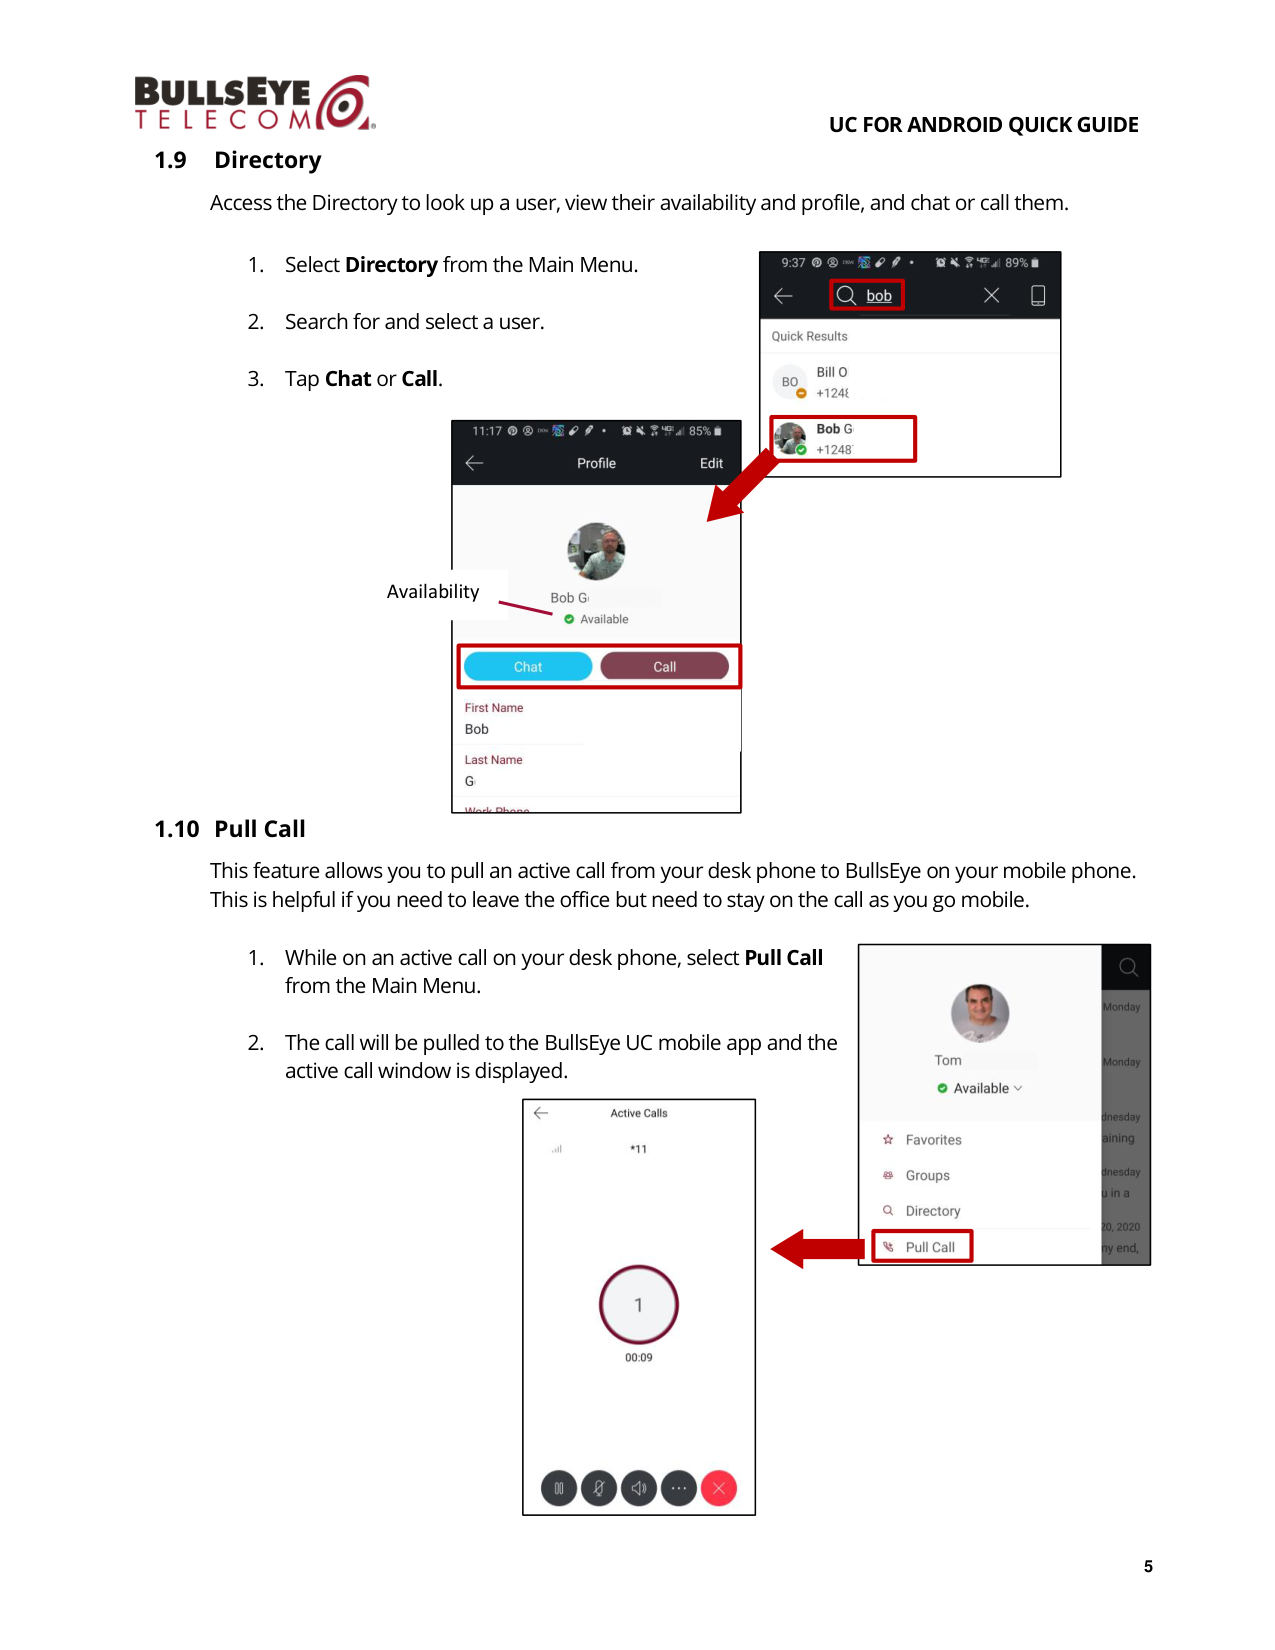
1.9
Directory
Access the Directory to look up a user, view their availability and profile, and chat or call them.
1. Select Directory from the Main Menu.
2. Search for and select a user.
3. Tap Chat or Call.
1.10 Pull Call
This feature allows you to pull an active call from your desk phone to BullsEye on your mobile phone.
This is helpful if you need to leave the office but need to stay on the call as you go mobile.
1. While on an active call on your desk phone, select Pull Call
from the Main Menu.
2. The call will be pulled to the BullsEye UC mobile app and the
active call window is displayed.
Availability
UC FOR ANDROID QUICK GUIDE
6
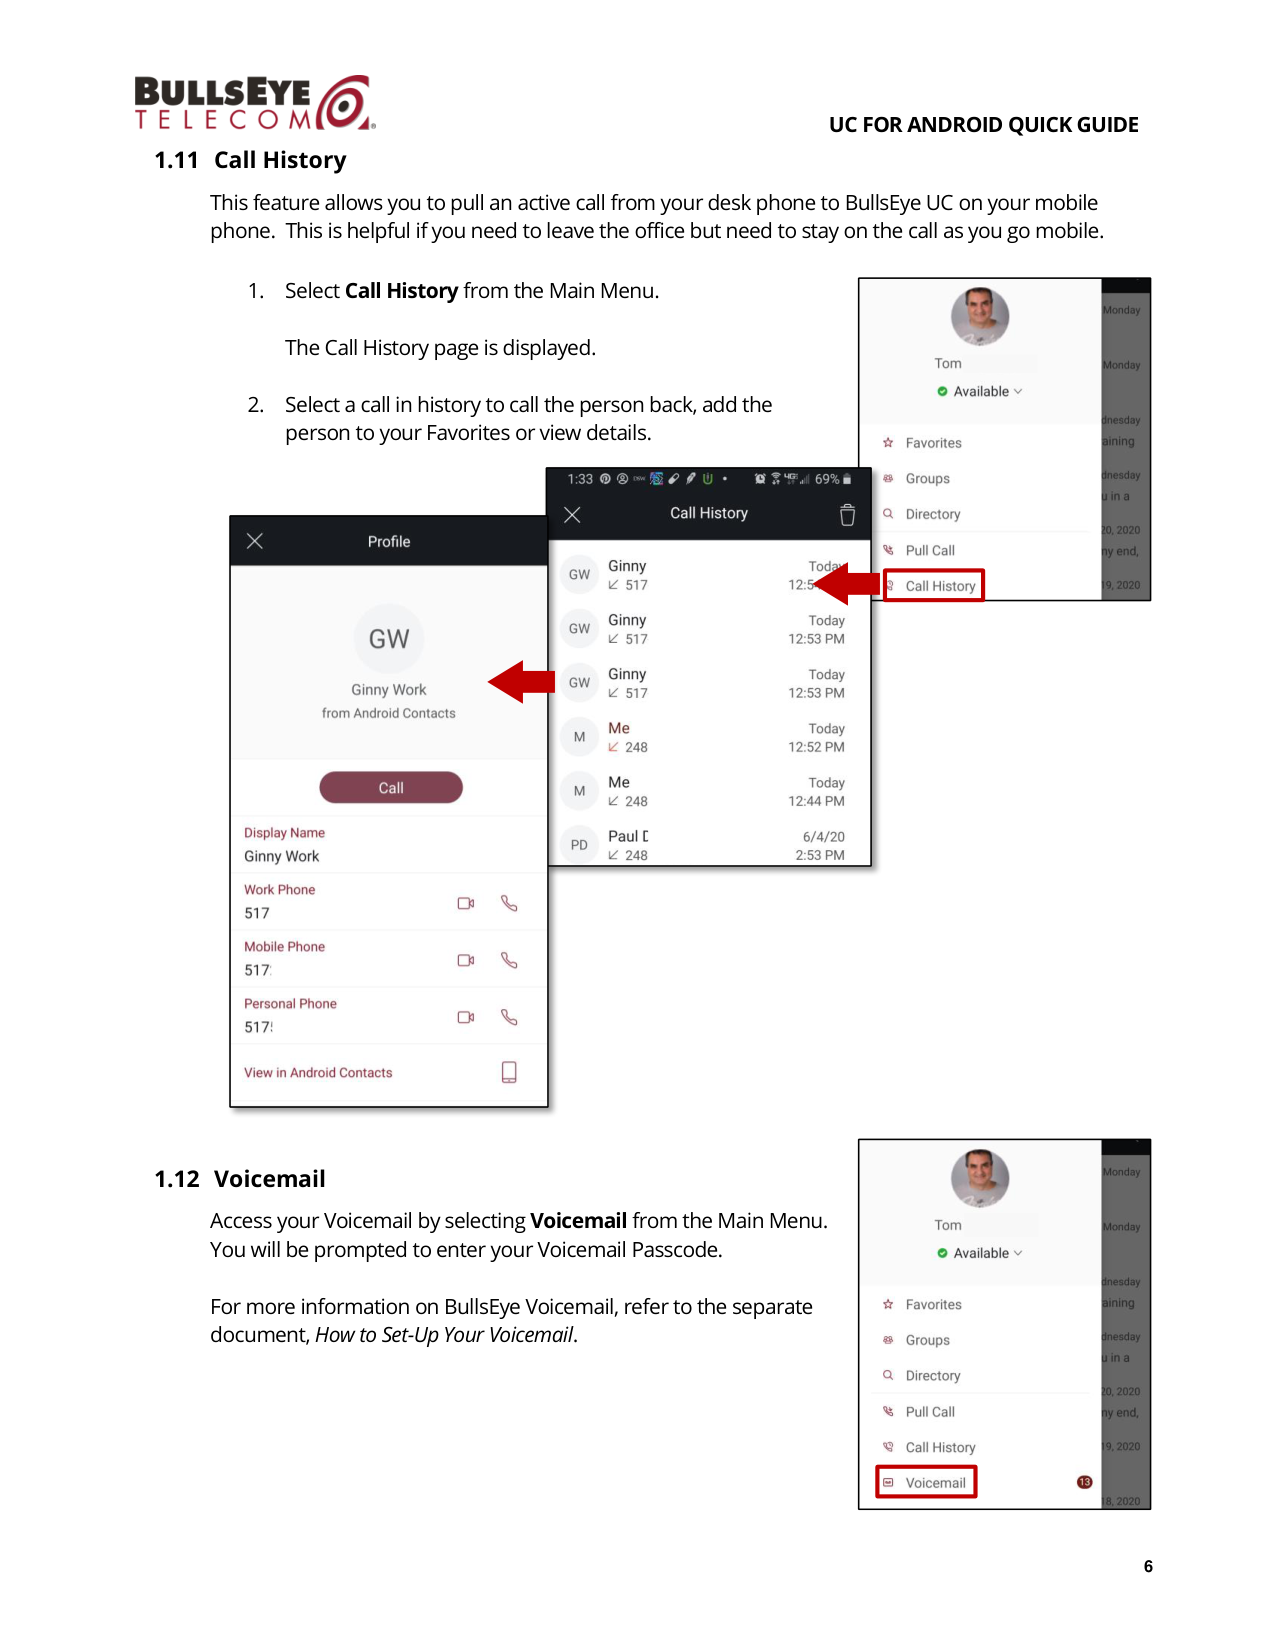
1.11 Call History
This feature allows you to pull an active call from your desk phone to BullsEye UC on your mobile
phone. This is helpful if you need to leave the office but need to stay on the call as you go mobile.
1. Select Call History from the Main Menu.
The Call History page is displayed.
2. Select a call in history to call the person back, add the
person to your Favorites or view details.
1.12 Voicemail
Access your Voicemail by selecting Voicemail from the Main Menu.
You will be prompted to enter your Voicemail Passcode.
For more information on BullsEye Voicemail, refer to the separate
document, How to Set-Up Your Voicemail.
UC FOR ANDROID QUICK GUIDE
7
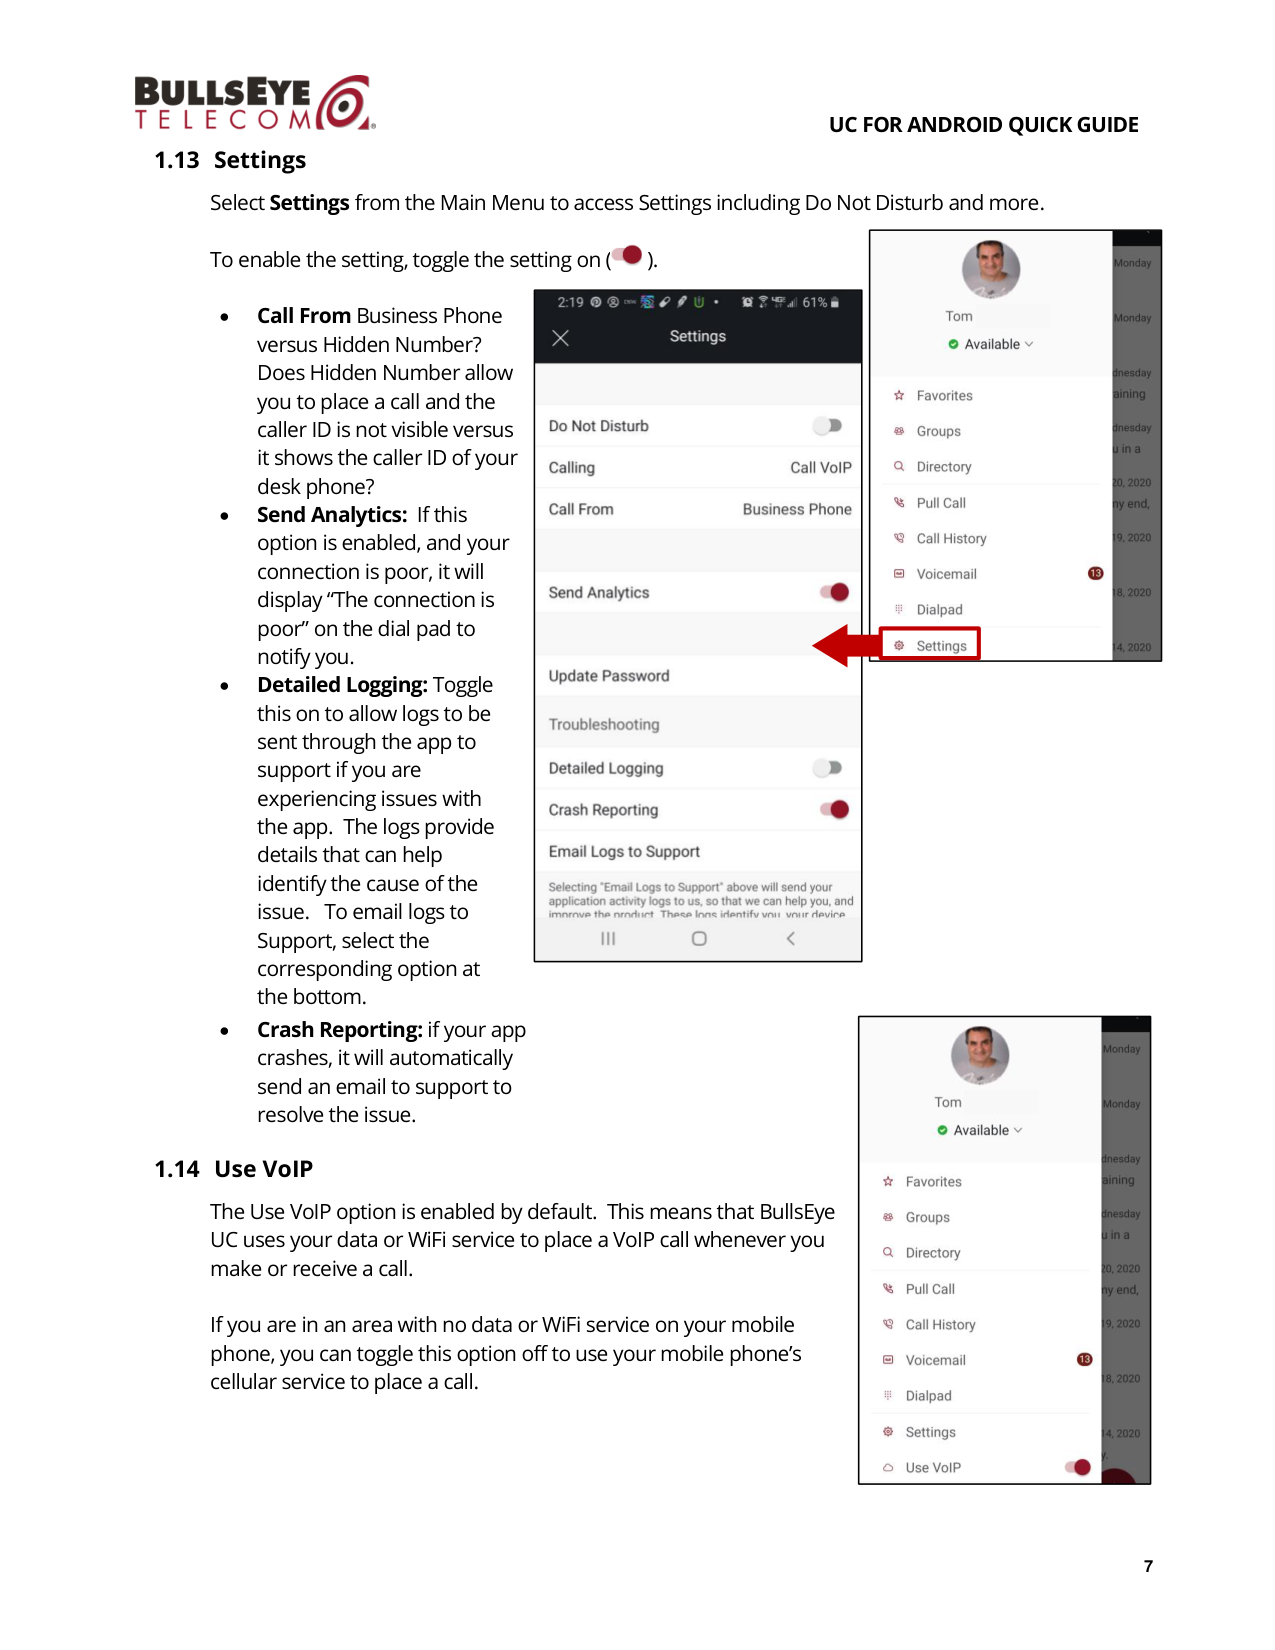
1.13 Settings
Select Settings from the Main Menu to access Settings including Do Not Disturb and more.
To enable the setting, toggle the setting on (
).
•
Call From Business Phone
versus Hidden Number?
Does Hidden Number allow
you to place a call and the
caller ID is not visible versus
it shows the caller ID of your
desk phone?
•
Send Analytics: If this
option is enabled, and your
connection is poor, it will
display “The connection is
poor” on the dial pad to
notify you.
•
Detailed Logging: Toggle
this on to allow logs to be
sent through the app to
support if you are
experiencing issues with
the app. The logs provide
details that can help
identify the cause of the
issue. To email logs to
Support, select the
corresponding option at
the bottom.
•
Crash Reporting: if your app
crashes, it will automatically
send an email to support to
resolve the issue.
1.14 Use VoIP
The Use VoIP option is enabled by default. This means that BullsEye
UC uses your data or WiFi service to place a VoIP call whenever you
make or receive a call.
If you are in an area with no data or WiFi service on your mobile
phone, you can toggle this option off to use your mobile phone’s
cellular service to place a call.
UC FOR ANDROID QUICK GUIDE
8
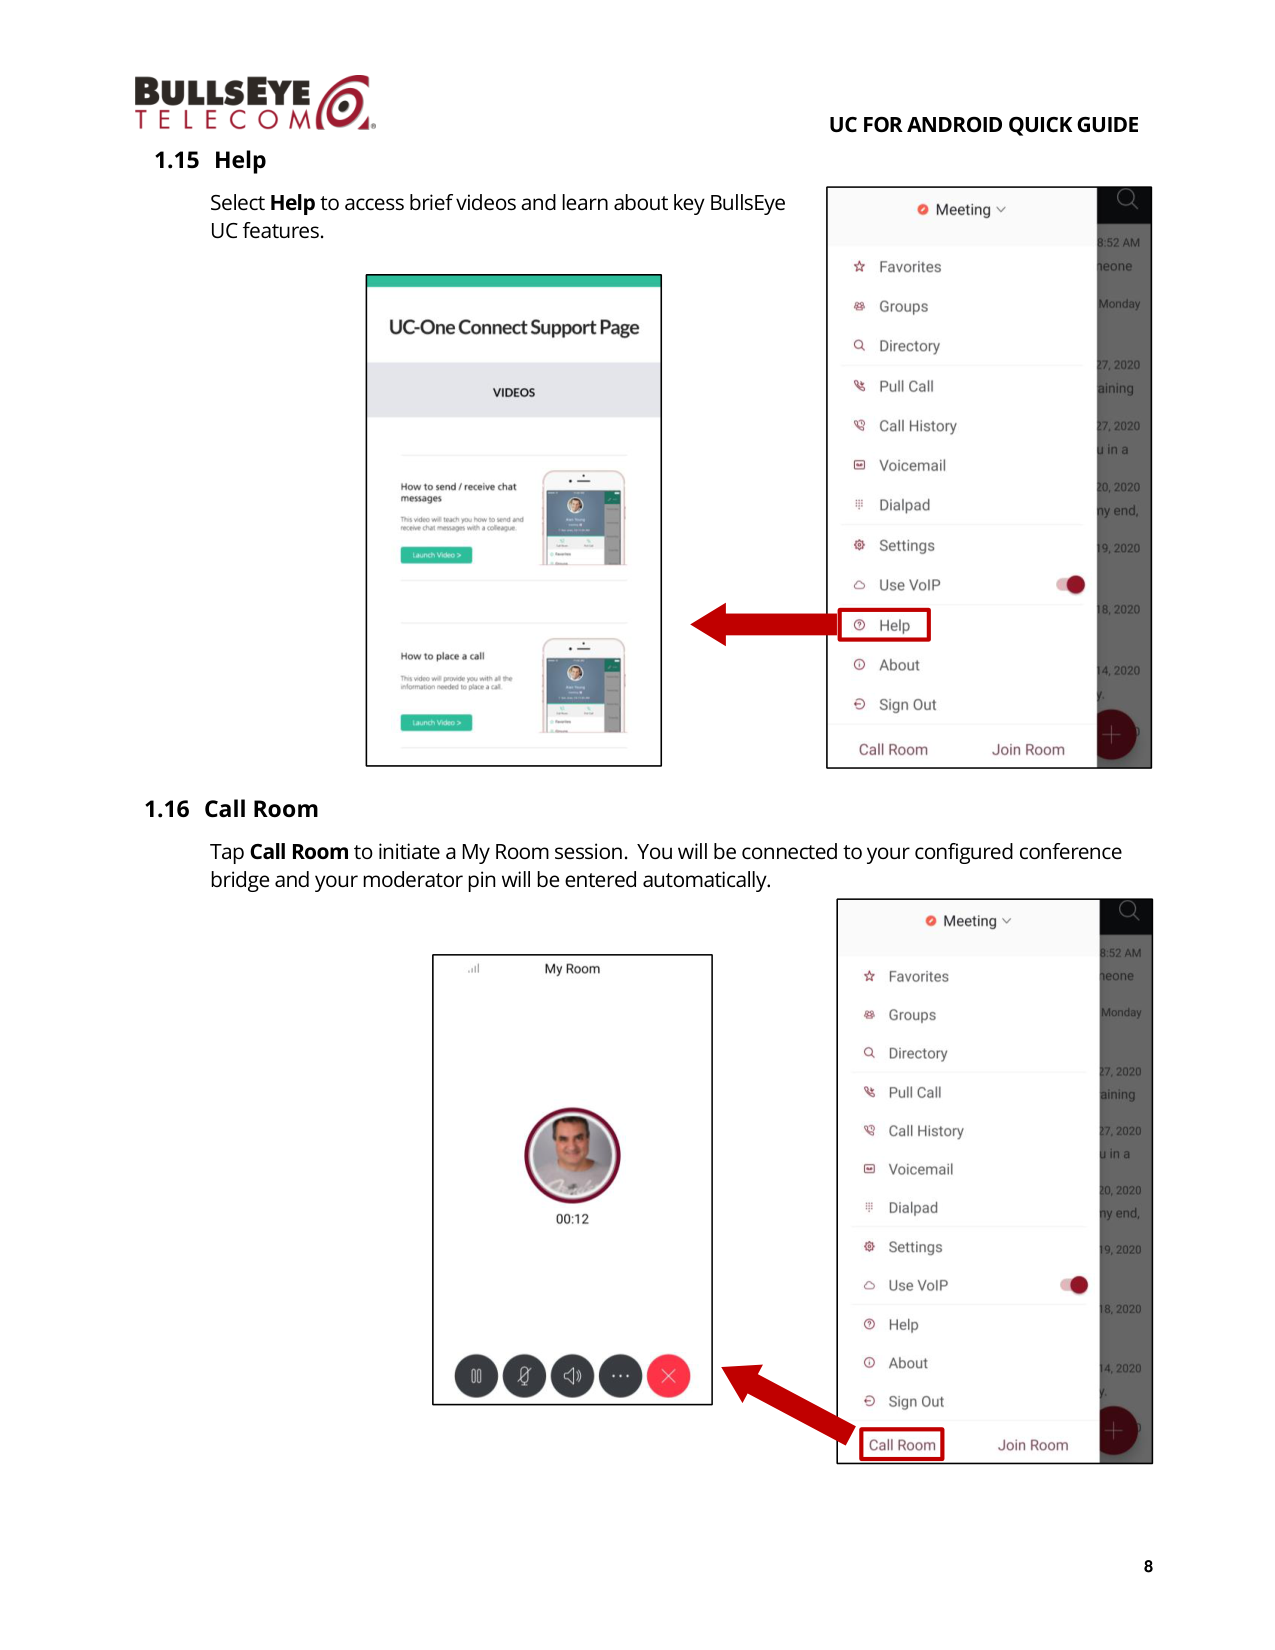
1.15 Help
Select Help to access brief videos and learn about key BullsEye
UC features.
1.16 Call Room
Tap Call Room to initiate a My Room session. You will be connected to your configured conference
bridge and your moderator pin will be entered automatically.
UC FOR ANDROID QUICK GUIDE
9
1.17 Join Room
Tap Join Room to open your My Room. When finished, select
Leave Room.
1.18 Join Someone Else’s Room
1. From the Directory, search for and select the person whose
room you want to join.
2. Select Join Room.
Once in their room, you will be able to chat, call the room,
video conference, view participants and more.
3. When you are finished, select Leave Room from the
options menu in the upper right.
Call Room
View Participants
Leave Room
Chat
UC FOR ANDROID QUICK GUIDE
10
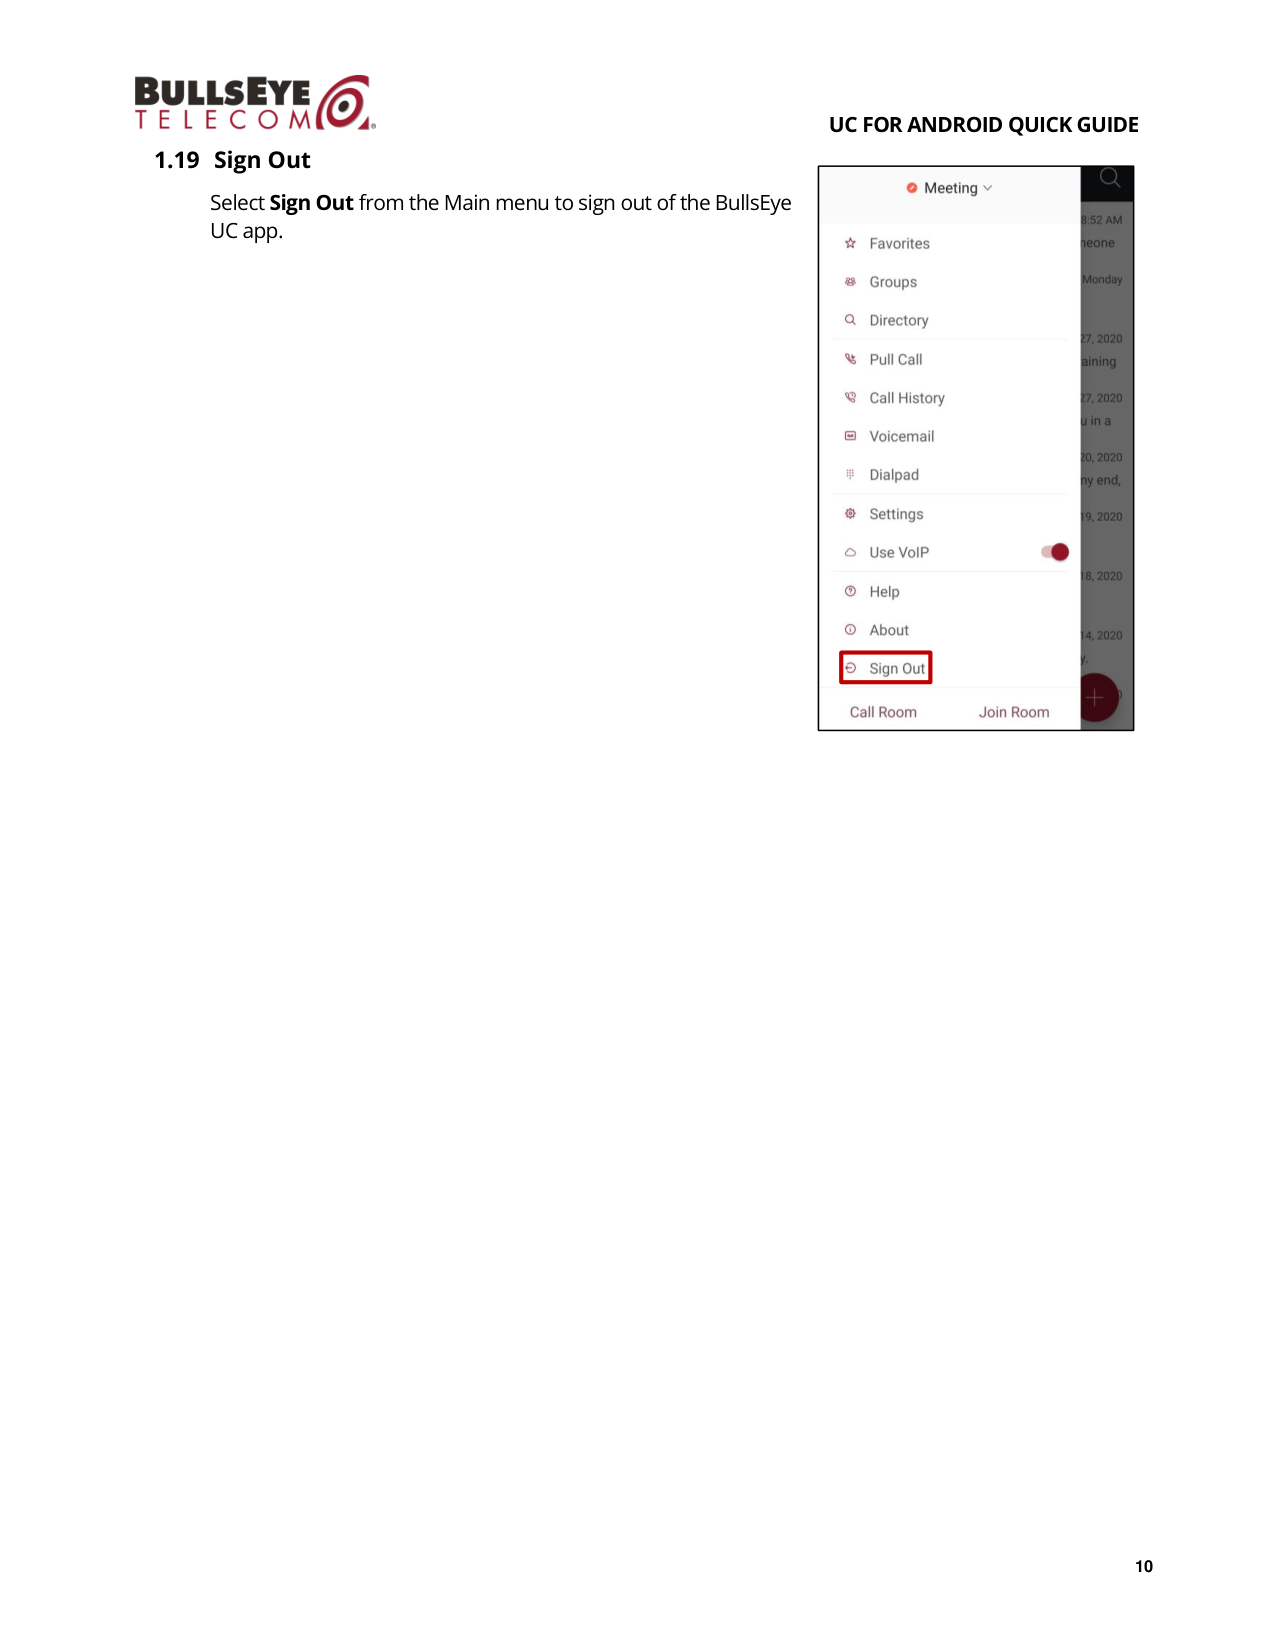
1.19 Sign Out
Select Sign Out from the Main menu to sign out of the BullsEye
UC app.