
VoIP Phone Installation Quick Guide
Summary: This quick guide covers basic self-installation instructions for Polycom and Panasonic handsets.
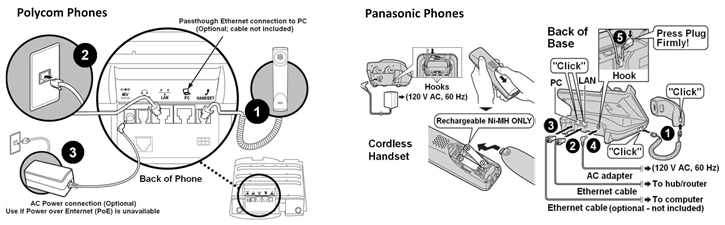
See Attachments in the upper left
1. Unpack phone.
2. Connect your handset to the power supply and your network.
3. Wait for the phone to initialize. Once initialized, the display will show the date and time.
4. Make outbound and inbound test calls.
a. If your phone was assigned a new phone number, you should be able to make both outbound and inbound calls upon receiving your handset.
b. If your phone was assigned to an existing (ported) phone number, you can make outbound calls. However, you will be unable to receive inbound calls until your port date.
5. If you were able to successfully complete outbound/inbound test calls, continue to step 6. Otherwise, refer to the following troubleshooting steps.
a. If your port date was within the past 24 hours, your phone number may not have been ported yet. Confirm your port date with your Order Manager.
b. If you have confirmed your phone number has been ported, ensure that the phone cable is plugged in and the phone has power.
c. If the problem persists, your firewall may be blocking in-bound traffic. Contact your internet service provider (ISP) and explain that you are unable to receive inbound calls through your third-party SIP provider. Ask them to check if the router’s firewall is blocking SIP-specific ports, and if so, have them deactivate your firewall settings for calls. Once this is complete, perform a test call while the representative is on the line.
d. If after performing the above Steps a-c, you are still unable to successfully complete outbound/inbound calls, contact BullsEye Client Services at 1-877-638-2855 for further assistance.
6. Set-up Voicemail. Press *62 on your handset and follow the prompts to set-up your Voicemail. When prompted to enter your passcode, enter 19992005. You will be prompted to create a new personal passcode (6-digits minimum). For more details, see BullsEye VoiceMail Setup Instructions .
7. Personalize your phone by setting up call management features as desired. To personalize your phone using the Feature Access Codes, refer to Using VoIP Feature Access Codes .
8. If you are the VoIP Portal Administrator, refer to the following links to configure your Hunt Group(s) and Auto Attendant(s) as applicable: