
BullsEye Unified Communications User Guide for iOS Tablet
Summary: This is the detailed BullsEye Unified Communications (UC) User Guide for the iOS (Apple) tablet.
Download article(s)
![]() BullsEye Unified Communications User Guide for iOS Tablet.pdf
BullsEye Unified Communications User Guide for iOS Tablet.pdf
BullsEye Unified Communications User Guide for iOS Tablet


BullsEye Unified Communications for (iOS Tablet)
User Guide
Release 22.5.1
Document Version 1
BULLSEYE UNIFIED COMMUNICATIONS (IOS TABLET) USER GUIDE
©2018 BULLSEYE TELECOM, INC.
PAGE 2
BullsEye Unified Communications for (iOS Tablet)® Guide
Copyright Notice
Copyright© 2018 Bullseye Telecom, Inc.
All rights reserved.
Any technical documentation that is made available by Bullseye Telecom, Inc. is
proprietary and confidential and is considered the copyrighted work of Bullseye
Telecom, Inc.
This publication is for distribution under Bullseye Telecom non-disclosure agreement
only. No part of this publication may be duplicated without the express written
permission of Bullseye Telecom, Inc., 25925 Telegraph Road, Southfield, MI 48033.
Bullseye Telecom reserves the right to make changes without prior notice.
Trademarks
Any product names mentioned in this document may be trademarks or registered
trademarks of Bullseye Telecom or their respective companies and are hereby
acknowledged.
This document is printed in the United States of America.
BULLSEYE UNIFIED COMMUNICATIONS (IOS TABLET) USER GUIDE
©2018 BULLSEYE TELECOM, INC.
PAGE 3
Table of Contents
1
About BullsEye Unified Communications for iOS Tablet ......................................................6
3
Main Tabs ........................................................................................................................................8
4
Contacts ....................................................................................................................................... 10
4.1
Contact Card .............................................................................................................................. 10
4.2
Add Contacts ............................................................................................................................. 10
4.3
Edit Contacts .............................................................................................................................. 11
4.4
Filters .......................................................................................................................................... 11
4.5
Sort and Display Order .............................................................................................................. 11
5
Availability.................................................................................................................................... 13
6
Instant Messaging ...................................................................................................................... 15
6.1
Chat Tab .................................................................................................................................... 15
6.2
Chat ............................................................................................................................................ 16
6.3
Group Chat ................................................................................................................................ 16
7
Audio and Video Calls ............................................................................................................... 18
7.1
Dial Pad Tab .............................................................................................................................. 18
7.2
Make Audio or Video Calls ........................................................................................................ 19
7.3
Answer Call ................................................................................................................................ 19
7.4
CallKit ......................................................................................................................................... 19
7.4.1
Answer Incoming VoIP Call on Locked Screen .............................................................. 19
7.4.2
Answer Incoming VoIP Call on Unlocked Screen .......................................................... 19
7.4.3
Receive Second Incoming Call (Call Waiting) ................................................................ 20
7.4.4
Integration with Native Contacts and Call History ........................................................... 20
7.5
In Call Actions ............................................................................................................................ 20
7.6
Missed Calls and New Messages ............................................................................................ 20
7.7
Message Waiting Indicator and Voice Mail Access ................................................................. 21
7.8
Business Line Call Back ............................................................................................................ 21
7.9
Contact Name Lookup for Incoming Calls and Call Logs ....................................................... 21
7.10 N-Way Calling (Conference) ..................................................................................................... 21
7.11 Call Waiting ................................................................................................................................ 21
7.12 New Call ..................................................................................................................................... 21
7.13 Call Transfer............................................................................................................................... 22
7.14 Swipe Between Chat, Audio/Video, and Screen Share Communication Views .................... 22
7.15 Seamless Call Handover for VoIP Calls ................................................................................... 22
8
Call History .................................................................................................................................. 23
9
Settings......................................................................................................................................... 24
9.1
Call Settings ............................................................................................................................... 24
9.1.1
Call Forwarding ................................................................................................................. 24
9.1.2
Do Not Disturb .................................................................................................................. 24
BULLSEYE UNIFIED COMMUNICATIONS (IOS TABLET) USER GUIDE
©2018 BULLSEYE TELECOM, INC.
PAGE 4
9.1.3
BullsEye Unified CommunicationsAnywhere .................................................................. 25
9.1.4
Remote Office ................................................................................................................... 25
9.2
Preferences ................................................................................................................................ 25
9.2.1
Language Support ............................................................................................................ 26
9.2.2
Caller ID Lookup ............................................................................................................... 26
9.2.3
Device ID ........................................................................................................................... 26
9.2.4
Troubleshooting ................................................................................................................ 26
9.3
About .......................................................................................................................................... 27
9.4
Test Call ..................................................................................................................................... 27
9.5
Help Page .................................................................................................................................. 27
9.6
Sign Out ..................................................................................................................................... 27
10 My Room ...................................................................................................................................... 28
10.1 Guest Client ............................................................................................................................... 28
11 BullsEye Unified Communications and iPad Settings ........................................................ 29
12 Screen Share ............................................................................................................................... 30
13 Search ........................................................................................................................................... 31
14 Push Notifications ...................................................................................................................... 32
14.1 Push Notifications for Incoming Calls ....................................................................................... 32
14.2 Push Notifications for Chat Messages ..................................................................................... 32
15 Multi-Device Support ................................................................................................................. 34
15.1 Message History and Message Read Status Synchronization ............................................... 34
16 Other Features ............................................................................................................................ 35
16.1 Version Control .......................................................................................................................... 35
16.2 Privacy Management ................................................................................................................ 35
16.3 Firewalls and NATs ................................................................................................................... 35
16.4 Failover and Failback ................................................................................................................ 35
16.5 Secure VoIP Communication ................................................................................................... 35
16.6 VoIP Quality of Service ............................................................................................................. 35
16.7 Emergency Call Address Change Service ............................................................................... 36
Acronyms and Abbreviations .......................................................................................................... 37
Appendix A: Third-Party Software and Copyright ...................................................................... 38
BULLSEYE UNIFIED COMMUNICATIONS (IOS TABLET) USER GUIDE
©2018 BULLSEYE TELECOM, INC.
PAGE 5
List of Figures
Figure 1 Main View ..................................................................................................................................... 8
Figure 2 Contact Info Screen ................................................................................................................... 12
Figure 3 Chat Tab ..................................................................................................................................... 15
Figure 4 Dial Pad Tab .............................................................................................................................. 18
BULLSEYE UNIFIED COMMUNICATIONS (IOS TABLET) USER GUIDE
©2018 BULLSEYE TELECOM, INC.
PAGE 6
1
About BullsEye Unified Communicationsfor iOS Tablet
BullsEye Unified Communicationsfor iOS Tablet provides the following communication
features:
◼
Instant Messaging and Presence (IM&P)
◼
Voice Calling (VoIP)
◼
Voice Calling (circuit-switched)
◼
Video Calling
◼
BullsEye Unified CommunicationsCall Settings
BULLSEYE UNIFIED COMMUNICATIONS (IOS TABLET) USER GUIDE
©2018 BULLSEYE TELECOM, INC.
PAGE 7
2
Get Started
This section contains the essential information for getting started with Unified
Communications.
2.1
Installation
Download the BullsEye Unified Communicationsapp from the App Store®
(search “Bullseye UC”) and then install on your iPad.
2.2
Sign In
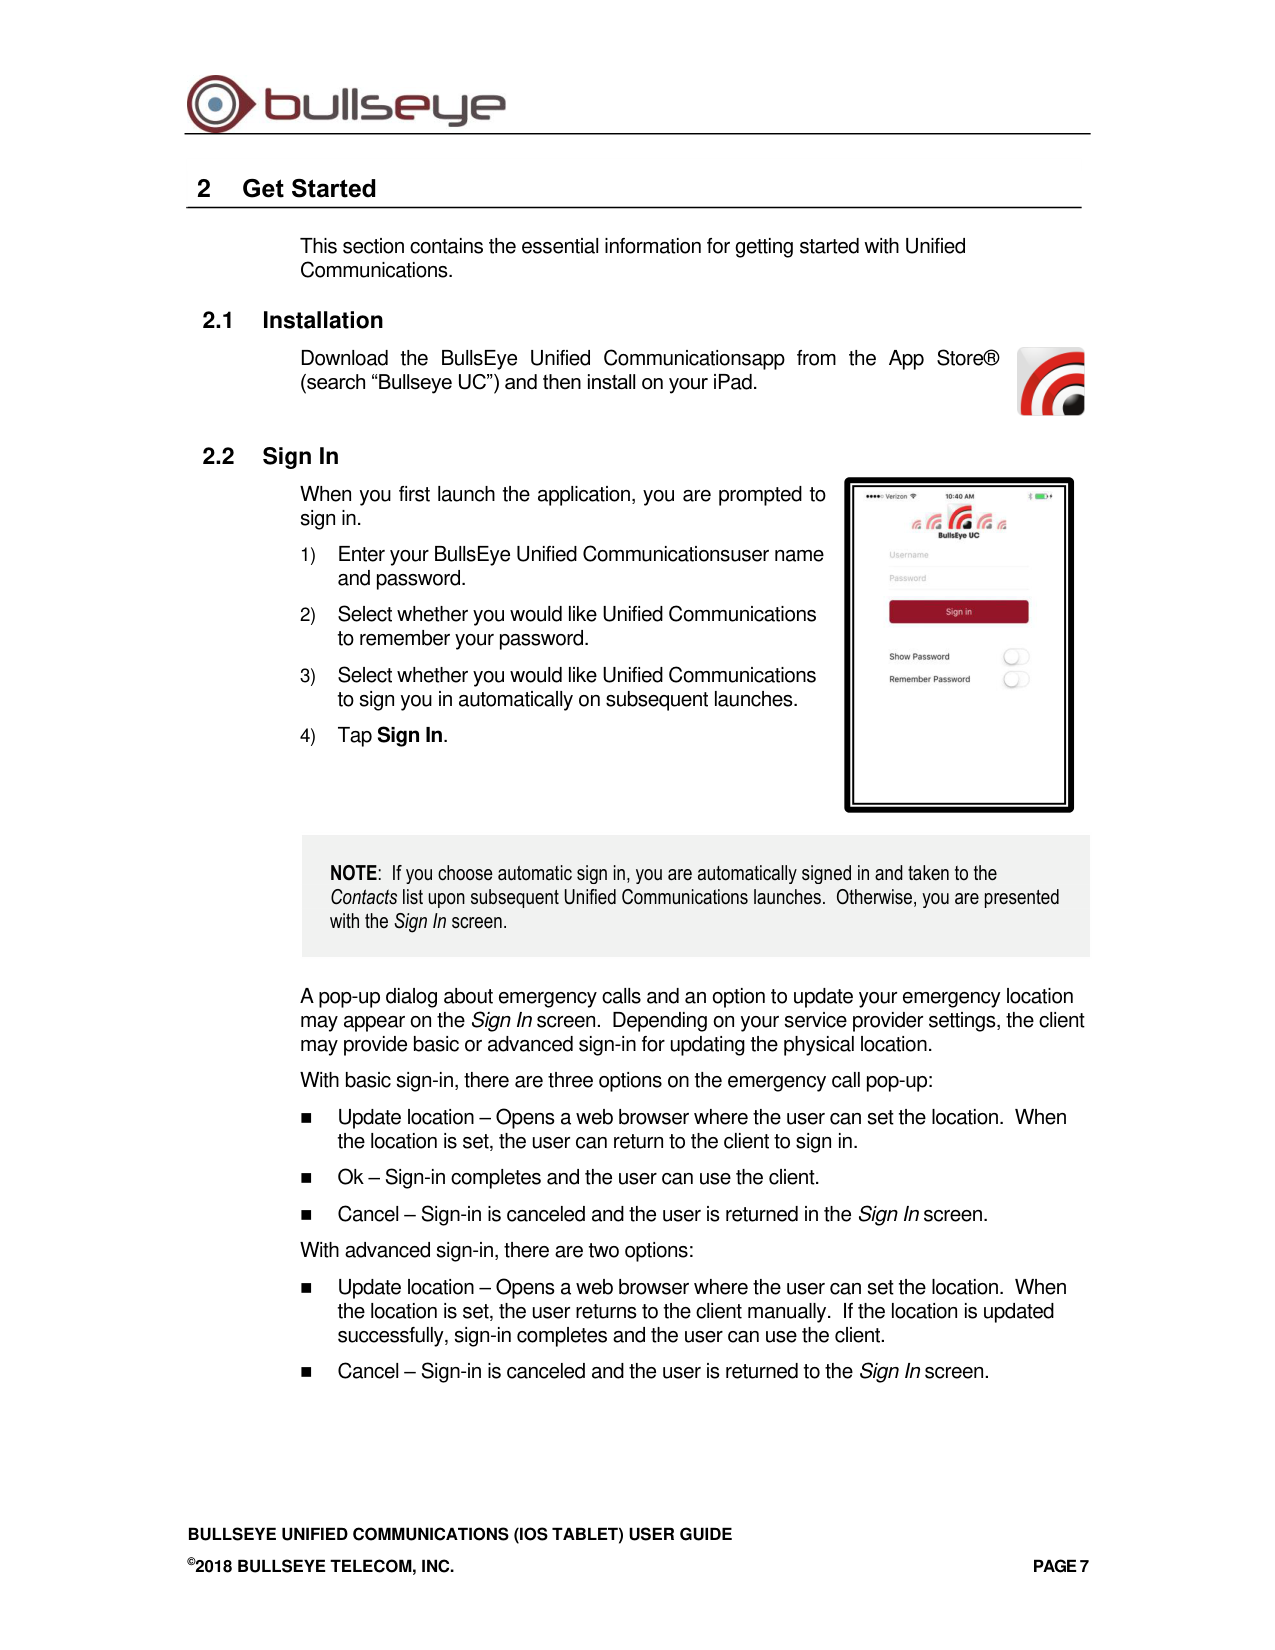
When you first launch the application, you are prompted to
sign in.
1) Enter your BullsEye Unified Communicationsuser name
and password.
2) Select whether you would like Unified Communications
to remember your password.
3) Select whether you would like Unified Communications
to sign you in automatically on subsequent launches.
4) Tap Sign In.
NOTE: If you choose automatic sign in, you are automatically signed in and taken to the
Contacts list upon subsequent Unified Communications launches. Otherwise, you are presented
with the Sign In screen.
A pop-up dialog about emergency calls and an option to update your emergency location
may appear on the Sign In screen. Depending on your service provider settings, the client
may provide basic or advanced sign-in for updating the physical location.
With basic sign-in, there are three options on the emergency call pop-up:
◼
Update location – Opens a web browser where the user can set the location. When
the location is set, the user can return to the client to sign in.
◼
Ok – Sign-in completes and the user can use the client.
◼
Cancel – Sign-in is canceled and the user is returned in the Sign In screen.
With advanced sign-in, there are two options:
◼
Update location – Opens a web browser where the user can set the location. When
the location is set, the user returns to the client manually. If the location is updated
successfully, sign-in completes and the user can use the client.
◼
Cancel – Sign-in is canceled and the user is returned to the Sign In screen.
BULLSEYE UNIFIED COMMUNICATIONS (IOS TABLET) USER GUIDE
©2018 BULLSEYE TELECOM, INC.
PAGE 8
3
Main Tabs
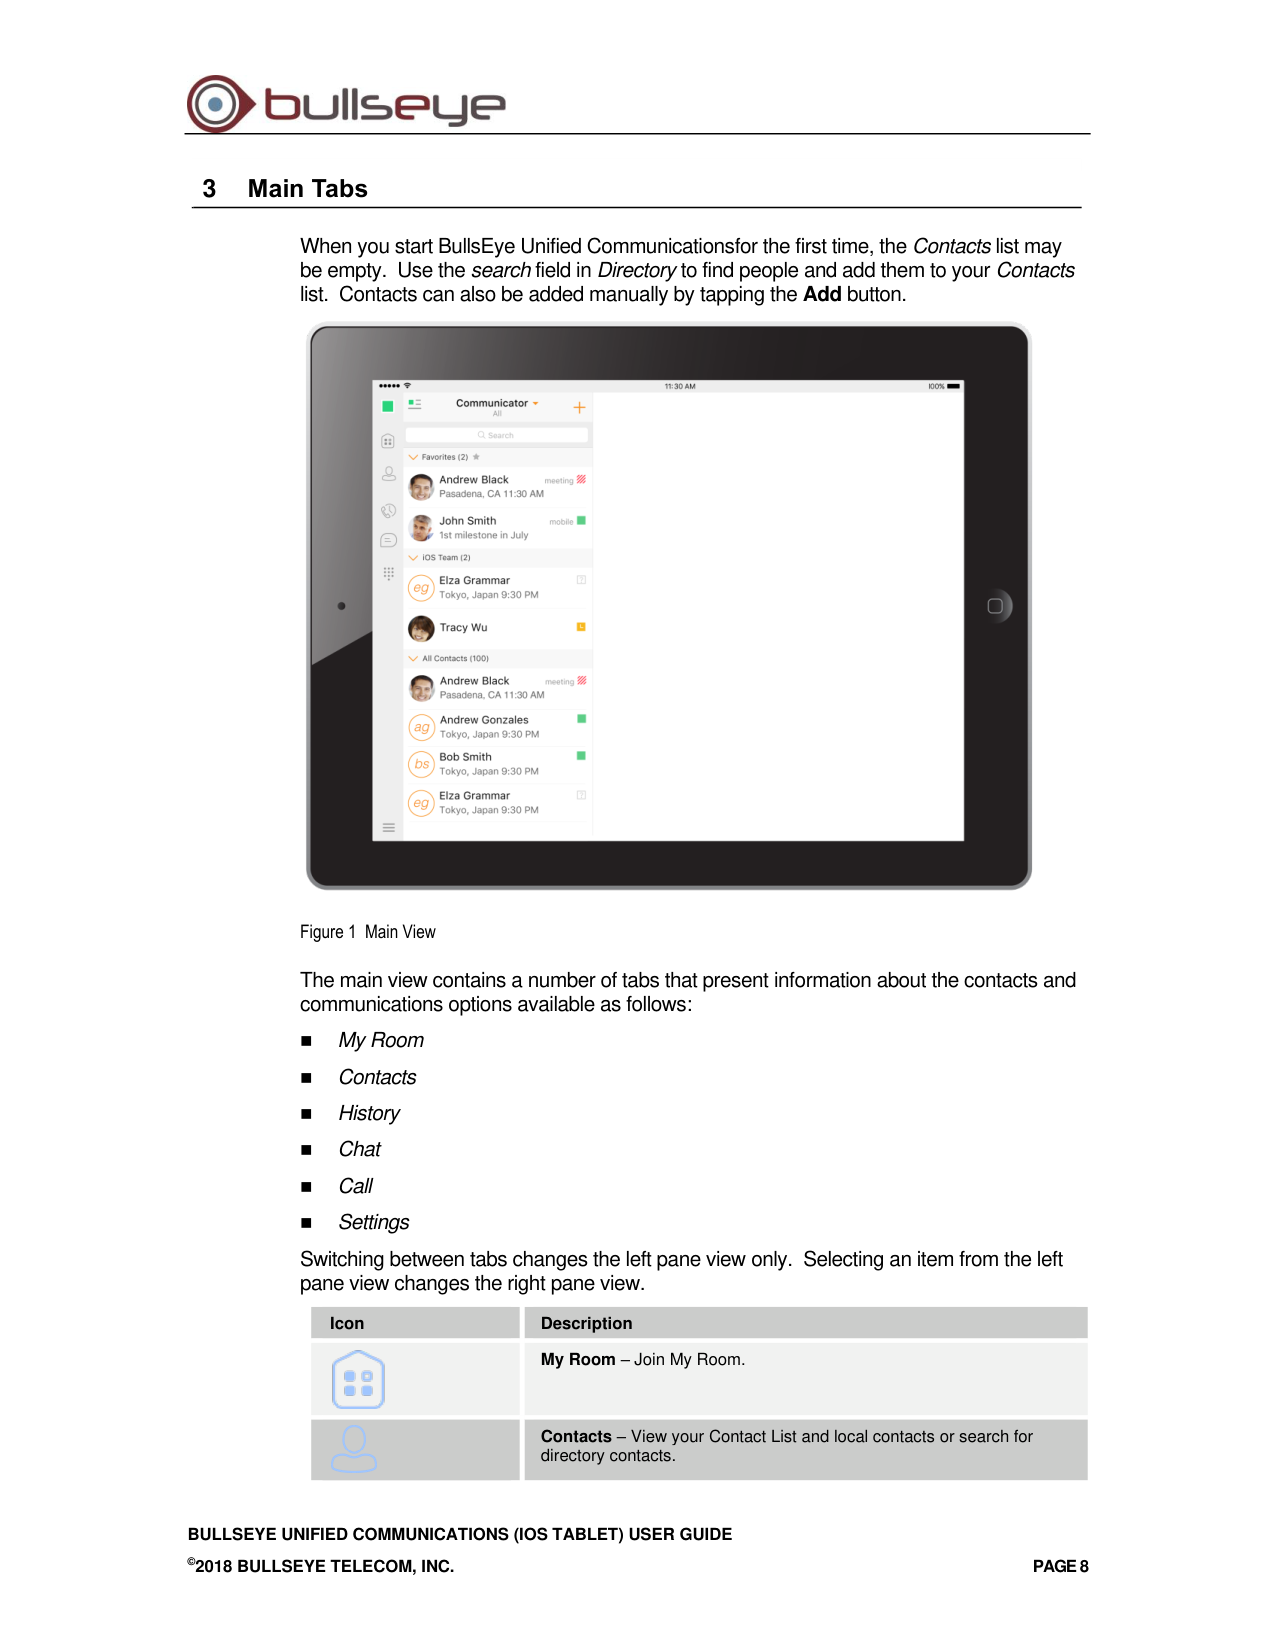
When you start BullsEye Unified Communicationsfor the first time, the Contacts list may
be empty. Use the search field in Directory to find people and add them to your Contacts
list. Contacts can also be added manually by tapping the Add button.
Figure 1 Main View
The main view contains a number of tabs that present information about the contacts and
communications options available as follows:
◼
My Room
◼
Contacts
◼
History
◼
Chat
◼
Call
◼
Settings
Switching between tabs changes the left pane view only. Selecting an item from the left
pane view changes the right pane view.
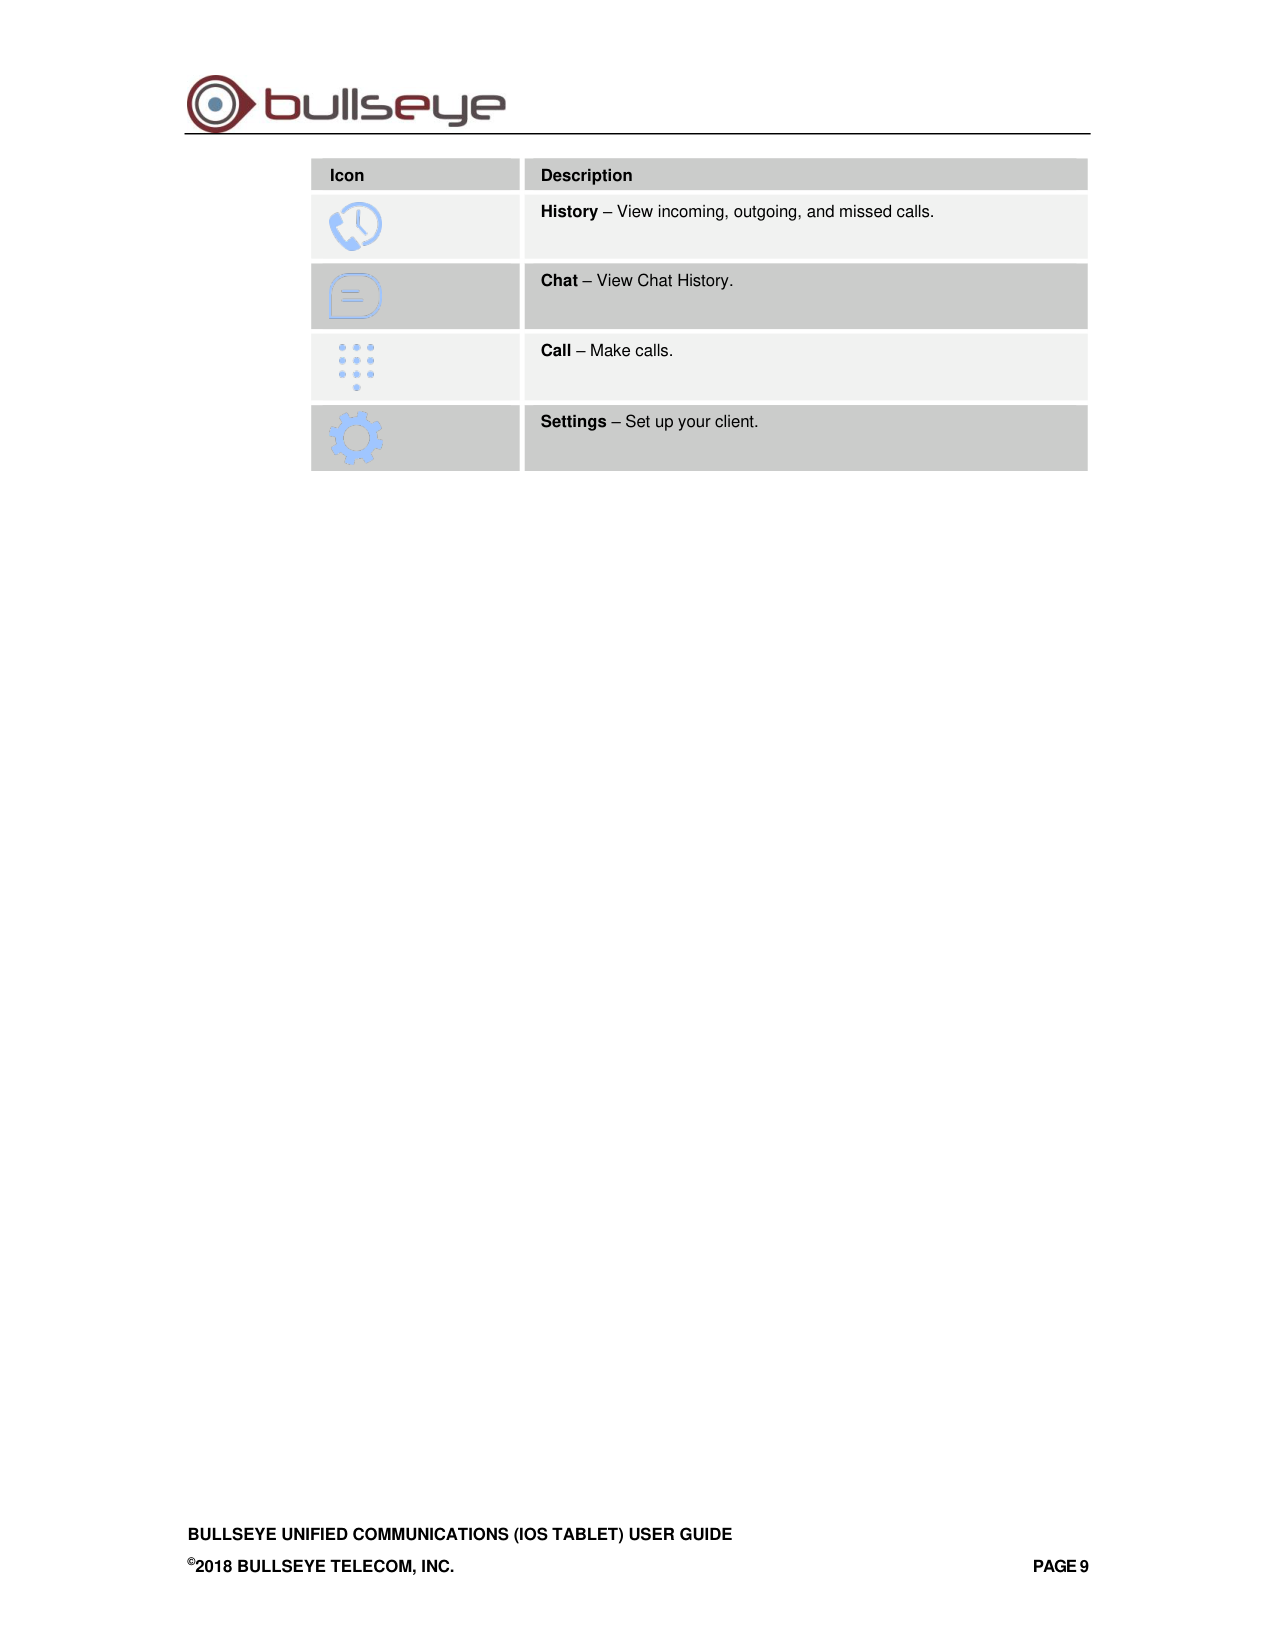
Icon
Description
My Room – Join My Room.
Contacts – View your Contact List and local contacts or search for
directory contacts.
BULLSEYE UNIFIED COMMUNICATIONS (IOS TABLET) USER GUIDE
©2018 BULLSEYE TELECOM, INC.
PAGE 9
Icon
Description
History – View incoming, outgoing, and missed calls.
Chat – View Chat History.
Call – Make calls.
Settings – Set up your client.
BULLSEYE UNIFIED COMMUNICATIONS (IOS TABLET) USER GUIDE
©2018 BULLSEYE TELECOM, INC.
PAGE 10
4
Contacts
The Contacts List in contact tab can contain different types of contacts as follows:
◼
Presence-enabled contacts
◼
Non-presence-enabled contacts
Any contact can be marked as a favorite and it appears at the top of the Contacts list in
the Favorites section.
Presence-enabled contacts are users with an Extensible Messaging and Presence
Protocol (XMPP) address. These can be other BullsEye Unified Communicationsusers or
users from federated systems such as Google Talk. Non-presence-enabled contacts can
be phone or conference numbers.
Contacts can also be organized in Groups.
The Contacts tab contains:
◼
Contacts list
◼
Local contacts
◼
Directory contacts
Directory provides the company directory contacts. The Local Contact List provides the
contacts from the local phone book.
4.1
Contact Card
The contact card displays information about a contact based on the contact type. This
includes BullsEye Unified Communications contacts, Local Address Book contacts, and
contacts from directory search results.
You can initiate a call or chat session directly from the contact card. This includes joining
another contact's My Room or dialing a My Room audio bridge from a directory contact
search result.
If the contact has an associated email address, then the application supports sending an
email to the contact by launching the native email client on the mobile device.
4.2
Add Contacts
When you sign in for the first time, there are no contacts on your Contacts list. Add a new
presence-enable contact at any time by selecting the option Add Contact from the plus
icon in the navigation bar. Another way to add new contacts is to use the directory search
option from the Contacts tab.
In the Add Contact screen, enter the contact’s information and then select Done. By
default, your presence information is always shared with a new contact if an XMPP
address is provided.
If you receive a contact request, you can ignore or accept it. If you ignore the contact
request, you can always share your presence information later by selecting Subscribe
from the contact card. Note that the contact must accept your subscription request for you
to establish the presence relationship successfully.
BULLSEYE UNIFIED COMMUNICATIONS (IOS TABLET) USER GUIDE
©2018 BULLSEYE TELECOM, INC.
PAGE 11
Add a conference number by selecting the same option Add Contact from plus icon in the
navigation bar by typing a conference number. You can also add a conference number
from directory search. A conference contact is a special contact used for conference
bridges to avoid having to remember a PIN code and a conference number, for example,
for a recurring conference.
Add a local contact by selecting the Add Local Contact option using the plus icon in the
navigation bar. The Add Local Contact option opens the native Address Book for adding a
new contact in the local phone book.
Add a group in contacts list by selecting Add Group using the plus icon in the navigation
bar. Type a group name and select contacts that you want to be in the group then select
Done.
4.3
Edit Contacts
Tap a contact entry from the Contacts list to open a contact card. This is the same for
presence-enabled and non-presence-enabled contacts.
◼
Edit opens the Contact Information dialog box where you can add, edit, or remove
information. This works for both presence-enabled and non-presence-enabled
contacts.
◼
Unsubscribe removes the presence relationship between you and that contact. This
means you do not see the contact’s presence information and your contact does not
see your information. Select Subscribe to re-establish the presence relationship. An
unsubscribed contact remains on your Contacts list and is always shown as “offline”.
◼
Remove contact removes the contact from your Contacts list.
4.4
Filters
There are four contact filters available from the Contacts tab:
◼
All – Shows all presence-enabled and non-presence-enabled contacts.
◼
Online – Shows only the presence-enabled contacts that are currently online.
◼
Local Address Book – Shows the contacts from your local phone book.
◼
Directory – Shows the contacts from a company directory (which requires a search).
4.5
Sort and Display Order
The sort and display order for contacts is based on phone settings: Settings → Mail,
Contacts, Calendars → Contacts for iOS 9 and lower, or Settings → Contacts for iOS 10.
◼
Display order – display First name or Last name first
◼
Sort order – sort by First name or Last name
◼
Short name – format of the name to be used in chat lists
NOTE 1: Short names are not supported on iOS 8. On iOS 8, the application always uses the
full names for display in such lists.
NOTE 2: Asian names – Chinese, Japanese, and Korean (CJK):
On Android, Asian names (CJK) are not dependent on the above settings. Asian names are
always sorted by Last name, and displayed with Last name first. For Asian names, the short
name format is always the full name.
BULLSEYE UNIFIED COMMUNICATIONS (IOS TABLET) USER GUIDE
©2018 BULLSEYE TELECOM, INC.
PAGE 12
On iOS, Asian names are sorted based on the iOS system settings; however, the display order
is always Last name first, and the short name format is always the full name.
Local Contacts
Local contacts are ordered in groups by letter, based on the first letter of their display
name. There is no further ordering within the group.
All contacts whose display name starts with non-Latin characters are put in the # group.
The display name of a local contact is taken from the first name, middle name, and last
name. If names are missing, the display name is taken from the JID field.
If all of the above are missing, then the phone number is used for the display name.
Figure 2 Contact Info Screen
BULLSEYE UNIFIED COMMUNICATIONS (IOS TABLET) USER GUIDE
©2018 BULLSEYE TELECOM, INC.
PAGE 13
5
Availability
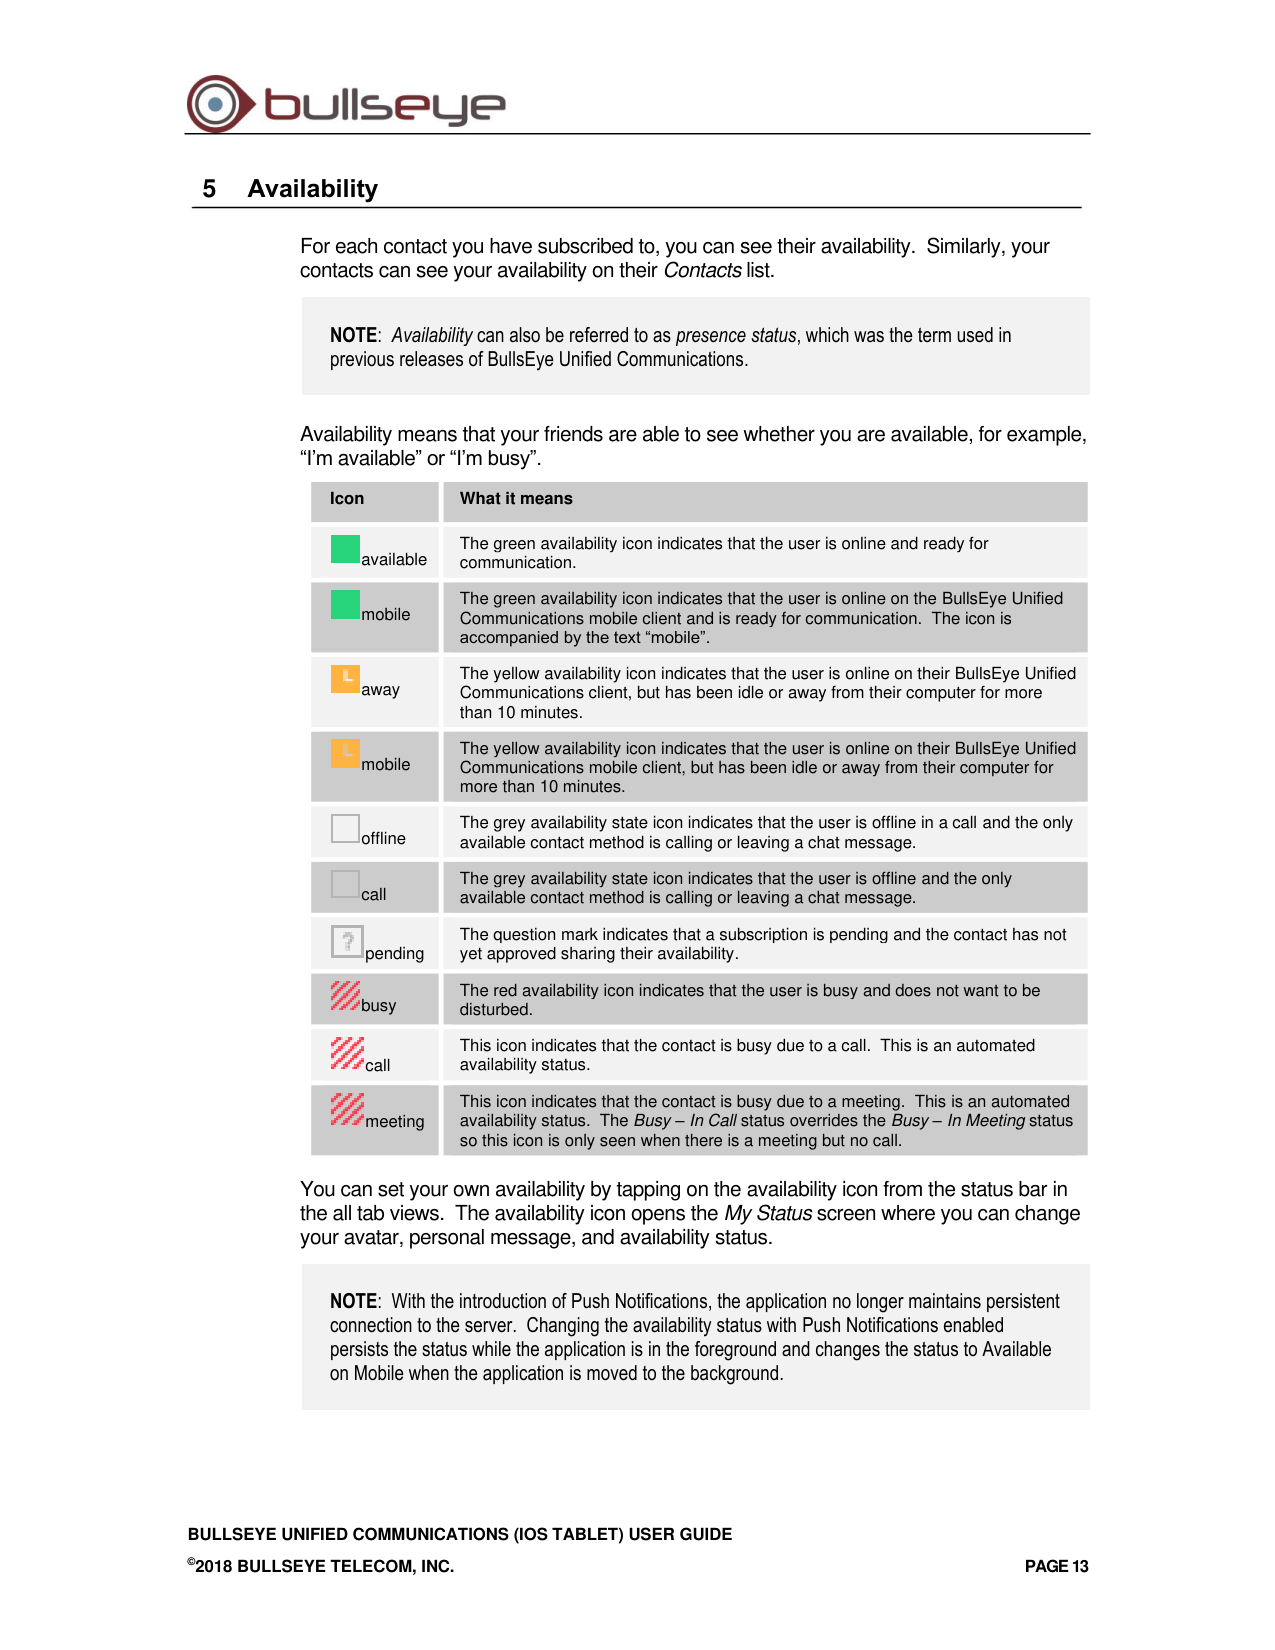
For each contact you have subscribed to, you can see their availability. Similarly, your
contacts can see your availability on their Contacts list.
NOTE: Availability can also be referred to as presence status, which was the term used in
previous releases of BullsEye Unified Communications.
Availability means that your friends are able to see whether you are available, for example,
“I’m available” or “I’m busy”.
Icon
What it means
available
The green availability icon indicates that the user is online and ready for
communication.
mobile
The green availability icon indicates that the user is online on the BullsEye Unified
Communications mobile client and is ready for communication. The icon is
accompanied by the text “mobile”.
away
The yellow availability icon indicates that the user is online on their BullsEye Unified
Communications client, but has been idle or away from their computer for more
than 10 minutes.
mobile
The yellow availability icon indicates that the user is online on their BullsEye Unified
Communications mobile client, but has been idle or away from their computer for
more than 10 minutes.
offline
The grey availability state icon indicates that the user is offline in a call and the only
available contact method is calling or leaving a chat message.
call
The grey availability state icon indicates that the user is offline and the only
available contact method is calling or leaving a chat message.
pending
The question mark indicates that a subscription is pending and the contact has not
yet approved sharing their availability.
busy
The red availability icon indicates that the user is busy and does not want to be
disturbed.
call
This icon indicates that the contact is busy due to a call. This is an automated
availability status.
meeting
This icon indicates that the contact is busy due to a meeting. This is an automated
availability status. The Busy – In Call status overrides the Busy – In Meeting status
so this icon is only seen when there is a meeting but no call.
You can set your own availability by tapping on the availability icon from the status bar in
the all tab views. The availability icon opens the My Status screen where you can change
your avatar, personal message, and availability status.
NOTE: With the introduction of Push Notifications, the application no longer maintains persistent
connection to the server. Changing the availability status with Push Notifications enabled
persists the status while the application is in the foreground and changes the status to Available
on Mobile when the application is moved to the background.
BULLSEYE UNIFIED COMMUNICATIONS (IOS TABLET) USER GUIDE
©2018 BULLSEYE TELECOM, INC.
PAGE 14
Your avatar is the picture that represents you in your friends’ Contacts lists and in chat
screens. Tapping on an avatar opens a dialog with options to select an existing image, to
take a new one with your device’s camera, or to clear your avatar.
You can enter a status message in the area next to the avatar. This status text is shown
in your friends’ Contacts lists.
If you see the error message “Chat Unavailable” under any tab, it means that XMPP
connectivity has been lost for chat and availability; however, you can still make calls. In
this case, you should contact your service provider.
The availability update is only triggered by appointments and meetings that are either
accepted by the user or made by them. All-day meetings do not trigger an availability
change to Busy – In Meeting.
BULLSEYE UNIFIED COMMUNICATIONS (IOS TABLET) USER GUIDE
©2018 BULLSEYE TELECOM, INC.
PAGE 15
6
Instant Messaging
6.1
Chat Tab
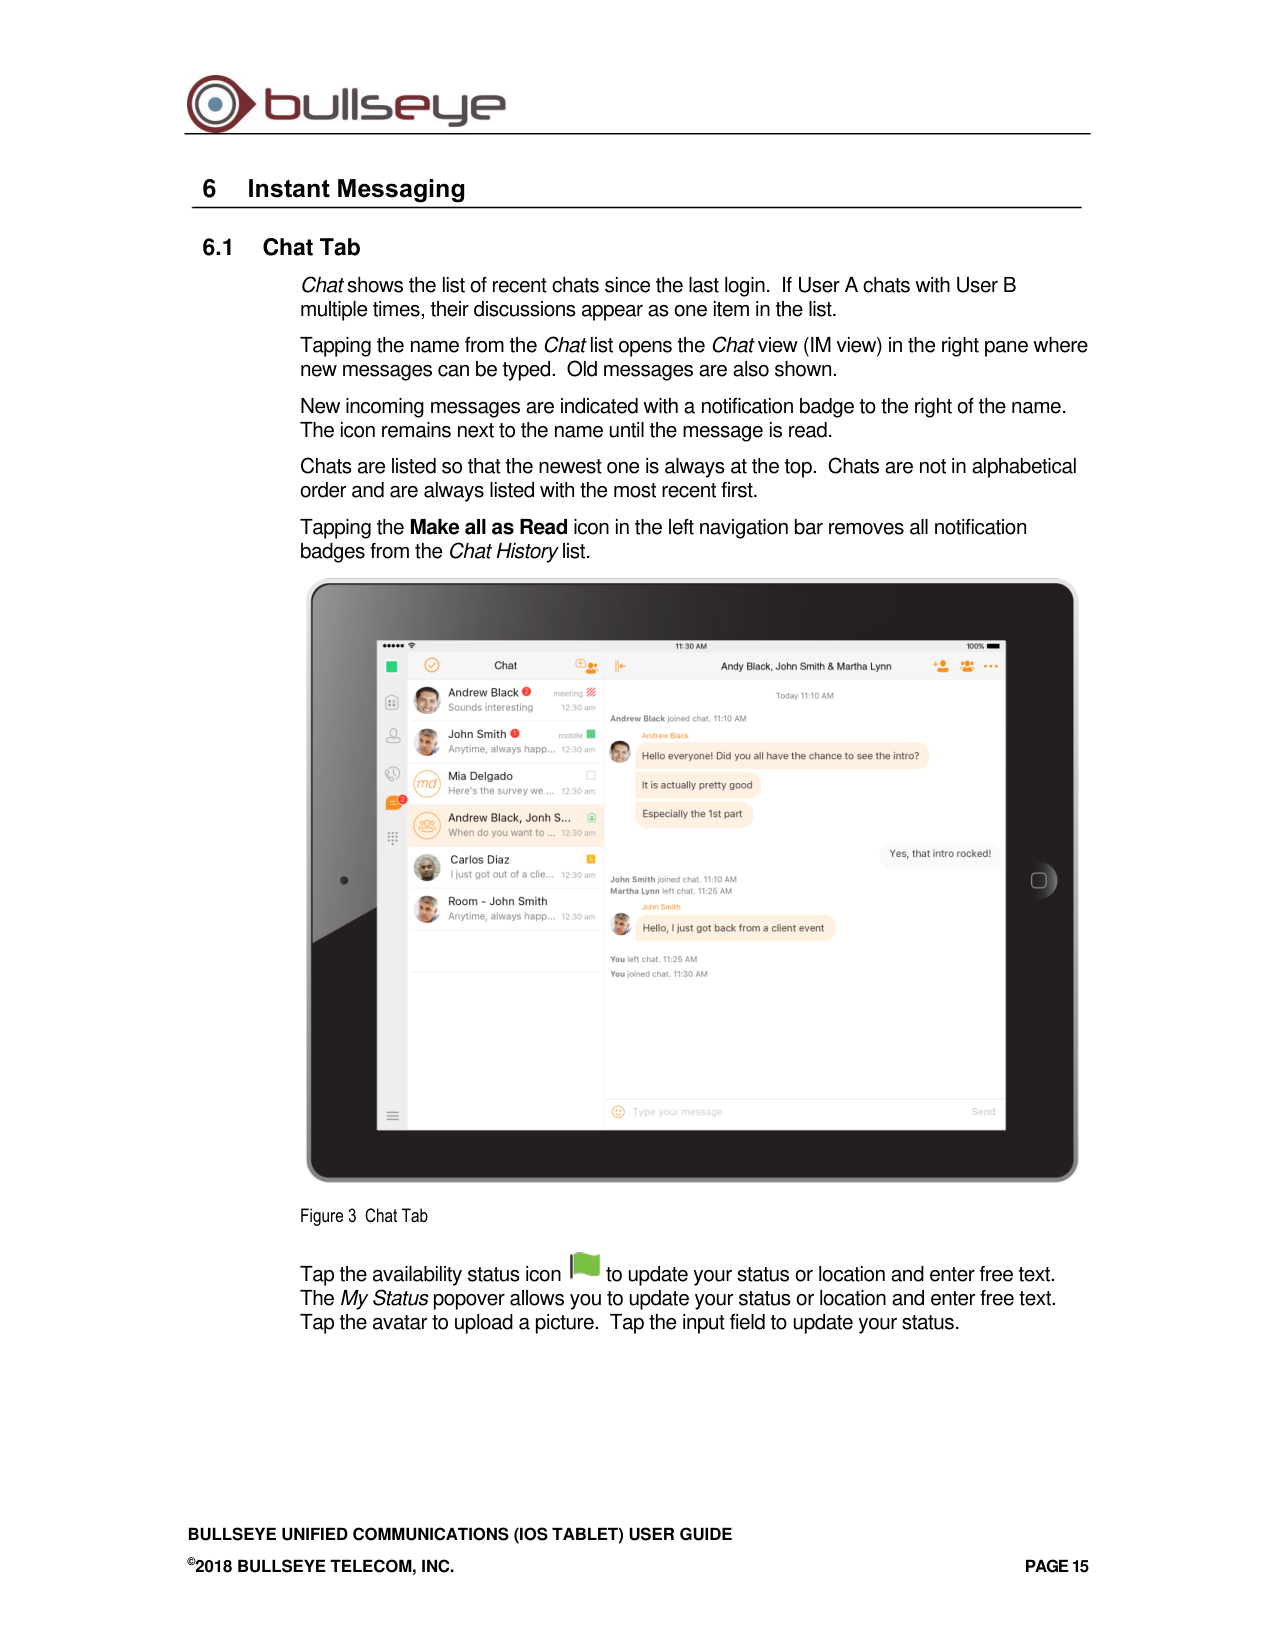
Chat shows the list of recent chats since the last login. If User A chats with User B
multiple times, their discussions appear as one item in the list.
Tapping the name from the Chat list opens the Chat view (IM view) in the right pane where
new messages can be typed. Old messages are also shown.
New incoming messages are indicated with a notification badge to the right of the name.
The icon remains next to the name until the message is read.
Chats are listed so that the newest one is always at the top. Chats are not in alphabetical
order and are always listed with the most recent first.
Tapping the Make all as Read icon in the left navigation bar removes all notification
badges from the Chat History list.
Figure 3 Chat Tab
Tap the availability status icon
to update your status or location and enter free text.
The My Status popover allows you to update your status or location and enter free text.
Tap the avatar to upload a picture. Tap the input field to update your status.
BULLSEYE UNIFIED COMMUNICATIONS (IOS TABLET) USER GUIDE
©2018 BULLSEYE TELECOM, INC.
PAGE 16
6.2
Chat
Start a chat using one of the following methods:
◼
From the Contact list, tap a contact to open the contact card. From the contact card,
choose the chat bubble icon to start a chat.
◼
In the Chat History list, tap a contact entry to start a chat.
When you initiate a chat, the Chat view opens in the right pane. To open chat in full
screen, tap the collapse icon
to hide the left pane. Selecting any tab from the vertical
menu or tapping on the expand icon
opens the left pane view. Chatting with a contact
is possible only when you are both online. If your contact initiates a chat, you see a
notification badge on the Chat tab and the entry appears on the top of Chat History list.
When the chat opens, the name of the recipient is on the top bar and there is an
availability icon flag before the name. The recipient messages are presented in the
orange background and the user is presented in white background.
A smiley can be added to a message by typing the corresponding character code or by
selecting a smiley icon. The smiley is displayed with its character code in the input text
area, and graphically in the chat area and when displayed to the remote party.
The text input field in Chat uses autocorrect, auto-cap, and spell check based on system
settings. Use the system settings to enable or disable these features.
Upon Clear History, the Chat History is removed from the view, but the chat view remains
open in case you want to continue chatting. If you navigate back to the chat list, then this
specific chat entry is removed from the list because there is no Chat History associated
with it.
Starting with Release 22.4.1, Mobile and Tablet clients support setting an IM retention
policy at the client level. The feature allows the client to be configured to store messages
for a specified number of days. Once the timeframe has passed, the client purges all
messages older than the timeframe specified.
6.3
Group Chat
Start a group chat using one of the following methods:
◼
In single chat session, tap the add participant icon
to escalate from a single to a
group chat.
◼
From the Chat tab, tap on the Crate Group Chat icon
to create group chat.
◼
In the Chat History list, tap a group communication entry to start a group chat.
When you initiate a group chat, the Chat screen opens. More people can be added later
to the chat using the Add participant icon. Anyone in the group chat can add
participants. Tapping on the View participant icon
opens a popover with the list of
group participants. To remove a participant, select the Edit button, choose a participant to
remove, and then select Done.
A group chat works the same way as a one-on-one chat. All messages from anyone are
sent to everyone else. A group Chat History is saved and is available to view later in the
Chat tab.
BULLSEYE UNIFIED COMMUNICATIONS (IOS TABLET) USER GUIDE
©2018 BULLSEYE TELECOM, INC.
PAGE 17
You can leave a group chat by selecting the Leave chat option from the More Options icon
in the right navigation pane. The chat is marked as “offline” and you no longer receive
messages from the chat. When tapping on the “offline” chat, you re-join the room and
start receiving messages. However, you do not receive messages that were sent in the
chat while you were outside of the room.
The Clear History menu item works the same way as the corresponding option in a one-
on-one chat and removes the local history.
The View Participants button opens a dialog that shows the list of participants in the
group chat.
Deleting a chat room is not supported.
BULLSEYE UNIFIED COMMUNICATIONS (IOS TABLET) USER GUIDE
©2018 BULLSEYE TELECOM, INC.
PAGE 18
7
Audio and Video Calls
7.1
Dial Pad Tab
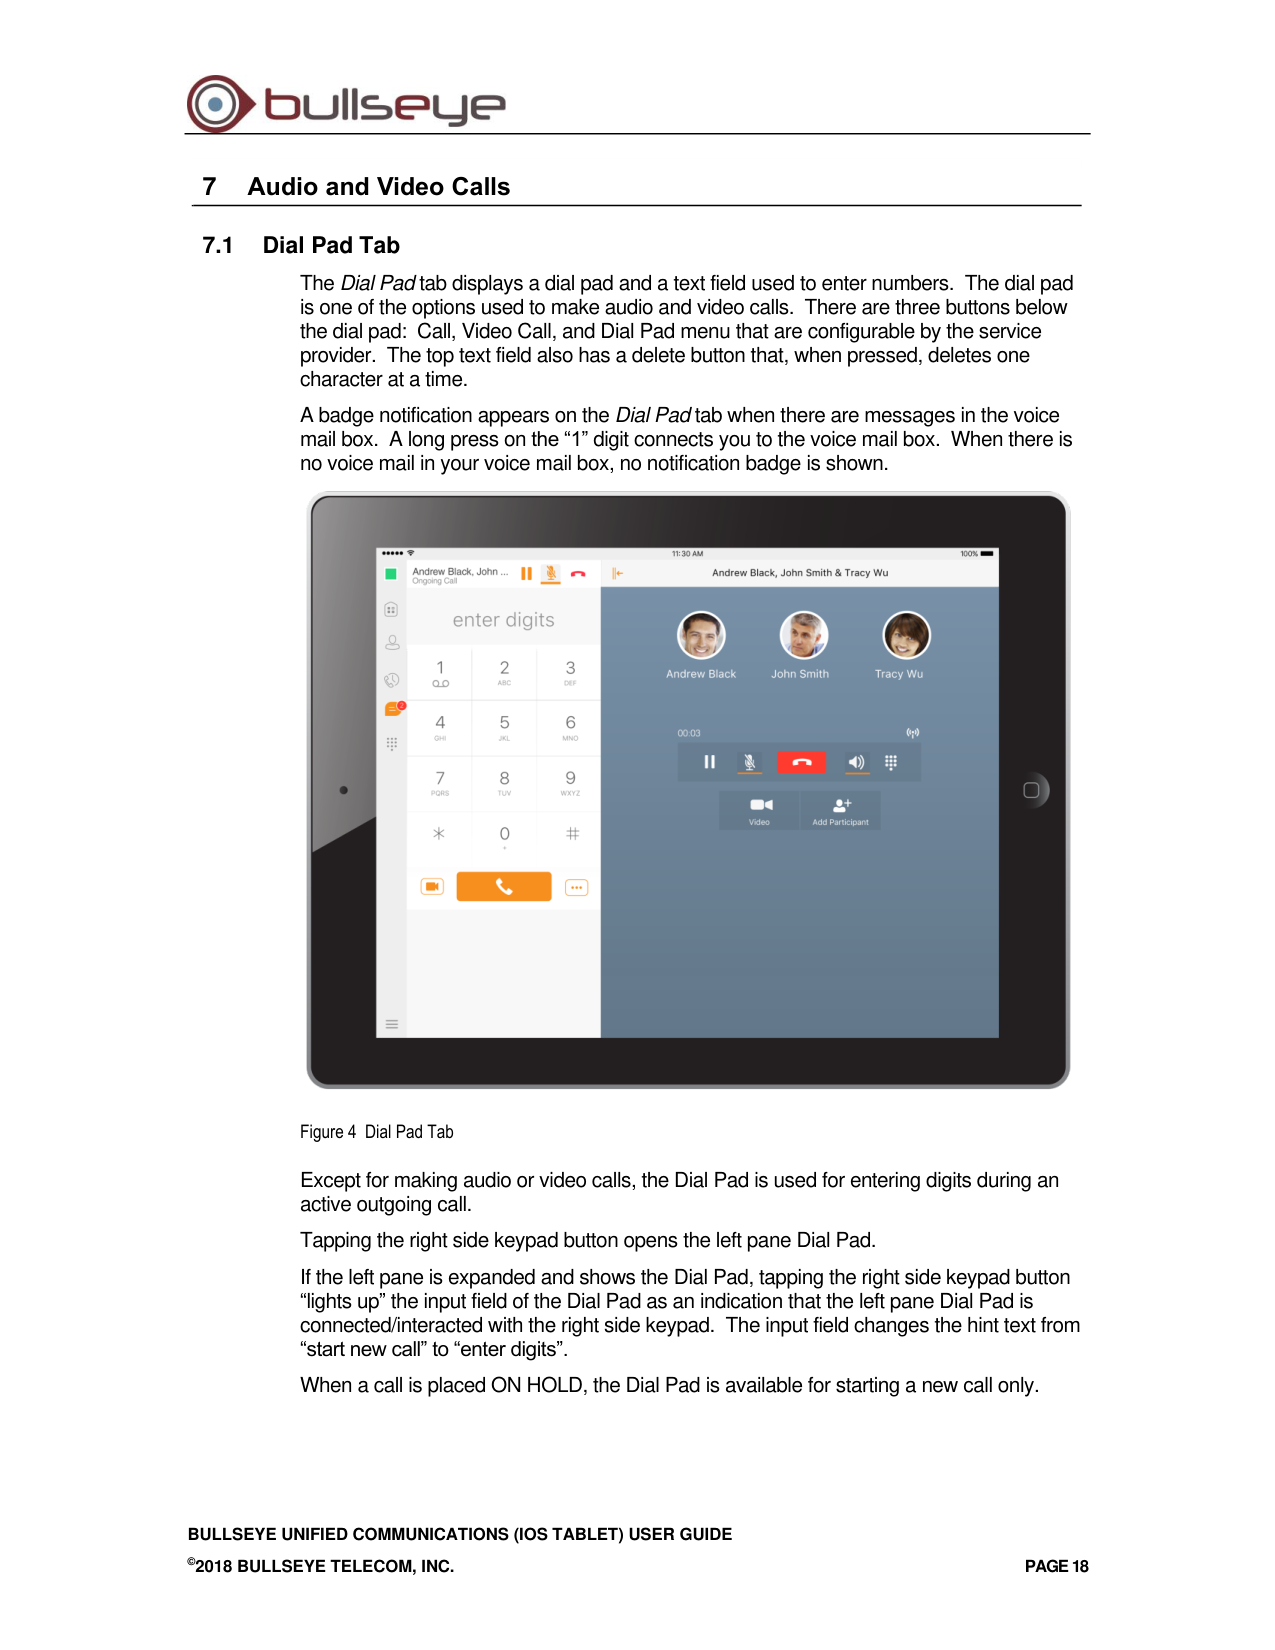
The Dial Pad tab displays a dial pad and a text field used to enter numbers. The dial pad
is one of the options used to make audio and video calls. There are three buttons below
the dial pad: Call, Video Call, and Dial Pad menu that are configurable by the service
provider. The top text field also has a delete button that, when pressed, deletes one
character at a time.
A badge notification appears on the Dial Pad tab when there are messages in the voice
mail box. A long press on the “1” digit connects you to the voice mail box. When there is
no voice mail in your voice mail box, no notification badge is shown.
Figure 4 Dial Pad Tab
Except for making audio or video calls, the Dial Pad is used for entering digits during an
active outgoing call.
Tapping the right side keypad button opens the left pane Dial Pad.
If the left pane is expanded and shows the Dial Pad, tapping the right side keypad button
“lights up” the input field of the Dial Pad as an indication that the left pane Dial Pad is
connected/interacted with the right side keypad. The input field changes the hint text from
“start new call” to “enter digits”.
When a call is placed ON HOLD, the Dial Pad is available for starting a new call only.
BULLSEYE UNIFIED COMMUNICATIONS (IOS TABLET) USER GUIDE
©2018 BULLSEYE TELECOM, INC.
PAGE 19
7.2
Make Audio or Video Calls
Make an audio or video call using one of the following methods:
◼
Choose a contact from Contact List to open the contact card and tap on the headset
icon
for an audio call or the video icon
for a video call.
◼
From search results, open a contact card and tap on the headset icon
for an
audio call or the video icon
for a video call.
◼
Open the dial pad, enter a phone number, and tap the Call or Video button.
◼
On the Call History list, tap a call entry.
◼
On the Chat screen, tap the headset icon
for an audio call or the video icon
for a video call.
7.3
Answer Call
An incoming call is indicated by a ringtone. There are two options on the incoming call
screen: Answer and Decline. If you decline the call, it causes the line to sound busy at
the caller’s end and they know that you rejected the call.
7.4
CallKit
Starting with iOS 10, BullsEye Unified Communications supports integration with the
iPhone UI using the CallKit Framework. This integration enables the functionality described in
the following subsections.
7.4.1
Answer Incoming VoIP Call on Locked Screen
When an incoming VoIP call is received and the device is locked, iOS shows the native
incoming call screen with the caller ID, avatar, and the “BullsEye Unified Communications
Audio” label.
Sliding the device lock establishes the call with no additional user interaction. You are not
required to enter the device unlock code if such is set.
You can perform basic mid-call control functions from the native screen. For advanced
mid-call control functionality, you must activate the application by using the application
button on the native screen. Entering the device lock code, if set, is required at that point.
Incoming calls are always accepted as audio. You have the option on the native In-Call
screen to add video. Upon adding video from the native incoming screen and unlocking
the phone, the application comes to the foreground with the video call enabled.
If you do not want to accept the call, you can tap the power button once to silence the call,
and twice to reject it.
7.4.2
Answer Incoming VoIP Call on Unlocked Screen
When an incoming VoIP call is received while the device is unlocked and the application is
either on foreground or background, you are notified with iOS native incoming call screen,
which shows the caller ID, avatar, and the “BullsEye Unified Communications Audio” label.
You can answer the call using the Accept button, which opens the application in Call
screen.
BULLSEYE UNIFIED COMMUNICATIONS (IOS TABLET) USER GUIDE
©2018 BULLSEYE TELECOM, INC.
PAGE 20
7.4.3
Receive Second Incoming Call (Call Waiting)
When a new incoming call is received during an ongoing VoIP call, you are notified with
the iOS native incoming call screen, which shows the caller ID and avatar of the new
calling party. You have the choice to hold the current call and answer, or end the current
call and answer or decline the new call to voice mail. Upon accepting the new call, the
previous call is put on hold. You have the option to swap between the calls or to end any
or both of them.
7.4.4
Integration with Native Contacts and Call History
BullsEye Unified Communications calls can be initiated directly from the contact profile of
an Address Book entry. Long press on the call or video button in a contact profile opens a
list of calling options which includes BullsEye Unified Communications.
If the last call to a contact has been handled by BullsEye Unified Communications, the call
button in the profile changes to “BullsEye Unified Communications”.
7.5
In Call Actions
You can perform the following actions from the In Call screen:
◼
End a call
◼
Mute the microphone
◼
Open the key pad
◼
Adjust the volume
◼
Escalate from an audio to video call
◼
Downgrade from a video to audio call
◼
Place a call on hold
◼
Make a new call
◼
Transfer a call – Attended
◼
Transfer a call – Unattended
◼
Make a conference
◼
Transfer a call to a circuit-switched call
◼
Add more participants (on conference call only)
◼
Merge two separate calls
◼
Swap two separate calls
◼
View participants (on a conference call)
7.6
Missed Calls and New Messages
Notifications (for example, missed calls or new messages) are shown as badges on the
tab icons.
Starting with Release 22.4.1, the Mobile and Tablet clients also display local visual
notification for unanswered calls and new voice mail messages.
The notification for unanswered call is displayed when there is call delivered to the device,
and the application is alerted for the call but the call is not answered by the user. The
feature does not provide indication for missed calls on other endpoints.
BULLSEYE UNIFIED COMMUNICATIONS (IOS TABLET) USER GUIDE
©2018 BULLSEYE TELECOM, INC.
PAGE 21
The notification for new voice mail message is displayed when there is a new voice mail
message deposited on the server. The notification is accompanied with audio and
vibration.
7.7
Message Waiting Indicator and Voice Mail Access
If you have pending voice mail (VM) messages, then a badge is displayed on the Call tab
icon indicating the number of pending VM messages.
Voice mail is accessible with a long press of the dial pad digit “1” (similar to how it is done
on a regular mobile keyboard).
7.8
Business Line Call Back
BullsEye Unified Communications allows you to originate a call using your desk phone or
another configured phone or device. This is done using the Call Back functionality on
BullsEye Unified Communications.
When you select Call Back, your other devices ring based on your service provider
configuration.
7.9
Contact Name Lookup for Incoming Calls and Call Logs
Upon receiving a call, BullsEye Unified Communications searches for the name in the
following contact sources and order: XMPP contact name, Enterprise Directories, Local
Contact, and
P-Identifier header (SIP) and From header (SIP). If the number matches one of the
contacts, the name is shown on the incoming call screen.
7.10 N-Way Calling (Conference)
BullsEye Unified Communications supports network SIP-based conference calls. While
on a two-way audio or video call, you can add more participants by using the Conference
button. It enters Conference Mode on the device and allows you to search for and select
the new participant. Once the conference is established, the participants are shown on
the device screen.
The other way to create Conference call or to add participant in the existing Conference is
to make a new second call then select the merge option.
7.11 Call Waiting
You can have one active call at any one time if you receive a new incoming call and
accept it. The existing call is put on hold and you can change between these two calls by
using the Hold and Unhold buttons.
7.12 New Call
The client supports starting a new call while in an ongoing call. To establish a call, choose
one of the options in section 7.2 Make Audio or Video Calls. After the new call is
established, the first call is put on hold. You can swap the two calls or merge them into a
conference.
BULLSEYE UNIFIED COMMUNICATIONS (IOS TABLET) USER GUIDE
©2018 BULLSEYE TELECOM, INC.
PAGE 22
7.13 Call Transfer
The client supports transferring VoIP calls to another party. Two modes of transfer are
supported:
◼
Attended Transfer – Establish a call with a remote party. Select a contact then
choose a number. Select the call first option. If the call is successfully established,
you can talk with the third party privately before completing the transfer by tapping the
Complete button.
◼
Unattended Transfer – Establish a call with a remote party. Select a contact then
choose a number. Select the Transfer option and the transfer is completed.
7.14 Swipe Between Chat, Audio/Video, and Screen Share Communication
Views
BullsEye Unified Communications provides the ability to switch between Chat,
Audio/Video, and Screen Share communications sessions for own My Room, other users’
My Room, and two-way chat. The ability to switch between sessions is indicated by the
presence dots at the bottom of the screen. You can perform a swipe to switch between
sessions.
7.15 Seamless Call Handover for VoIP Calls
Starting with Release 22.2.1, BullsEye Unified Communications for iOS Tablet clients
support seamless call handover for VoIP calls between WiFi and cellular data networks.
If the data connection drops during an ongoing VoIP call, then the application tries to use
another data connection, if available, or waits for a configurable period of time, (for
example, one minute) for the data connection to be re-established. At that point, the call is
retried on the new or re-established connection.
During the transition, there is a beeping sound played to the user and an indication in the
user interface that the application is trying to reconnect the call.
BULLSEYE UNIFIED COMMUNICATIONS (IOS TABLET) USER GUIDE
©2018 BULLSEYE TELECOM, INC.
PAGE 23
8
Call History
The client supports displaying basic and enhanced BullsEye Unified CommunicationsCall
History.
BullsEye Unified Communications can also show information about Hunt Groups and call
duration, which is only available as part of enhanced call logs.
From the segmented controls, Call History can be set to show all or missed calls.
On the list of calls, there are icons indicating whether a call was incoming, outgoing, or
missed.
The list of the call items consists of an icon showing what kind of call it was (a green arrow
means incoming, a blue arrow means outgoing, a red arrow means missed, and a green
group icon means hunt group). It also shows the name, number, and Unavailable status
for the caller. Below the name, it shows the number, if available. Below the number, it
shows the date and time of the call.
In the Call Details screen, you can find information about the duration of the call.
Call History makes it easy for you to redial and call back when you miss a call or when you
want to dial a contact with whom you have recently spoken.
BULLSEYE UNIFIED COMMUNICATIONS (IOS TABLET) USER GUIDE
©2018 BULLSEYE TELECOM, INC.
PAGE 24
9
Settings
The Settings pop-up contains the following items, which can be configured by the end
user:
◼
Call Settings
◼
Preferences
◼
Update 911 Location
◼
Test Call
◼
About
◼
Help
◼
Sign Out
9.1
Call Settings
The client supports the following BullsEye Unified Communicationsservice management
features, allowing BullsEye Unified Communicationssupplementary services to be turned
on or off using the native client Call Settings window:
Call Options
◼
Block My Caller ID
◼
Dialing Service
◼
VoIP Calls
Call Forwarding
◼
When No Answer
◼
Always
◼
When Not Reachable
◼
When Busy
◼
Do Not Disturb
Incoming Calls
◼
Call Waiting
◼
Simultaneous Ring
◼
BullsEye Unified CommunicationsAnywhere
◼
Remote Office
9.1.1
Call Forwarding
By tapping on a different Call Forward option, you can enter a number to forward your
calls as follows: Call Forward Always, Busy, or When Unreachable.
9.1.2
Do Not Disturb
When you activate this service, all calls are typically blocked by the server and sent to
voice mail.
BULLSEYE UNIFIED COMMUNICATIONS (IOS TABLET) USER GUIDE
©2018 BULLSEYE TELECOM, INC.
PAGE 25
9.1.3
BullsEye Unified CommunicationsAnywhere
BullsEye Unified CommunicationsAnywhere allows service providers to offer fixed-mobile
convergence (FMC) services without additional equipment.
BullsEye Unified CommunicationsAnywhere simplifies communications for on-the-go
users and remote users by extending the features of a desk phone to any other fixed or
mobile device, regardless of the network or handset manufacturer. Callers dial one
number and can reach you on any phone the user chooses. A desk phone, cell phone,
and/or a soft phone can ring simultaneously.
Voice call continuity is possible with the ability to move live calls from one device to
another without hanging up.
Add locations (numbers) that can be used in the service using the Add New Location
button. Use the Alert all locations to activate parallel ringing.
Select “Prevent Diverting” to prevent a call from ending up as a voice mail, which can be
problematic, for example, in conference call situations.
Select “Answer Confirmation” to receive a separate audio prompt when answering a call
from that number (location). It may be useful in cases where, for example, mobile
numbers are being used to prevent incoming calls going to mobile voice mail since the call
is ended without going to voice mail if the answer confirmation is not provided.
Select “Call Control” to enable the server platform to provide mid-call services such as Call
Transfer and Conferencing for that number (location).
9.1.4
Remote Office
This service allows the use of any phone as the office phone from a charging and
numbering perspective. For instance, a hotel room phone can be used as the office
phone.
Enable Remote Office and specify a phone number to be used as the Remote Office
number.
9.2
Preferences
The client supports the following Preferences:
◼
Language
◼
Remember Password
◼
Sign in automatically
◼
Caller ID Lookup
◼
Troubleshooting
The following Preferences are available through the Sign In screen:
◼
Language
◼
Version
◼
Device ID
◼
Help
◼
About
◼
Troubleshooting
BULLSEYE UNIFIED COMMUNICATIONS (IOS TABLET) USER GUIDE
©2018 BULLSEYE TELECOM, INC.
PAGE 26
9.2.1
Language Support
The client is prepared for localization and can be delivered in any language. Currently, the
client is available in the following languages:
◼
U.S. English
◼
French
◼
French (Canadian)
◼
German
◼
Italian
◼
Spanish (European)
◼
Spanish (Latin America)
◼
Korean
◼
Japanese
◼
Chinese
Additional languages are available upon request as part of a customization project.
Starting with Release 22.4.1, Mobile and Tablet clients support automatic detection of the
device language. The client application detects and selects the language that is in use by
the operating system on the device.
NOTE: The legacy method for selecting the language from the application Preferences is still
available on the iOS clients. The Android clients support only the new mechanism for
automatically using the device language.
9.2.2
Caller ID Lookup
When there is an incoming call, BullsEye Unified Communications matches it by searching
in the Contact List, local Address Book, and BullsEye Unified Communicationsdirectory.
To improve the performance, BullsEye Unified Communications provides the ability to turn
on/off searching in local Address Book.
9.2.3
Device ID
BullsEye Unified Communications has the ability to lock the user to a single desktop or
mobile device so that the software cannot be used on other hardware. The iPhone user
can copy the Device ID from Preferences before signing into the application and provide it
to the company administrator. The administrator locks BullsEye Unified Communications
to the reported device and the user can sign in only from that device.
9.2.4
Troubleshooting
The troubleshooting function can be used if there are issues encountered with the
application. It collects and sends diagnostic information to a predefined support email
address that is configurable via the branding process. This helps support personnel to
identify the issues. The information sent consists of the application and media engine
diagnostic logs.
BULLSEYE UNIFIED COMMUNICATIONS (IOS TABLET) USER GUIDE
©2018 BULLSEYE TELECOM, INC.
PAGE 27
Troubleshooting is managed by a menu entry in Settings. It can be accessed from two
places in the client:
◼
From the Settings button on the Sign In screen – This opens the screen that contains
the help and troubleshooting-related entries. This can be used before the user has
signed in, which is most often for cases when a user has issues with signing in or with
connectivity.
◼
From the Preferences screen, accessible from the side navigation. This is available
while the user is logged in.
Troubleshooting options:
◼
Console logging – Gets logs in a development environment. The device should be
connected to a PC/MAC and the logs appear in real-time in the console.
◼
File Logging – Saves logs to the device memory for subsequent sending by email.
◼
XMPP logging – Includes IM&P-related information (XMPP stanzas) in the logs.
◼
Other logging – Includes additional logs different from XMPP.
◼
PN logging – Includes Push Notification-related information (only when Push
Notifications are enabled).
◼
Crash reporting – Send crash logs to a crash report.
◼
Display Diagnostic Info in Calls – Displays information about ongoing calls like the
codec type.
9.3
About
The About screen includes three sub views:
◼
Info – This view contains short info text, version, copyright, website URL, app ID, and
build version.
◼
License – This view contains the End User License Agreement.
◼
Legal Notices – This view lists the third parties used from the application.
9.4
Test Call
The client provides the ability to perform an audio or video test call to an echo number.
Note that the echo service is provided and enabled by the service provider.
A common example of using an echo service is:
◼
Tap Test Call to initiate a call to the echo service, then follow the operator’s
instructions until you hear back your recorded message.
9.5
Help Page
The client provides web-based help that can be launched from the Settings view.
9.6
Sign Out
You can sign out at the bottom of the left-side navigation drawer.
BULLSEYE UNIFIED COMMUNICATIONS (IOS TABLET) USER GUIDE
©2018 BULLSEYE TELECOM, INC.
PAGE 28
10 My Room
My Room is an always available and permanent room you can use to chat with anyone
that joins.
My Room is accessible from the Chat tab using the menu icon on the navigation bar. You
can add more participants using the add participants icon or they can join your room from
your contact card. Once people join the chat room, they can tap the Call button of that
screen to automatically join the conference.
My Room uses your permanent chat room, permanent collaboration room, and
conference bridge (audio or video). All My Room sessions start as chats but calls can be
added to the session while in progress.
Others join your room by tapping your name on their Contacts list and selecting Join
Room from the contact card.
You can dial into another contact's My Room audio bridge from the directory contact card.
10.1 Guest Client
The Guest Client feature is specifically intended for users outside of the company.
BullsEye Unified Communications users can invite Guest Client users to their My Room by
selecting “Copy Guest Join Link” from a My Room menu button on the right of the
Participants title bar. The copied link delivery (that is, email) is outside the scope of
BullsEye Unified Communications.
Guest users can join a session with audio in the web browser by requesting a Call Back
using the provided dial-in number and conference PIN. They can also use group chat and
sharing inside the web browser. However, guest clients do not have the private chat
possibility and they can only see the Chat History of messages that occurred after they
joined the session.
The My Room owner is prompted to accept or reject guest client users requesting to join
the My Room session.
Guest client user invitations can be revoked by selecting “Reset Guest Link” from the
Participants menu button.
BULLSEYE UNIFIED COMMUNICATIONS (IOS TABLET) USER GUIDE
©2018 BULLSEYE TELECOM, INC.
PAGE 29
11 BullsEye Unified Communications and iPad Settings
From iPad Settings → BullsEye Unified Communications, you can allow BullsEye Unified
Communications to access:
◼
Contacts
◼
Microphone
◼
Camera
◼
Notifications
It is recommended that BullsEye Unified Communications have access to all resources in
the previous list.
In addition, you can configure the type of notifications you want to get with BullsEye
Unified Communications:
◼
Allow Notifications
◼
Show in Notification Center
◼
Sounds
◼
Badge App Icon
◼
Show on Lock Screen
It is recommended for all items in the previous list to be enabled.
In addition, it is recommended to configure the option “Alert style when unlocked” to
“Alerts”.
BULLSEYE UNIFIED COMMUNICATIONS (IOS TABLET) USER GUIDE
©2018 BULLSEYE TELECOM, INC.
PAGE 30
12 Screen Share
BullsEye Unified Communications for iOS Tablet supports only view of Screen Share.
When a Screen Share invitation is sent via Desktop BullsEye Unified Communications, the
badge notification appears on the main bar and in the chat list view. Selecting the entry
with screen sharing from chat list opens a communication pane with the share by default.
You can return to the chat / call (if present) with a swipe. When the share is paused, the
Screen Share view remains active showing the last image that was shared.
Viewing Screen Share is available in all communication modes:
◼
My Room
◼
One-to-one chat
◼
Ad Hoc group chat room (Multi-User Chat [MUC])
BULLSEYE UNIFIED COMMUNICATIONS (IOS TABLET) USER GUIDE
©2018 BULLSEYE TELECOM, INC.
PAGE 31
13 Search
BullsEye Unified Communications supports search in BullsEye Unified Communications
Contacts and Contact Directories. The search is performed in a separate input field in the
Contacts tab. Depending on the selected filter (All, Online, Local Address Book, or
Directories), search results display contacts only from the current selected category.
In other words, the clients do not perform directory searches, unless the user goes into
the directory section itself, otherwise, the search just filters the Contact List.
When searching the Enterprise Directory, the search is also performed in several more
search sources:
◼
User’s Personal Phone List
◼
Group’s Common Phone List
◼
Enterprise’s Common Phone List
The enhanced search is applied for both contacts searching initiated by the user and upon
receiving an incoming call, and searching for a display name corresponding to an
unknown number.
BullsEye Unified Communications for iOS also supports search in an LDAP-compatible
directory like Microsoft Exchange. If the device email and contact applications are
synchronized with Microsoft Exchange or compatible email provider, then BullsEye Unified
Communications can look up contacts from the directory Global Address List (GAL). This
search is available through Contacts, Local Address Book, All Contacts with Groups,
Groups, and GAL.
BULLSEYE UNIFIED COMMUNICATIONS (IOS TABLET) USER GUIDE
©2018 BULLSEYE TELECOM, INC.
PAGE 32
14 Push Notifications
14.1 Push Notifications for Incoming Calls
BullsEye Unified Communications introduced support for Push Notifications for Incoming
Calls.
Mobile client applications use Push Notifications to get alerted for incoming calls and for
accepting the call as VoIP.
When there is new call, a Push Notification is sent to the client which is presented to the
user as either a platform-specific visual notification or in the user interface of the client
application.
From a user experience standpoint, accepting a call works in the same way for both push-
enabled clients and non-push-enabled clients.
On iOS, when the client is in the background, the call is presented to the user with an iOS-
specific local notification (alert or banner). When the client is in the foreground, the call is
presented with an application-specific Incoming Call screen with Answer and Decline
buttons.
Outgoing VoIP calls are performed with SIP registration on demand, which is transparent
to the user. The SIP registration is done only when the user initiates the VoIP call.
In addition to Push Notifications for new calls, the solution also supports Push Notifications
for new voice mail.
NOTE: Using Push Notifications for calls with Apple Watch:
When using Push Notifications for calls and Apple Watch, notifications go to the iPhone or the
Apple Watch, depending on the device that is being used. When there is an incoming call and
the phone is locked, the notification is shown only on the watch. You can see the notification on
the watch but cannot pick up the call from the watch. For more information, see the following
Apple support document: https://support.apple.com/en-us/HT204791.
14.2 Push Notifications for Chat Messages
BullsEye Unified Communications introduces support for Push Notifications for Chat
Messages.
Mobile client applications use Push Notifications to get alerted for incoming messages and
for chat invitations.
When there is new message, a Push Notification is sent to the client which is presented to
the user as either a platform-specific visual notification or in the user interface of the client
application.
The following functionality is supported with Push Notifications:
◼
Receiving one-on-one messages.
◼
Receiving My Room and chat invitations.
◼
Receiving requests for approving guest invitations.
BULLSEYE UNIFIED COMMUNICATIONS (IOS TABLET) USER GUIDE
©2018 BULLSEYE TELECOM, INC.
PAGE 33
NOTE: Receiving Push Notifications when the application is not running:
You can decide to explicitly remove the application from memory by swiping it, at which point the
application is no longer be running in the background.
Push Notifications for incoming calls and one-on-one messages are received even if the client
application is not running, provided that you are signed in and registered for Push Notifications
before the application is removed from memory.
The following types of Push Notifications and functionality require the application to be running:
Push Notifications for invitations into My Room or group chats, Push Notifications for approving
Guest Client invitations, as well as ongoing communication in a chat room require that the client
application to be running either in the background or foreground.
In addition, the application icon badge for unread conversations is updated only if the application
is running in the background.
BULLSEYE UNIFIED COMMUNICATIONS (IOS TABLET) USER GUIDE
©2018 BULLSEYE TELECOM, INC.
PAGE 34
15 Multi-Device Support
BullsEye Unified Communications provides support for users with multiple devices. This
includes several features:
◼
Chat invitations are sent to all devices. Before the session is accepted, messages are
sent to all devices, and once answered, the chat messages go to the device that sent
a reply message.
◼
Retrieving one’s own presence notifications when another client updates the user’s
presence. The client updates its own status based on the information it receives from
the server.
◼
Accepting a shared presence invitation in one client is also recognized by another
client and both clients start receiving presence updates.
◼
A new presence subscription made in one client is recognized in another. If the
contact blocks the invitation, there are presence notifications sent from the server to
all of the user’s clients indicating that the subscription was terminated. This
information is shown to the user. If the client receives two presence authorization
requests from two or more devices for the same user, it only shows one request to the
user.
◼
Removing a contact from a Contact List in one device is recognized in another client
and the Contact List is updated (that is, the contact is removed) in the other client as
well.
15.1 Message History and Message Read Status Synchronization
BullsEye Unified Communications introduces support for synchronizing message history
and message read status on all devices.
◼
Message history is retrieved and synchronized on all devices. This includes all
received and sent messages, even if the particular user device was not online when a
message is received or sent.
◼
Message history is fetched when the mobile application is brought from the
background to the foreground, or at certain time periods when receiving messages in
the background.
NOTE: Received messages are immediately available on all logged clients, while sent
messages are synchronized when the message history is fetched from the server.
◼
Messages read status is also synchronized when a message is read on another
device and unread message counts are appropriately updated on the badges.
NOTE: The application icon badge for unread messages is updated only if the application is
running in the background.
BULLSEYE UNIFIED COMMUNICATIONS (IOS TABLET) USER GUIDE
©2018 BULLSEYE TELECOM, INC.
PAGE 35
16 Other Features
16.1 Version Control
Version control is supported using the App Store mechanism. When a new release is
available, the old version is removed from the App Store and users of the previous version
are notified about the update possibility.
16.2 Privacy Management
BullsEye Unified Communications supports authentication with a user name and
password for different services and servers requiring authentication. For convenience, the
end user can save a user name and password for different realms.
When the end user adds contacts to the Contacts list, these contacts receive a New
Subscriber dialog asking whether they want to allow the end user to see their presence.
This information is stored in this contact’s presence policies.
At any time, the user can edit the presence policies (which are stored on the server). The
user can see all contacts that are allowed to view their presence (white list) and users that
are not allowed to view their presence (blacklist). This feature requires a compatible
presence server.
16.3 Firewalls and NATs
The client supports rport (RFC 3581) for network address translation (NAT) traversal and
for using the client behind a firewall. However, it is assumed that the client is mainly used
with a session border controller (SBC), which also provides support for NAT traversal for
several key features, such as calling (which is currently unlikely to work without an SBC).
16.4 Failover and Failback
The client supports failover and failback mechanisms for all used protocols: Xsi, XMPP,
and SIP. This feature is used to:
◼
Detect multiple connection endpoints (per protocol).
◼
Order connection points by priority.
◼
Connect to the highest priority connection point.
◼
Reconnect to the next connection point by priority one (if there is a problem with the
primary connection point).
◼
Provide a failback mechanism to switch back to the primary (which is the highest
priority connection point).
16.5 Secure VoIP Communication
The client supports secure VoIP communication using encrypted call negotiation and
media streams. Mandatory, preferred, and optional secure modes are supported.
16.6 VoIP Quality of Service
The client can mark audio and video streams with Differentiated Services Code Point
(DSCP) or Type of Service (ToS) flags using the Quality of Service (QoS) capabilities of
the network equipment.
BULLSEYE UNIFIED COMMUNICATIONS (IOS TABLET) USER GUIDE
©2018 BULLSEYE TELECOM, INC.
PAGE 36
16.7 Emergency Call Address Change Service
Depending on service provider settings, a special dialog can be shown at login asking if
the physical address must be updated. If not, login proceeds normally. If the user replies
“yes”, a web browser opens with the possibility to update the physical address for
emergency calls. Once the address update is complete, login continues.
Depending on service provider settings, a separate Emergency Call Address Change
Service (ECACS) menu item may also be visible in the application. This menu item allows
the ECACS service to be invoked at any time after login.
BULLSEYE UNIFIED COMMUNICATIONS (IOS TABLET) USER GUIDE
©2018 BULLSEYE TELECOM, INC.
PAGE 37
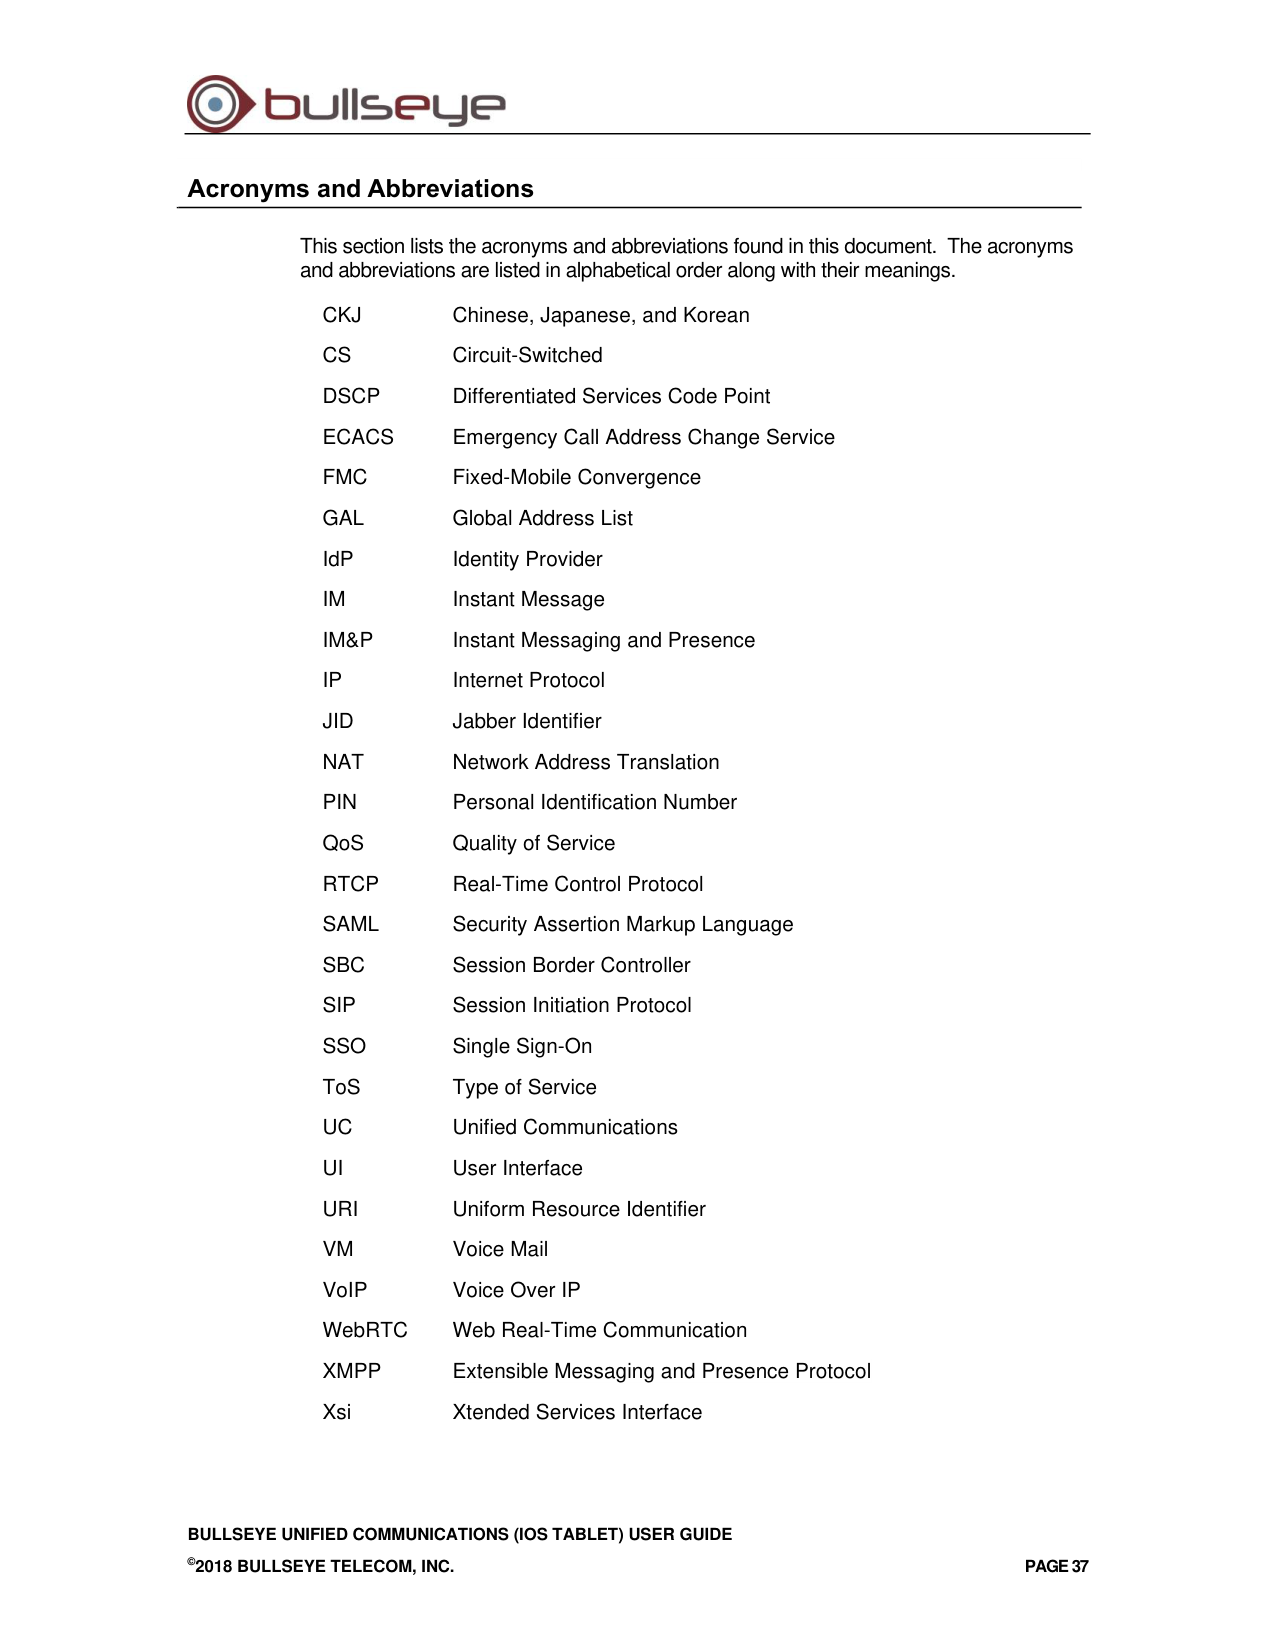
Acronyms and Abbreviations
This section lists the acronyms and abbreviations found in this document. The acronyms
and abbreviations are listed in alphabetical order along with their meanings.
CKJ
Chinese, Japanese, and Korean
CS
Circuit-Switched
DSCP
Differentiated Services Code Point
ECACS
Emergency Call Address Change Service
FMC
Fixed-Mobile Convergence
GAL
Global Address List
IdP
Identity Provider
IM
Instant Message
IM&P
Instant Messaging and Presence
IP
Internet Protocol
JID
Jabber Identifier
NAT
Network Address Translation
PIN
Personal Identification Number
QoS
Quality of Service
RTCP
Real-Time Control Protocol
SAML
Security Assertion Markup Language
SBC
Session Border Controller
SIP
Session Initiation Protocol
SSO
Single Sign-On
ToS
Type of Service
UC
Unified Communications
UI
User Interface
URI
Uniform Resource Identifier
VM
Voice Mail
VoIP
Voice Over IP
WebRTC
Web Real-Time Communication
XMPP
Extensible Messaging and Presence Protocol
Xsi
Xtended Services Interface
BULLSEYE UNIFIED COMMUNICATIONS (IOS TABLET) USER GUIDE
©2018 BULLSEYE TELECOM, INC.
PAGE 38
Appendix A: Third-Party Software and Copyright
This software uses XMPP Framework
(https://github.com/robbiehanson/XMPPFramework), license:
https://github.com/robbiehanson/XMPPFramework/blob/master/copying.txt
This software uses CocoaAsyncSocket
(https://github.com/robbiehanson/CocoaAsyncSocket), public domain
This software uses CocoaLumberjack
(https://github.com/robbiehanson/CocoaLumberjack), license:
https://github.com/robbiehanson/CocoaLumberjack/blob/master/LICENSE.txt
This software uses XML-to-NSDictionary (https://github.com/bcaccinolo/XML-to-
NSDictionary), license: https://github.com/bcaccinolo/XML-to-
NSDictionary/blob/master/LICENCE
This software uses ASIHTTPRequest (http://allseeing-i.com/ASIHTTPRequest),
license: https://github.com/pokeb/asi-http-request/blob/master/LICENSE
This software uses Minizip (http://www.winimage.com/zLibDll/minizip.html),
license: http://zlib.net/zlib_license.html
This software uses JASidePanelController Copyright (c) 2012 Jesse Andersen. All rights
reserved.
This software uses WebRTC (http://www.webrtc.org/),
license: https://webrtc.org/license/software/
This software uses libSRTP (https://github.com/cisco/libsrtp),
license: https://github.com/cisco/libsrtp#license-and-disclaimer