
Secure Cloud Fax Quick Guide
Summary: This guide provides detailed instructions on using Secure Cloud Fax to send & receive faxes virtually.
Download article(s)
![]() Secure Cloud Fax Quick Guide 042423.pdf
Secure Cloud Fax Quick Guide 042423.pdf
Secure Cloud Fax Quick Guide 042423
Secure Cloud Fax Quick Guide
4/24/2023
1
There are several different ways to send a fax using BullsEye Secure Cloud Fax:
•
Email
•
Portal
•
App
Before sending a fax using the app, you’ll need to install it on to your desktop, tablet, or cell phone (see
Appendix A).
Sending a Fax via Email
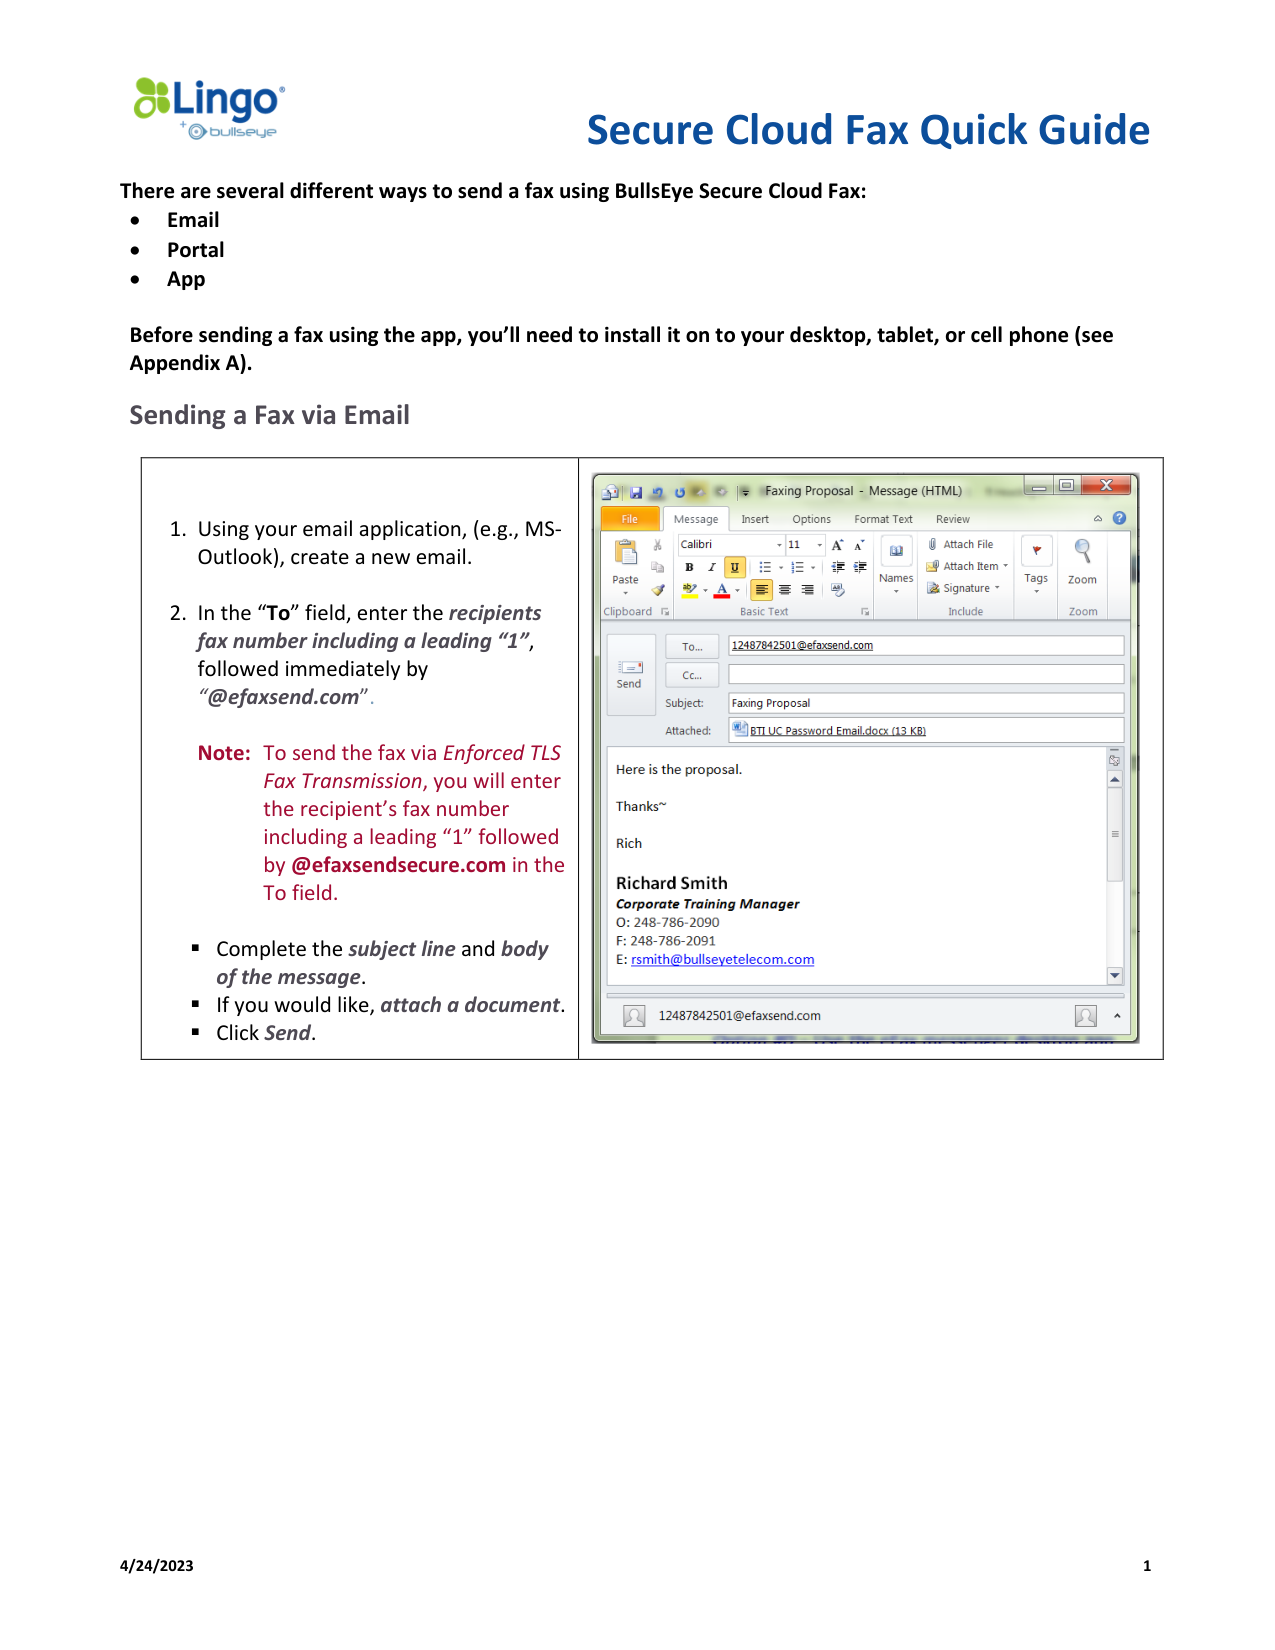
1. Using your email application, (e.g., MS-
Outlook), create a new email.
2. In the “To” field, enter the recipients
fax number including a leading “1”,
followed immediately by
“@efaxsend.com”.
Note: To send the fax via Enforced TLS
Fax Transmission, you will enter
the recipient’s fax number
including a leading “1” followed
by @efaxsendsecure.com in the
To field.
▪ Complete the subject line and body
of the message.
▪ If you would like, attach a document.
▪ Click Send.
Secure Cloud Fax Quick Guide
4/24/2023
2
Sending a Fax via the Web Portal
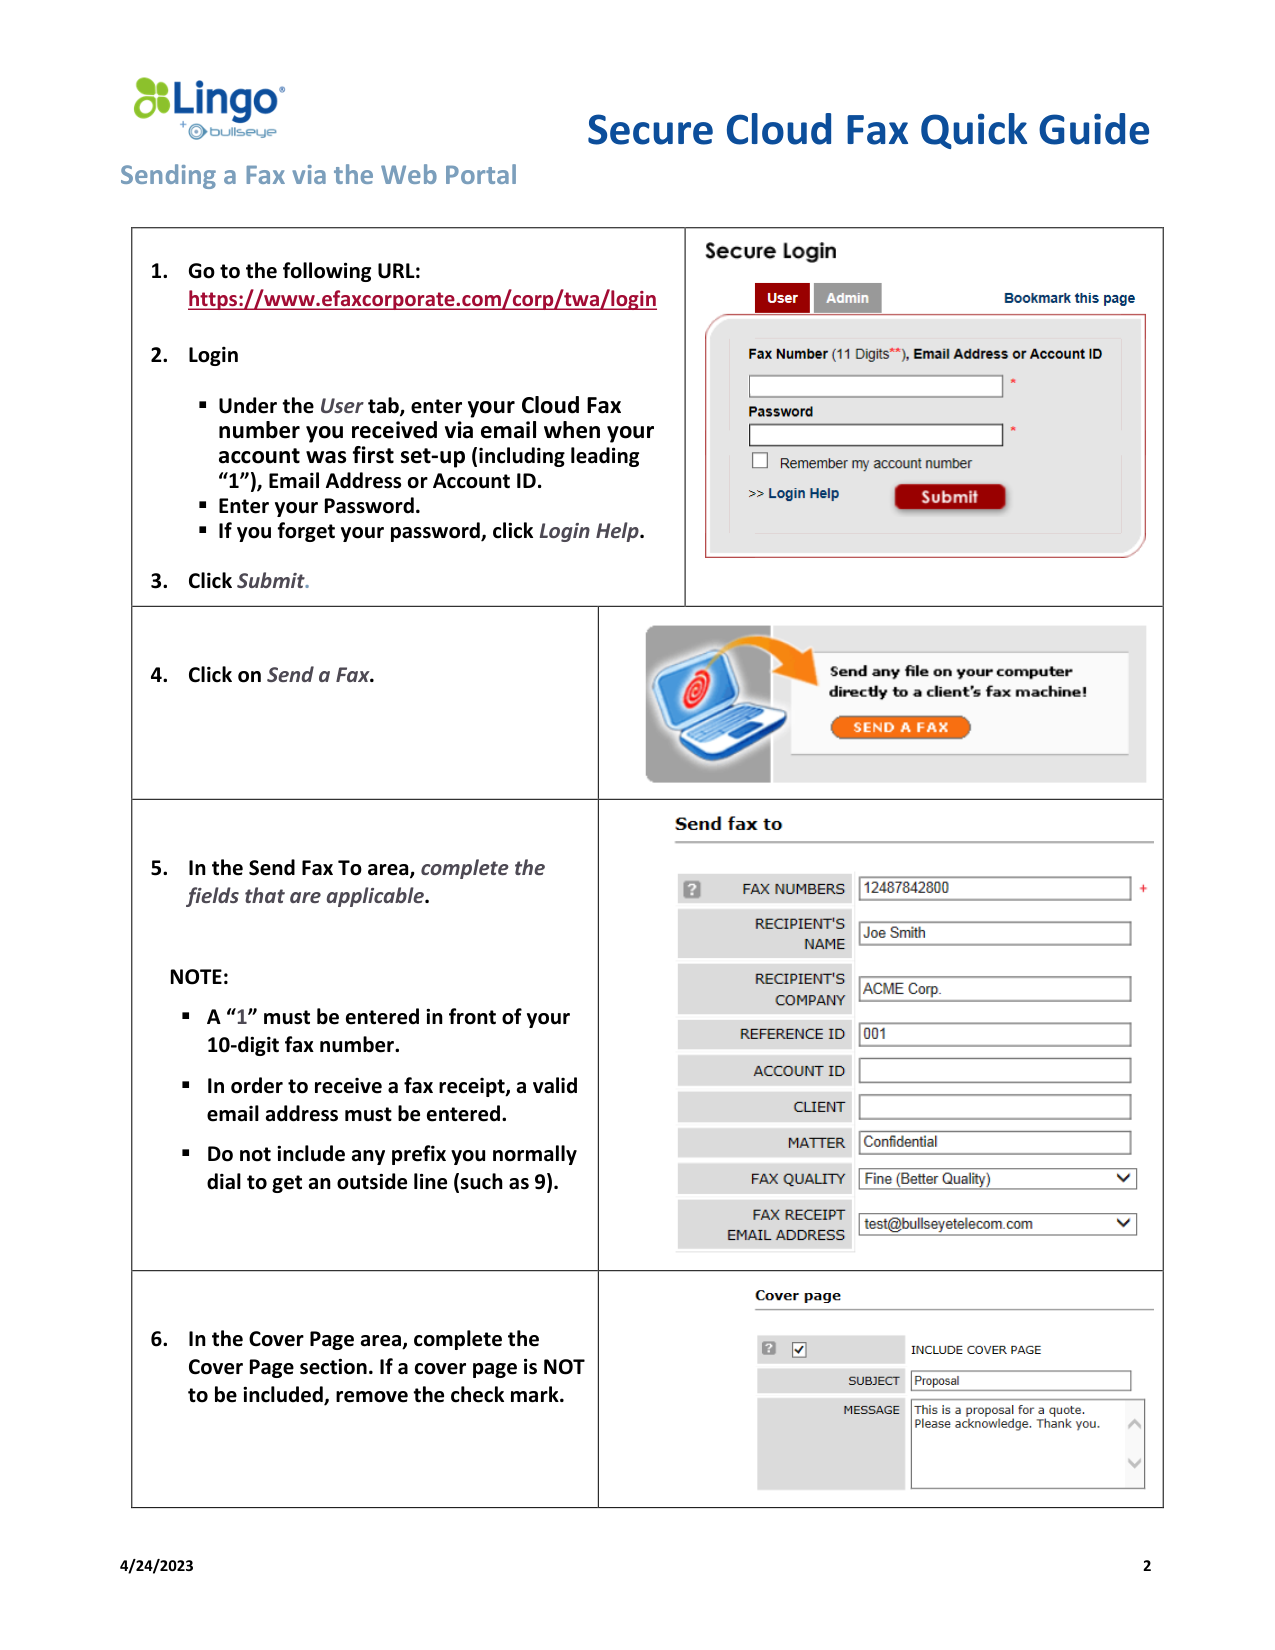
1. Go to the following URL:
https://www.efaxcorporate.com/corp/twa/login
2. Login
▪ Under the User tab, enter your Cloud Fax
number you received via email when your
account was first set-up (including leading
“1”), Email Address or Account ID.
▪ Enter your Password.
▪ If you forget your password, click Login Help.
3. Click Submit.
4. Click on Send a Fax.
5. In the Send Fax To area, complete the
fields that are applicable.
NOTE:
▪ A “1” must be entered in front of your
10-digit fax number.
▪ In order to receive a fax receipt, a valid
email address must be entered.
▪ Do not include any prefix you normally
dial to get an outside line (such as 9).
6. In the Cover Page area, complete the
Cover Page section. If a cover page is NOT
to be included, remove the check mark.
Secure Cloud Fax Quick Guide
4/24/2023
3
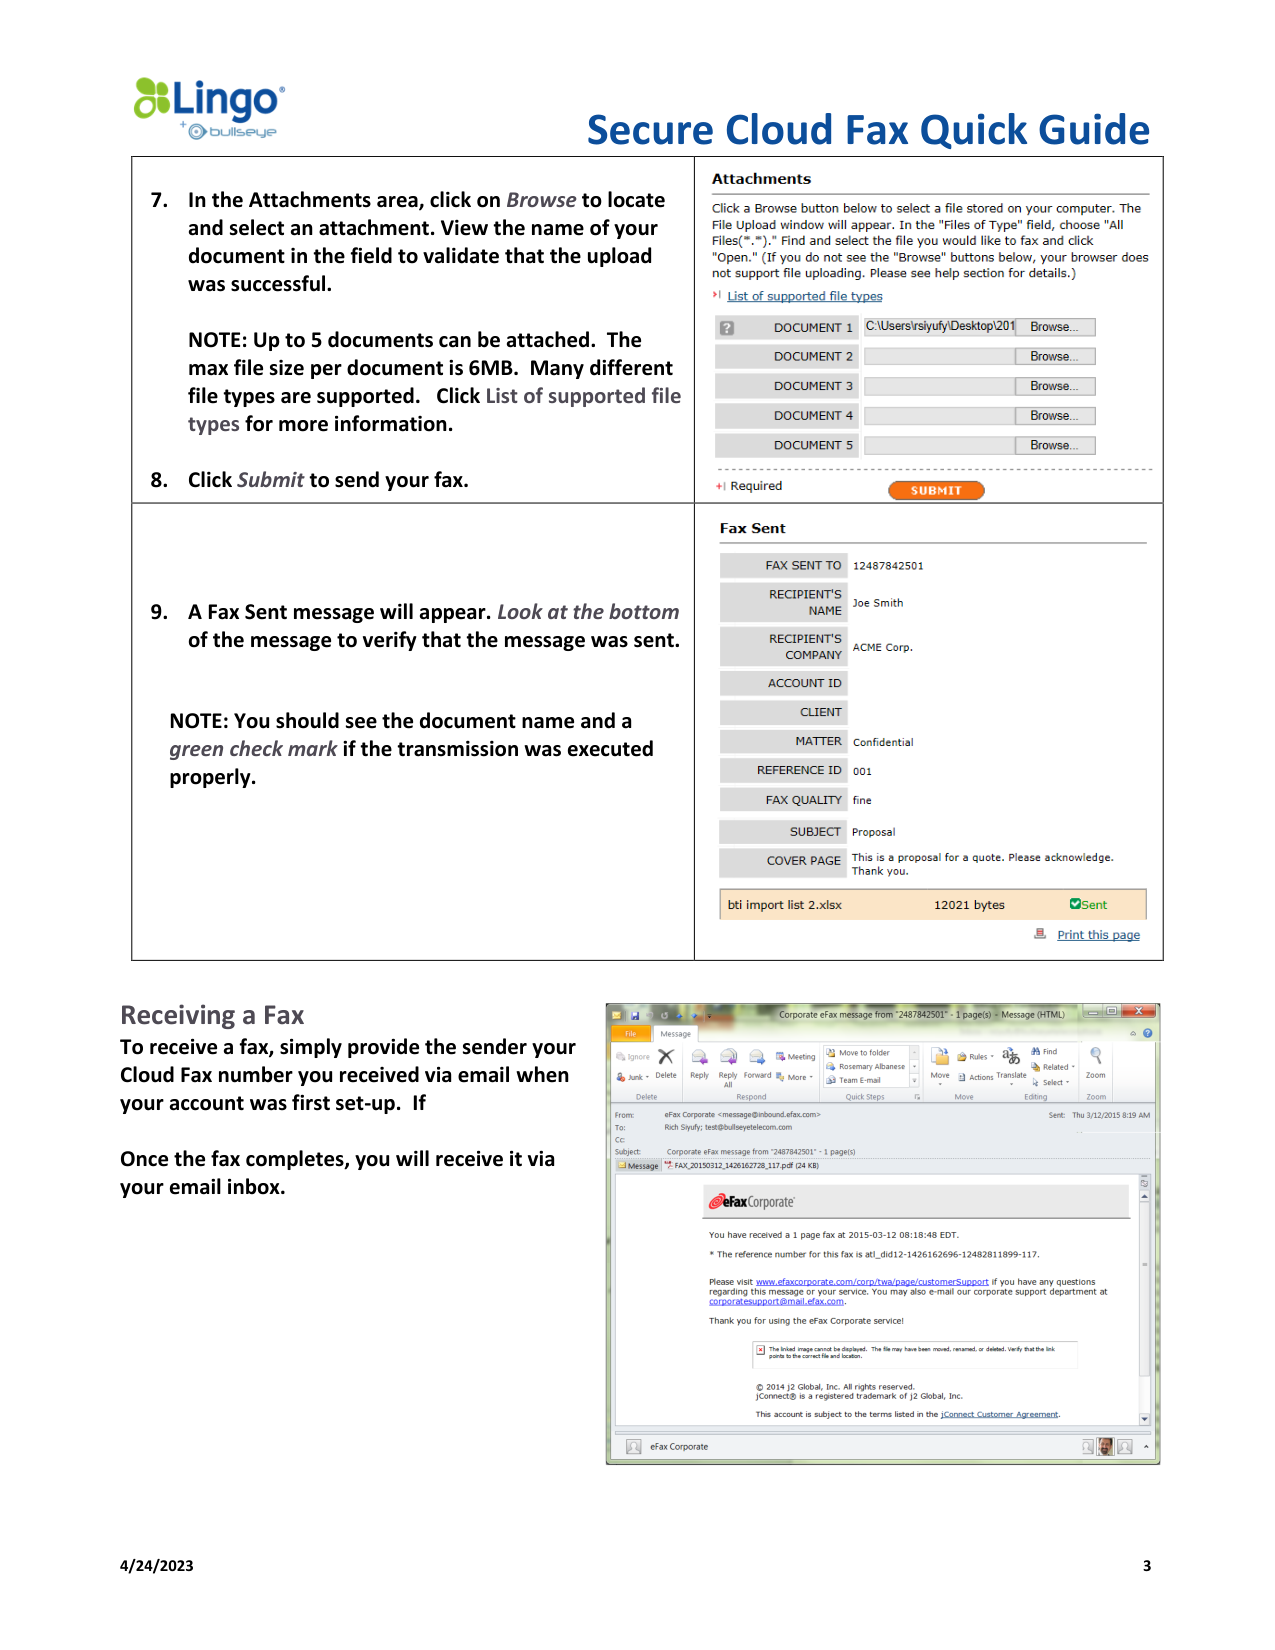
7. In the Attachments area, click on Browse to locate
and select an attachment. View the name of your
document in the field to validate that the upload
was successful.
NOTE: Up to 5 documents can be attached. The
max file size per document is 6MB. Many different
file types are supported. Click List of supported file
types for more information.
8. Click Submit to send your fax.
9. A Fax Sent message will appear. Look at the bottom
of the message to verify that the message was sent.
NOTE: You should see the document name and a
green check mark if the transmission was executed
properly.
Receiving a Fax
To receive a fax, simply provide the sender your
Cloud Fax number you received via email when
your account was first set-up. If
Once the fax completes, you will receive it via
your email inbox.
Secure Cloud Fax Quick Guide
4/24/2023
4
Managing Your Account
Log-in to Your Account
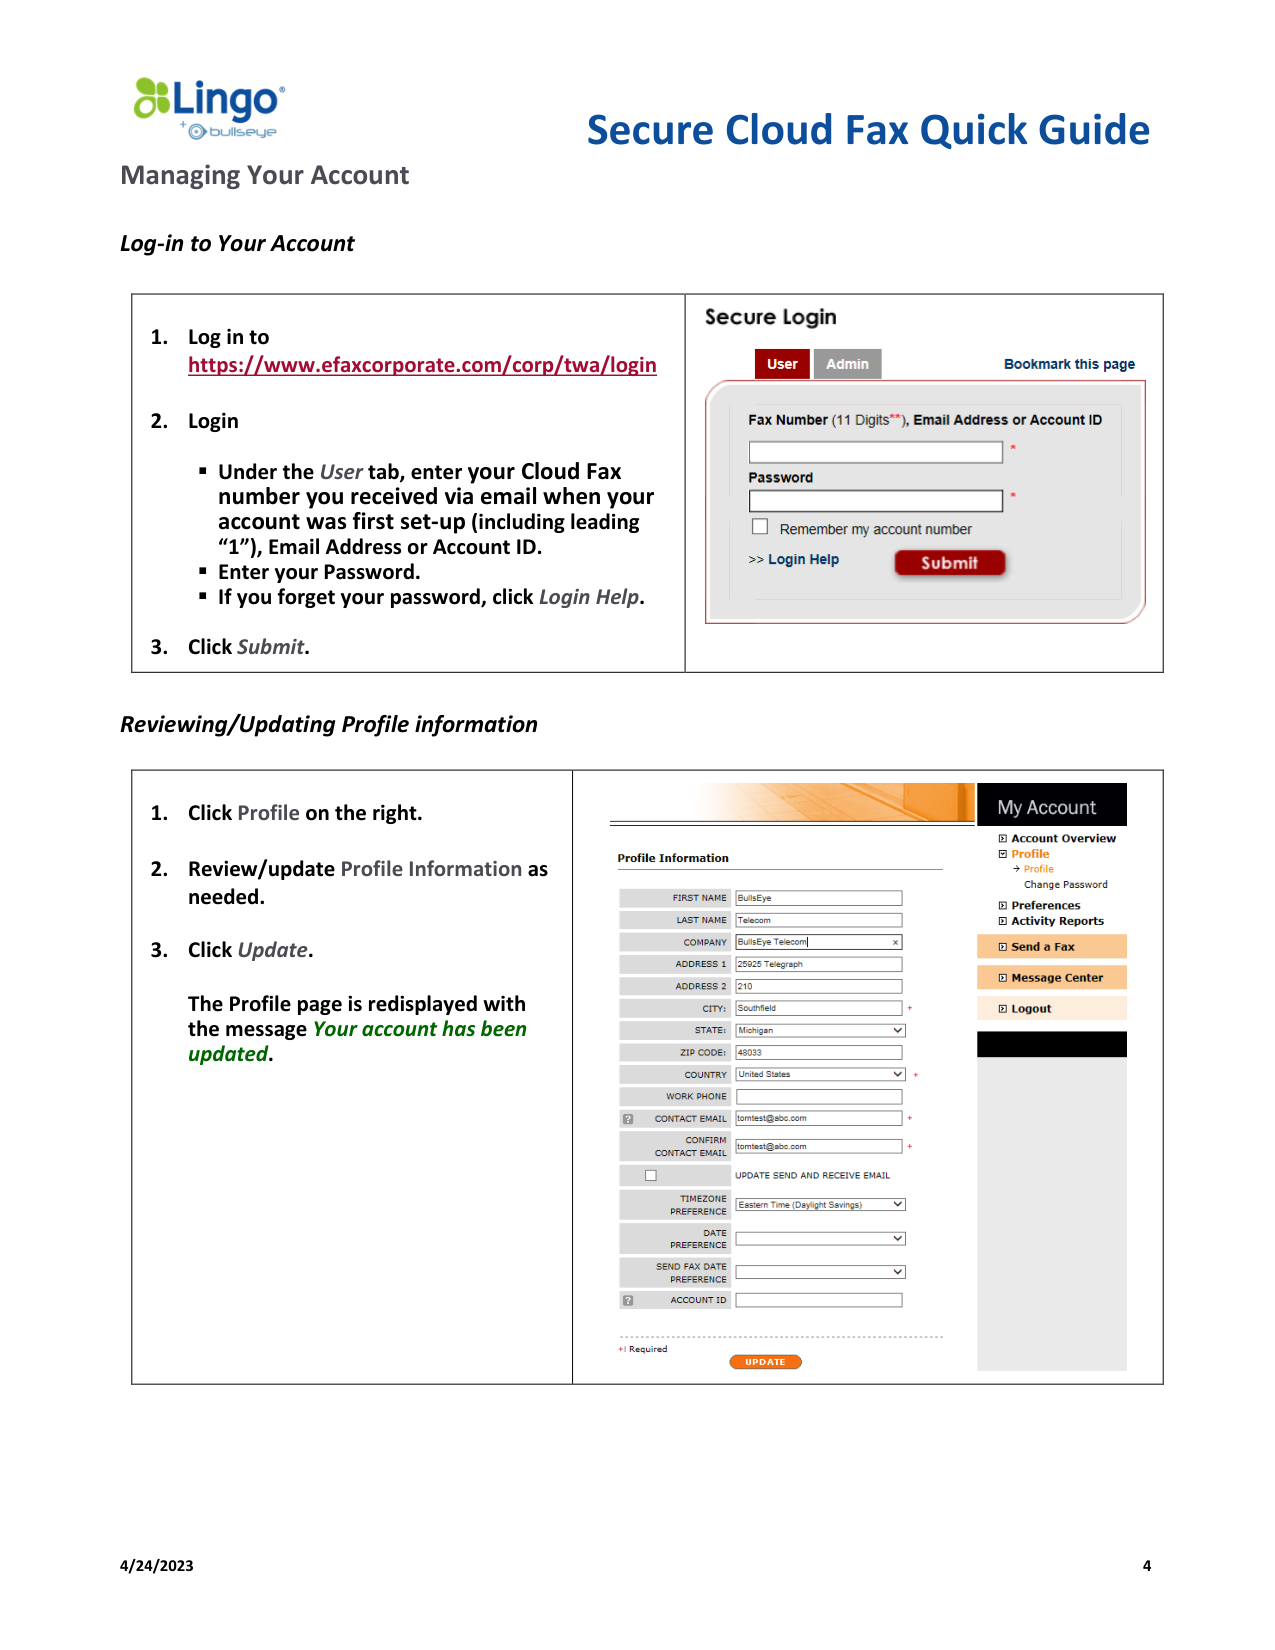
1. Log in to
https://www.efaxcorporate.com/corp/twa/login
2. Login
▪ Under the User tab, enter your Cloud Fax
number you received via email when your
account was first set-up (including leading
“1”), Email Address or Account ID.
▪ Enter your Password.
▪ If you forget your password, click Login Help.
3. Click Submit.
Reviewing/Updating Profile information
1. Click Profile on the right.
2. Review/update Profile Information as
needed.
3. Click Update.
The Profile page is redisplayed with
the message Your account has been
updated.
Secure Cloud Fax Quick Guide
4/24/2023
5
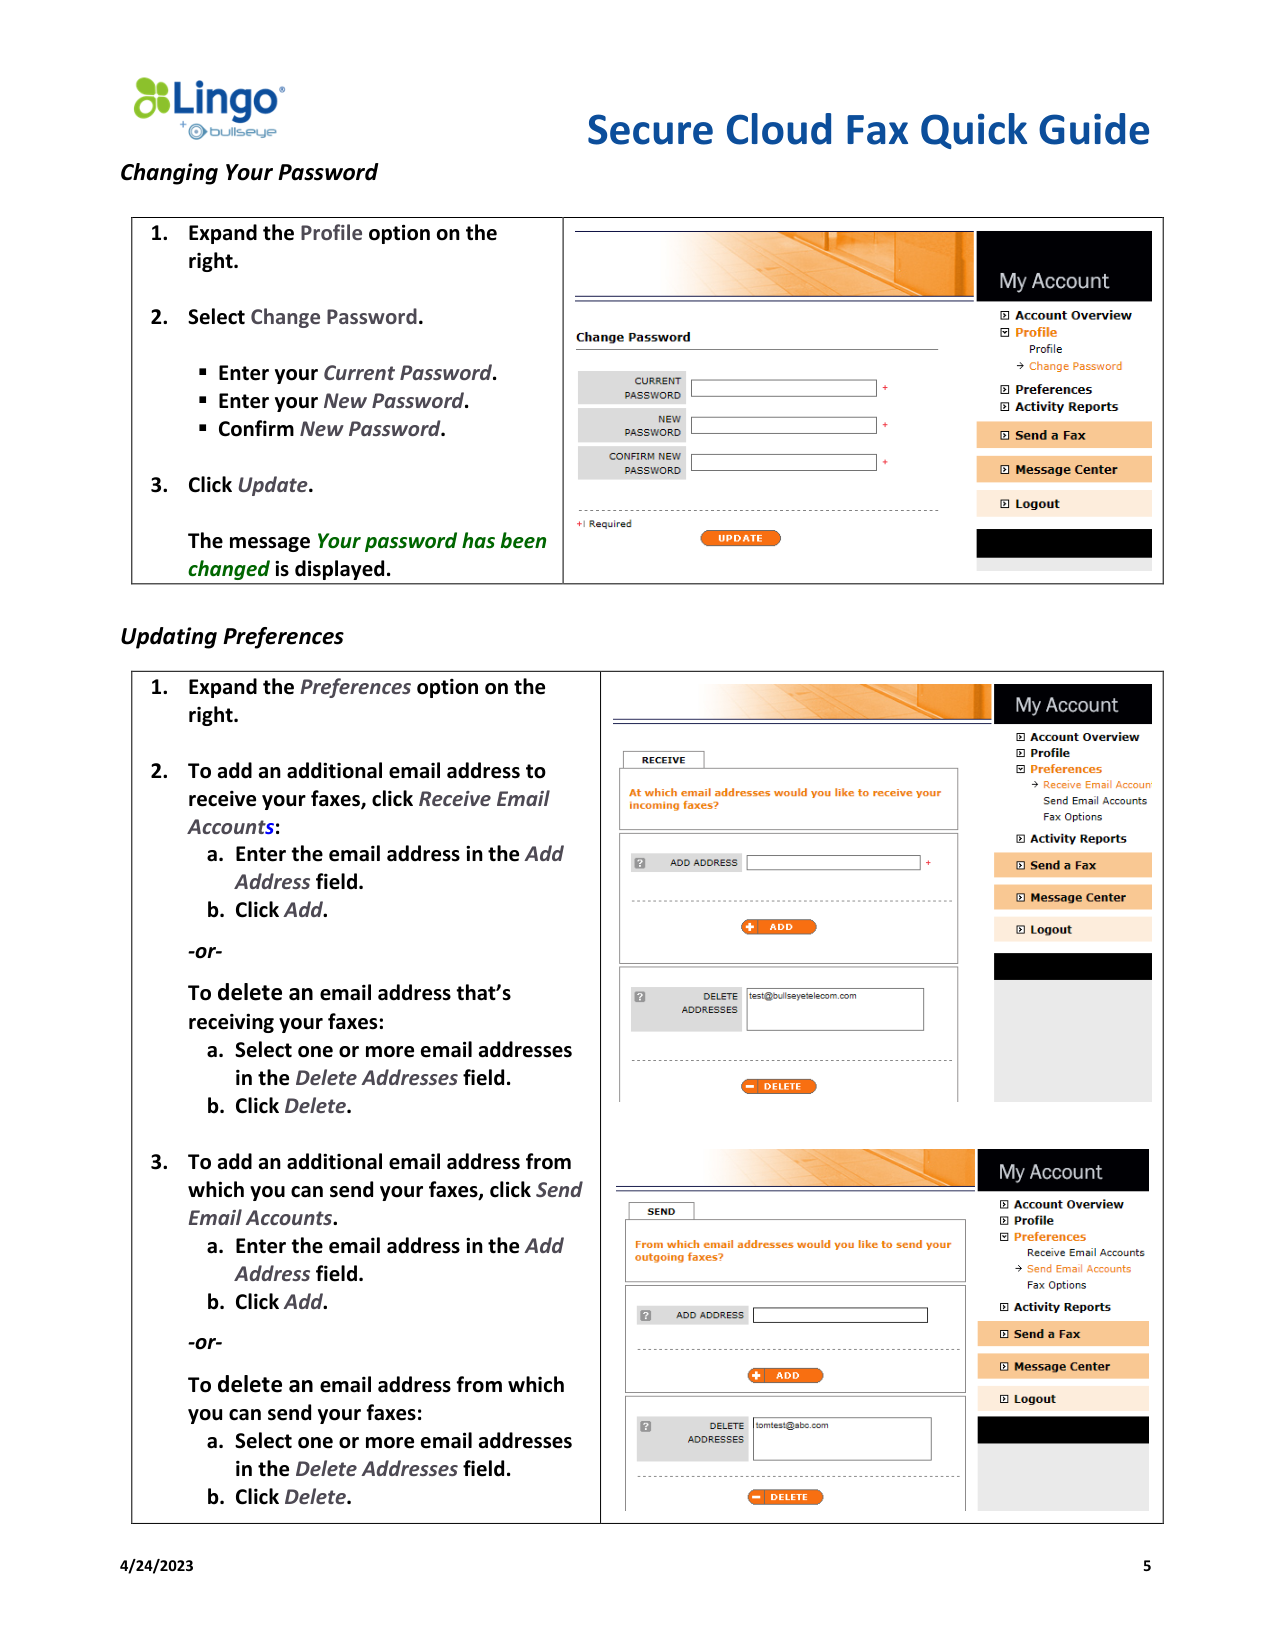
Changing Your Password
1. Expand the Profile option on the
right.
2. Select Change Password.
▪ Enter your Current Password.
▪ Enter your New Password.
▪ Confirm New Password.
3. Click Update.
The message Your password has been
changed is displayed.
Updating Preferences
1. Expand the Preferences option on the
right.
2. To add an additional email address to
receive your faxes, click Receive Email
Accounts:
a. Enter the email address in the Add
Address field.
b. Click Add.
-or-
To delete an email address that’s
receiving your faxes:
a. Select one or more email addresses
in the Delete Addresses field.
b. Click Delete.
3. To add an additional email address from
which you can send your faxes, click Send
Email Accounts.
a. Enter the email address in the Add
Address field.
b. Click Add.
-or-
To delete an email address from which
you can send your faxes:
a. Select one or more email addresses
in the Delete Addresses field.
b. Click Delete.
Secure Cloud Fax Quick Guide
4/24/2023
6
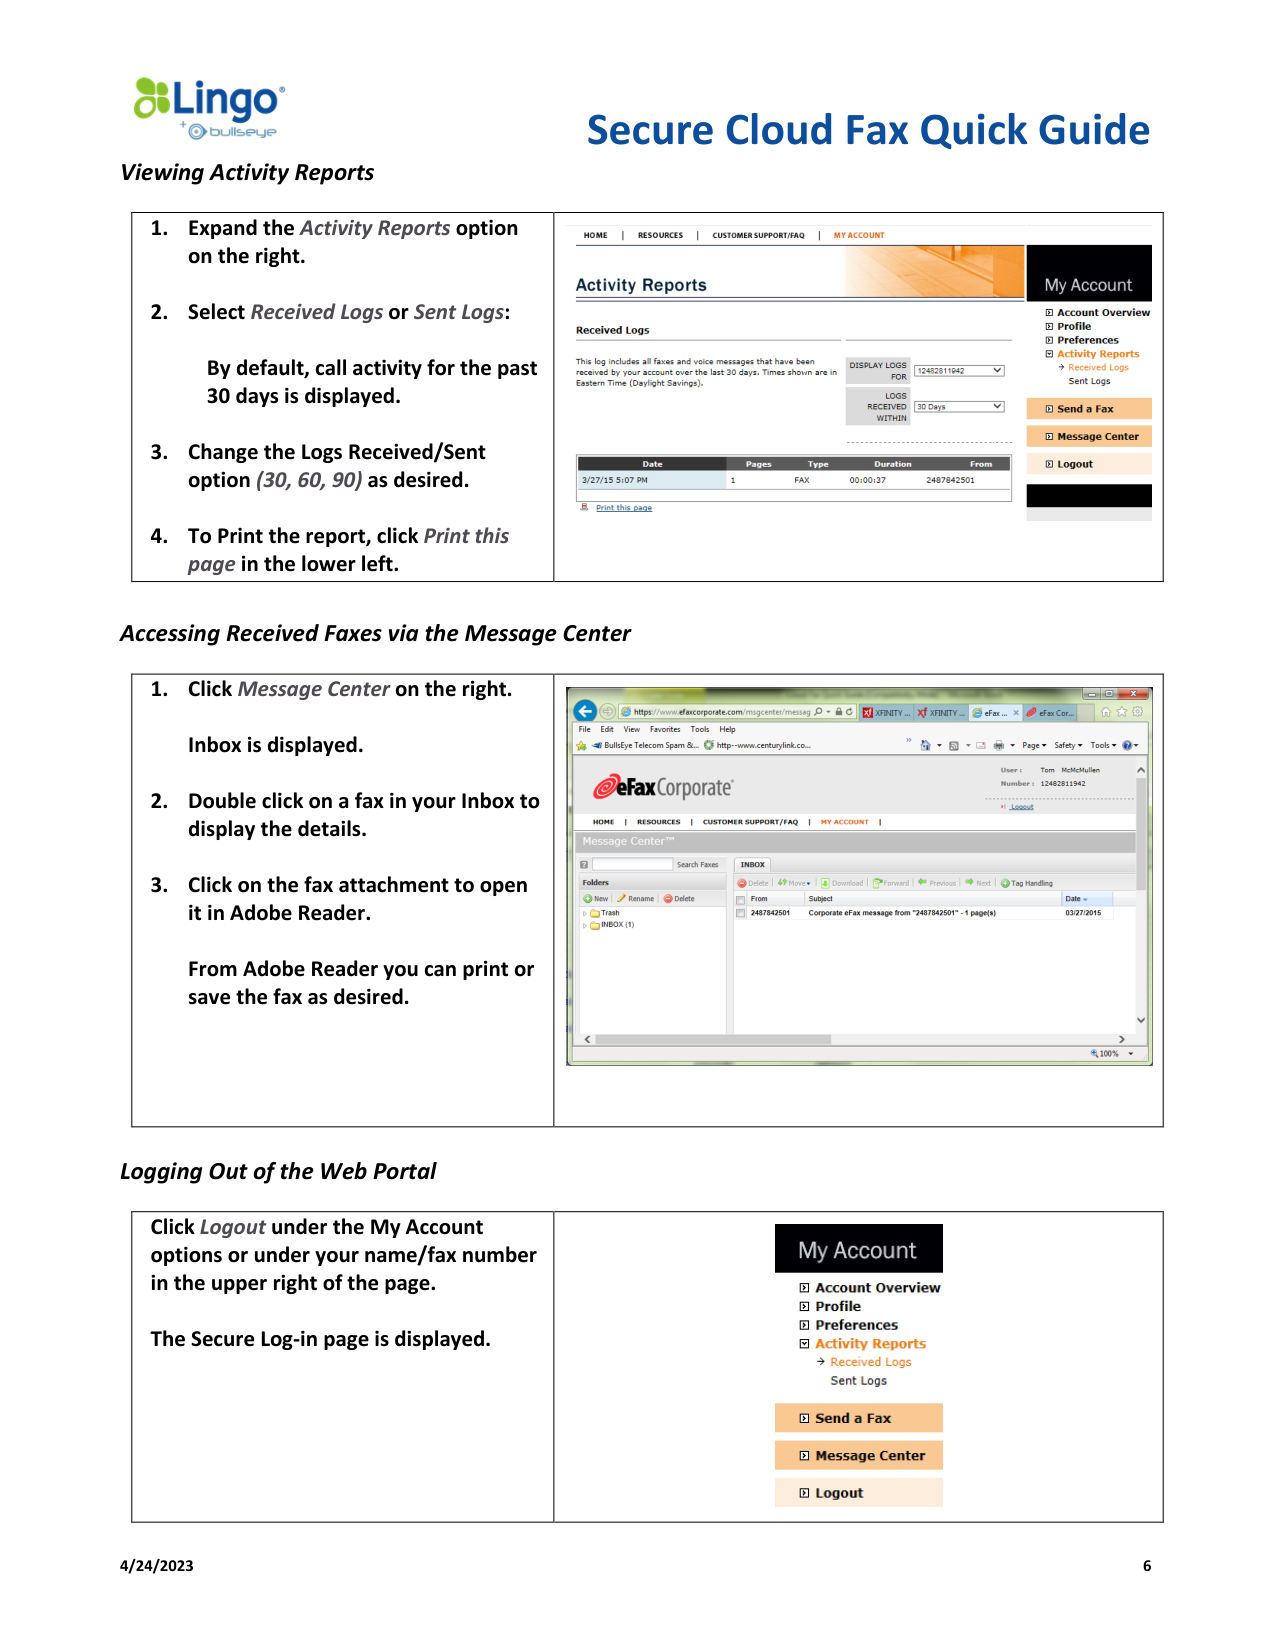
Viewing Activity Reports
1. Expand the Activity Reports option
on the right.
2. Select Received Logs or Sent Logs:
By default, call activity for the past
30 days is displayed.
3. Change the Logs Received/Sent
option (30, 60, 90) as desired.
4. To Print the report, click Print this
page in the lower left.
Accessing Received Faxes via the Message Center
1. Click Message Center on the right.
Inbox is displayed.
2. Double click on a fax in your Inbox to
display the details.
3. Click on the fax attachment to open
it in Adobe Reader.
From Adobe Reader you can print or
save the fax as desired.
Logging Out of the Web Portal
Click Logout under the My Account
options or under your name/fax number
in the upper right of the page.
The Secure Log-in page is displayed.
Secure Cloud Fax Quick Guide
4/24/2023
7
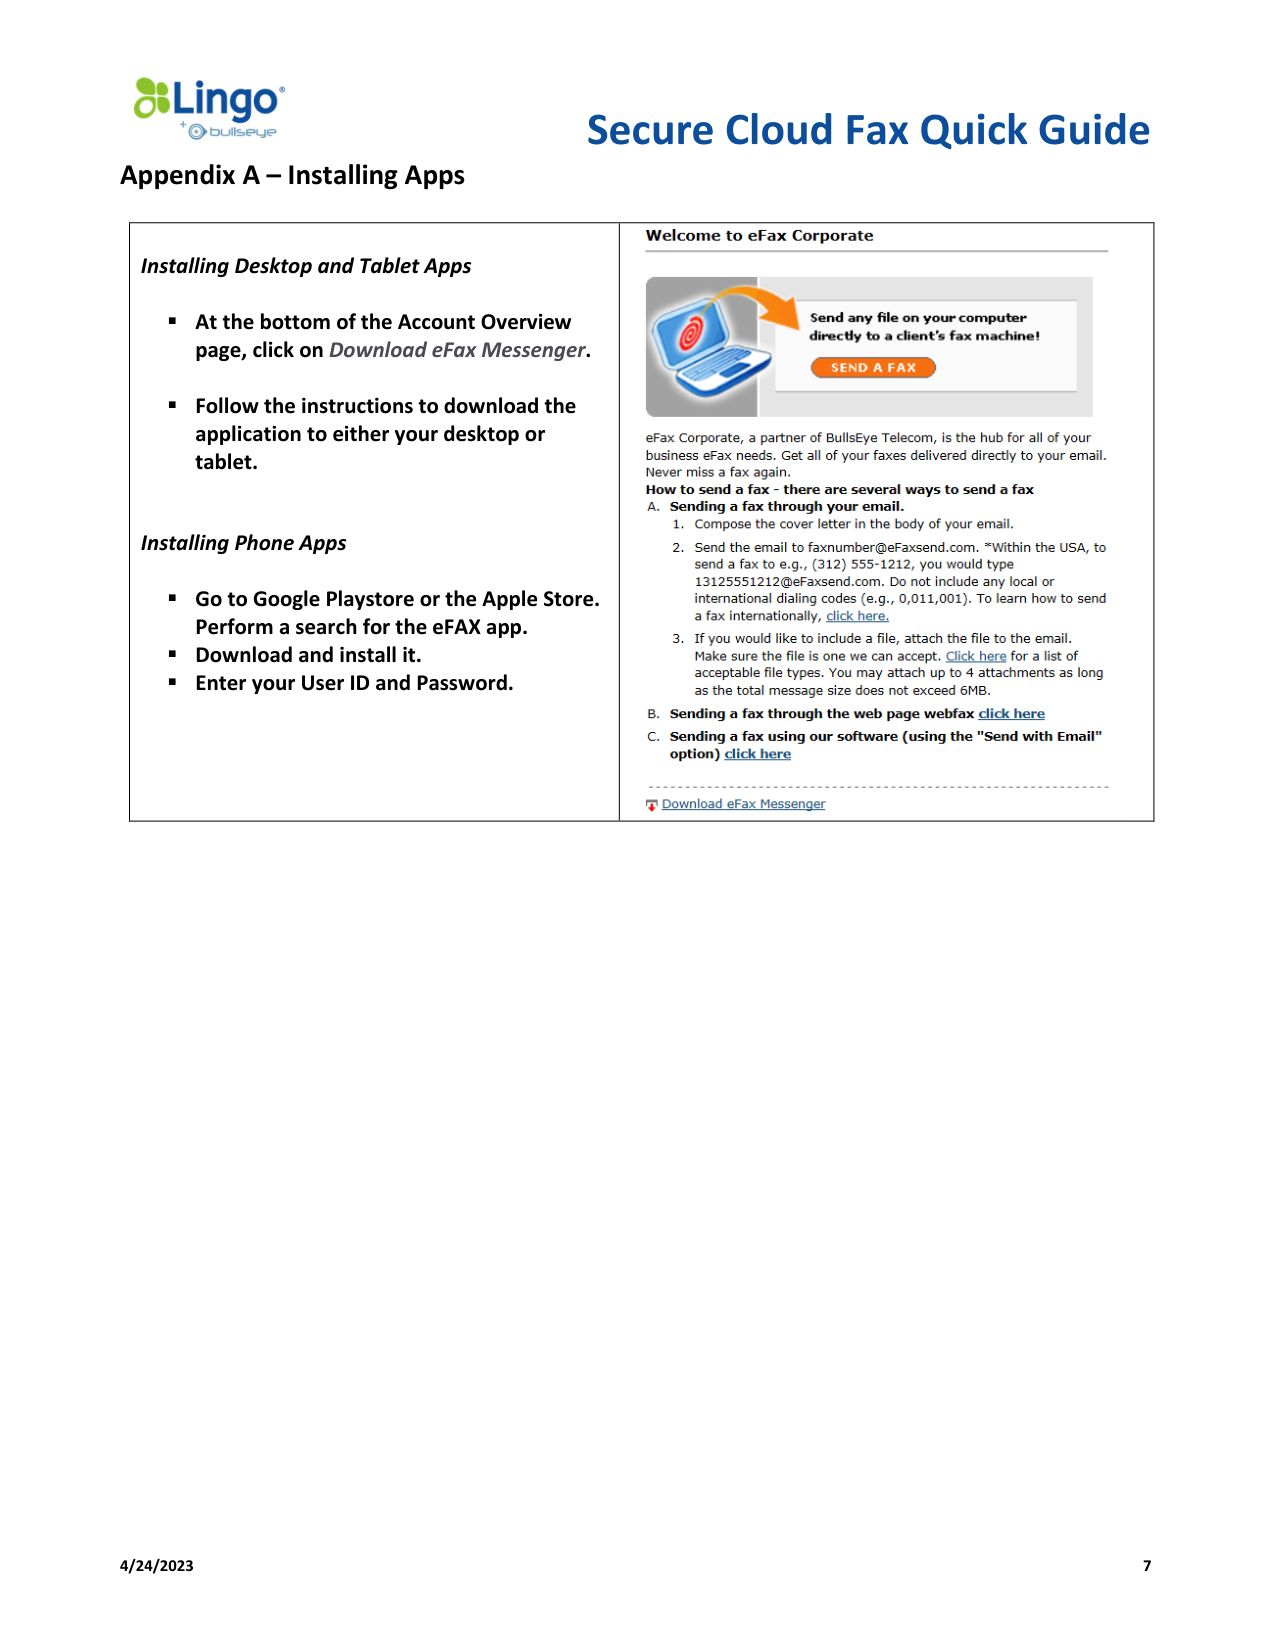
Appendix A – Installing Apps
Installing Desktop and Tablet Apps
▪ At the bottom of the Account Overview
page, click on Download eFax Messenger.
▪ Follow the instructions to download the
application to either your desktop or
tablet.
Installing Phone Apps
▪ Go to Google Playstore or the Apple Store.
Perform a search for the eFAX app.
▪ Download and install it.
▪ Enter your User ID and Password.