
Managing Your VoIP Service
Summary: This document explains key responsibilities of the VoIP portal administrator as well as how to access and navigate around the portal.
Download article(s)
![]() 02_Managing Your Hosted PBX Services 102623.pdf
02_Managing Your Hosted PBX Services 102623.pdf
02_Managing Your Hosted PBX Services 102623

Managing Your Hosted PBX Services
Managing Your Hosted Account
10/26/2023
1
This guide is designed to provide some insight in to managing your Hosted PBX account. The
topics in this guide are as follows:
Your Role
Contacting BullsEye
An Overview of Hosted PBX functionality
Administrative Tasks
Configuration Setup
Disaster Recovery Options
IP Phone Troubleshooting
Your Role
If you are reading this, you have assumed the role of managing your company’s Hosted PBX
services. With a little help from BullsEye, you’ll be able to meet the needs of your users and
take full advantage of all that your new phone system has to offer. Your responsibilities as an
Administrator are as follows:
Educate Yourself. As the Administrator, it is important that you have a good working
knowledge of IP technology, and in particular, Hosted PBX. As well, there are numerous
tools that you and your team are going to be using (i.e., Feature Access Codes for the user
and the VoIP Portal for the Administrator(s)). Being very familiar with their operation is
important. Support materials for these tools, your handsets and much more are available
at https://bullseyetelecom.my.site.com/BullsEyeCustomerCommunity/s/.
Properly Configure Your Services. The crux of your duties lies in the initial setup and on-
going management of your Hosted PBX services.
Monitor Your Services. It is imperative that your phone system is properly working 24/7.
This includes ensuring sufficient bandwidth and internet access to each location, as well as
the IP phones and router (i.e., session border controller) that are part of your configuration.
Field Questions from Staff. Staff will look to you for support on how to use, manage, and
configure their phones.
Make End User Account Changes. Inevitably, you will be asked to login to the VoIP portal
and make changes to the individual accounts of your staff. For example, someone may call
you to change their Call Forwarding to a different telephone number.
Contacting Lingo + BullsEye
If you have any questions or issues, there are numerous people you can call that can assist you.
Before and during the installation of your service, your Order Manager and Professional
Services Technician will be your primary contacts for service configuration. Once the service
is installed, forward all inquiries to Client Services.
Trouble tickets and inquiries related to your invoice, feature usage, special promotions or any
other questions regarding the status of your account can be submitted 24/7 via MBA (My
BullsEye Account). Client Services is available 24/7/365 to assist with any repair issue at 877-
438-2855 regarding your account.
Managing Your Hosted PBX Services
Managing Your Hosted Account
10/26/2023
2
An Overview of Hosted PBX Functionality
How does Hosted PBX work?
At the customer premise, IP handsets (telephones) are plugged directly into the data
network which connects to the Internet using a broadband connection.
The CPE (handsets / router) is programmed to communicate directly with BullsEye’s IP
switch. BullsEye’s switch handles all of the signaling, calls and features (a.k.a., PBX
functionality) using VoIP software.
As incoming and outgoing calls are transmitted over this connection, the calls are converted
to IP-packets. Utilizing BullsEye’s network and VoIP platform, the calls are placed and
received over a broadband connection to the outside telephone word (i.e., the Public
Switched Telephone Network).
In summary, Hosted PBX is a phone system where BullsEye (as the provider) hosts most of
the equipment the phone system requires to operate. All of the functionality usually
provided by a customer-premise PBX is provided by BullsEye via a broadband connection.
How is it connected?
Like a desktop PC, the IP phone plugs into a data network using a network cable, and once
turned on, can make calls, forward calls, hold calls, transfer calls, check voice mail, and
perform all the functional tasks you would expect out of a business grade PBX.
As long as the IP phone has a connection to the Internet, it will function as a business
telephone loaded with PBX features that go beyond what a traditional analog or digital
telephone can provide.
Because of the flexibility of IP, an IP handset can be configured to operate over an open
Internet connection without geographical boundaries.
Hosted PBX Equipment Options
The following is required when implementing Hosted PBX:
o A stable broadband connection (Cable, Fiber, etc.). Hosted PBX works with wide variety of
broadband and wireless technologies, as long as there is sufficient bandwidth to process
voice traffic.
o Polycom or Yealink IP phones.
o Router. The router or modem is most often provided by the broadband provider.
o POE Switch.
o CAT5 Ethernet cable.
o Patch Panel.
o A controlled cool area to mount the equipment.
As the administrator, you need to know how this equipment performs, and how to
troubleshoot it.
NOTE: Please see your Implementation Specialist for an inventory of your specific
equipment.
Managing Your Hosted PBX Services
Managing Your Hosted Account
10/26/2023
3
How much bandwidth do I really need to run a Hosted PBX?
Hosted PBX VoIP service does not consume any notable bandwidth until you make an external
phone call.
Usage, including checking voice mail, and dialing internal extensions within the company,
require negligible bandwidth. If there are no external calls made, the bandwidth consumption
is negligible.
Once you make or receive an external phone call, the bandwidth consumed will be a very
conservative 30kbps-90kbps (kilobits per second). If you have 2 external calls running at the
same time the bandwidth consumed will be 180kbps until either one of the calls hangs up, at
which point the consumption of bandwidth drops down. Though the signal is compressed at
30kbps, it is still very high quality.
The Engineering standard for VoIP call bandwidth is: G729 – 60k and G711 – 150k
The important thing to know is how many concurrent maximum calls (or paths) your office will
have at any one time, and the upload bandwidth available on your internet connection.
Administrative Task List
When it comes to managing your Hosted IP phone service, there are specific tasks that will require
your attention. These are broken up in to two groups – the tasks that are performed during your
initial setup, and the tasks that are done as part of your on-going maintenance. These tasks are as
follows:
INITIAL SETUP TASKS. During and immediately after your Hosted Service is installed, you will need
to ensure that your service is configured and operating correctly. This includes the following 6
tasks:
Task #1 - Confirming Your Call Flow. Meticulously checking the routing of all incoming calls
from all your phones to ensure that the setup has been done correctly is a very important first
step.
Task #2 - Confirming Your Auto Attendant Settings. Methodically checking the routing of
your Auto Attendant is also a very important thing to do. Methodically examining each option to
ensure that the routing is correct is paramount. Instructions on the Auto Attendant are available
from our online Learning Center.
Task #3 - Confirming Your Hunt Group Settings (if applicable). Similar to Call Flow and Auto
Attendant, a careful examination of your Hunt Group call routing needs to be performed.
Instructions on maintaining Hunt Groups are available from our online Learning Center.
Task #4 - Creating Portal User ID’s & Passwords. All recipients of an IP phone will require
secure access to the VoIP portal so that they can modify and control their IP phones. The steps to
perform this task are included in this document.
Task #5 - Setting Up Voicemail. Both at the company level and individual level, all voicemail
boxes need to be setup as soon as your new system comes online. The steps to perform this task
are included in this document.
Managing Your Hosted PBX Services
Managing Your Hosted Account
10/26/2023
4
Task #6 - Completing the Directory of Employee Names. Using the VoIP Portal, the directory
list of names needs to be updated so that it is accurate. This affects both Caller ID and Calling
Name functions. The steps to perform this task are included in this document.
ON-GOING MANAGEMENT TASKS. Once everything is installed and configured, the majority of
your time will be spent in management mode. This includes the following tasks:
Providing End User Account Support. Accessing the VoIP portal and making feature changes
(i.e., call routing) for your staff will occur. As well, some users will have issues making their
features work properly. This is where you will have to troubleshoot and solve their technical
issues.
Making Configuration Updates. As employees come and go, or people change roles or
departments, modifications to the Enterprise Directory of Employee Names will need to occur.
As well, changes to your Hunt Groups, User Id’s and passwords, etc., will constantly require
updating.
Monitoring Your Service & Equipment. All of your IP phones and the related equipment (i.e.,
your Power over Ethernet Switch) will need to be monitored. If something goes wrong, you will
need to investigate and address the issue.
Customizing Additional Features. Because of the rich feature set that is available, such as
Remote Office, Priority Alert, Time Schedules, etc., you should explore how these features can
help improve call flow and create operational efficiencies.
Providing Training. It will be necessary for new employees to receive information on their
phone system, as well as how to access and use the VoIP portal.
Managing Your Hosted PBX Services
Managing Your Hosted Account
10/26/2023
5
VoIP Portal Administrative Tasks
This topic provides an overview of the VoIP Portal and explains basic procedures used by the
VoIP Portal Administrator including:
•
Logging into the VoIP Portal
•
Navigating the VoIP Portal
•
Searching for a Group
•
Setting Your Schedules
•
Disaster Redirect
•
Searching for a User
•
User Level Calling Features
•
Viewing Registrations
•
Managing Users
VoIP Portal Overview
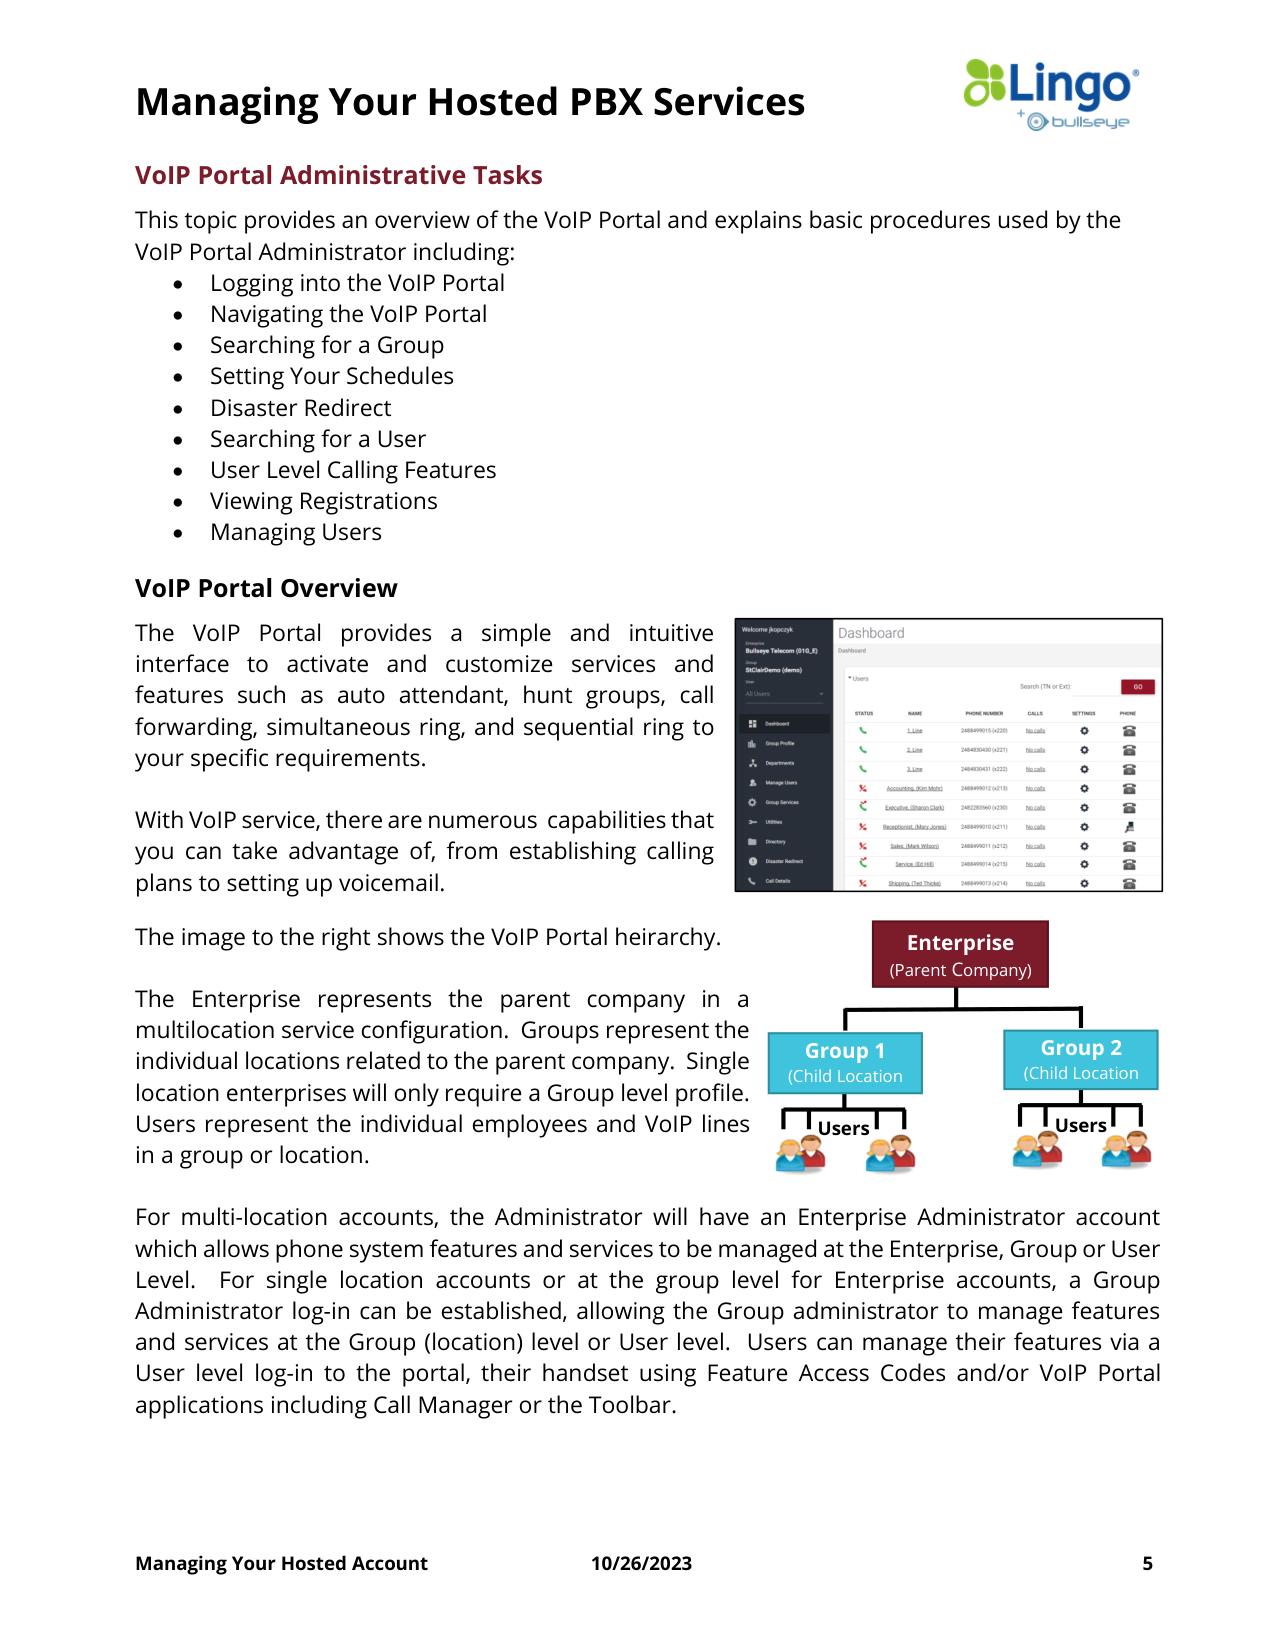
The VoIP Portal provides a simple and intuitive
interface to activate and customize services and
features such as auto attendant, hunt groups, call
forwarding, simultaneous ring, and sequential ring to
your specific requirements.
With VoIP service, there are numerous capabilities that
you can take advantage of, from establishing calling
plans to setting up voicemail.
The image to the right shows the VoIP Portal heirarchy.
The Enterprise represents the parent company in a
multilocation service configuration. Groups represent the
individual locations related to the parent company. Single
location enterprises will only require a Group level profile.
Users represent the individual employees and VoIP lines
in a group or location.
For multi-location accounts, the Administrator will have an Enterprise Administrator account
which allows phone system features and services to be managed at the Enterprise, Group or User
Level. For single location accounts or at the group level for Enterprise accounts, a Group
Administrator log-in can be established, allowing the Group administrator to manage features
and services at the Group (location) level or User level. Users can manage their features via a
User level log-in to the portal, their handset using Feature Access Codes and/or VoIP Portal
applications including Call Manager or the Toolbar.
Users
Users
Enterprise
(Parent Company)
Group 1
(Child Location
Group 2
(Child Location
Managing Your Hosted PBX Services
Managing Your Hosted Account
10/26/2023
6
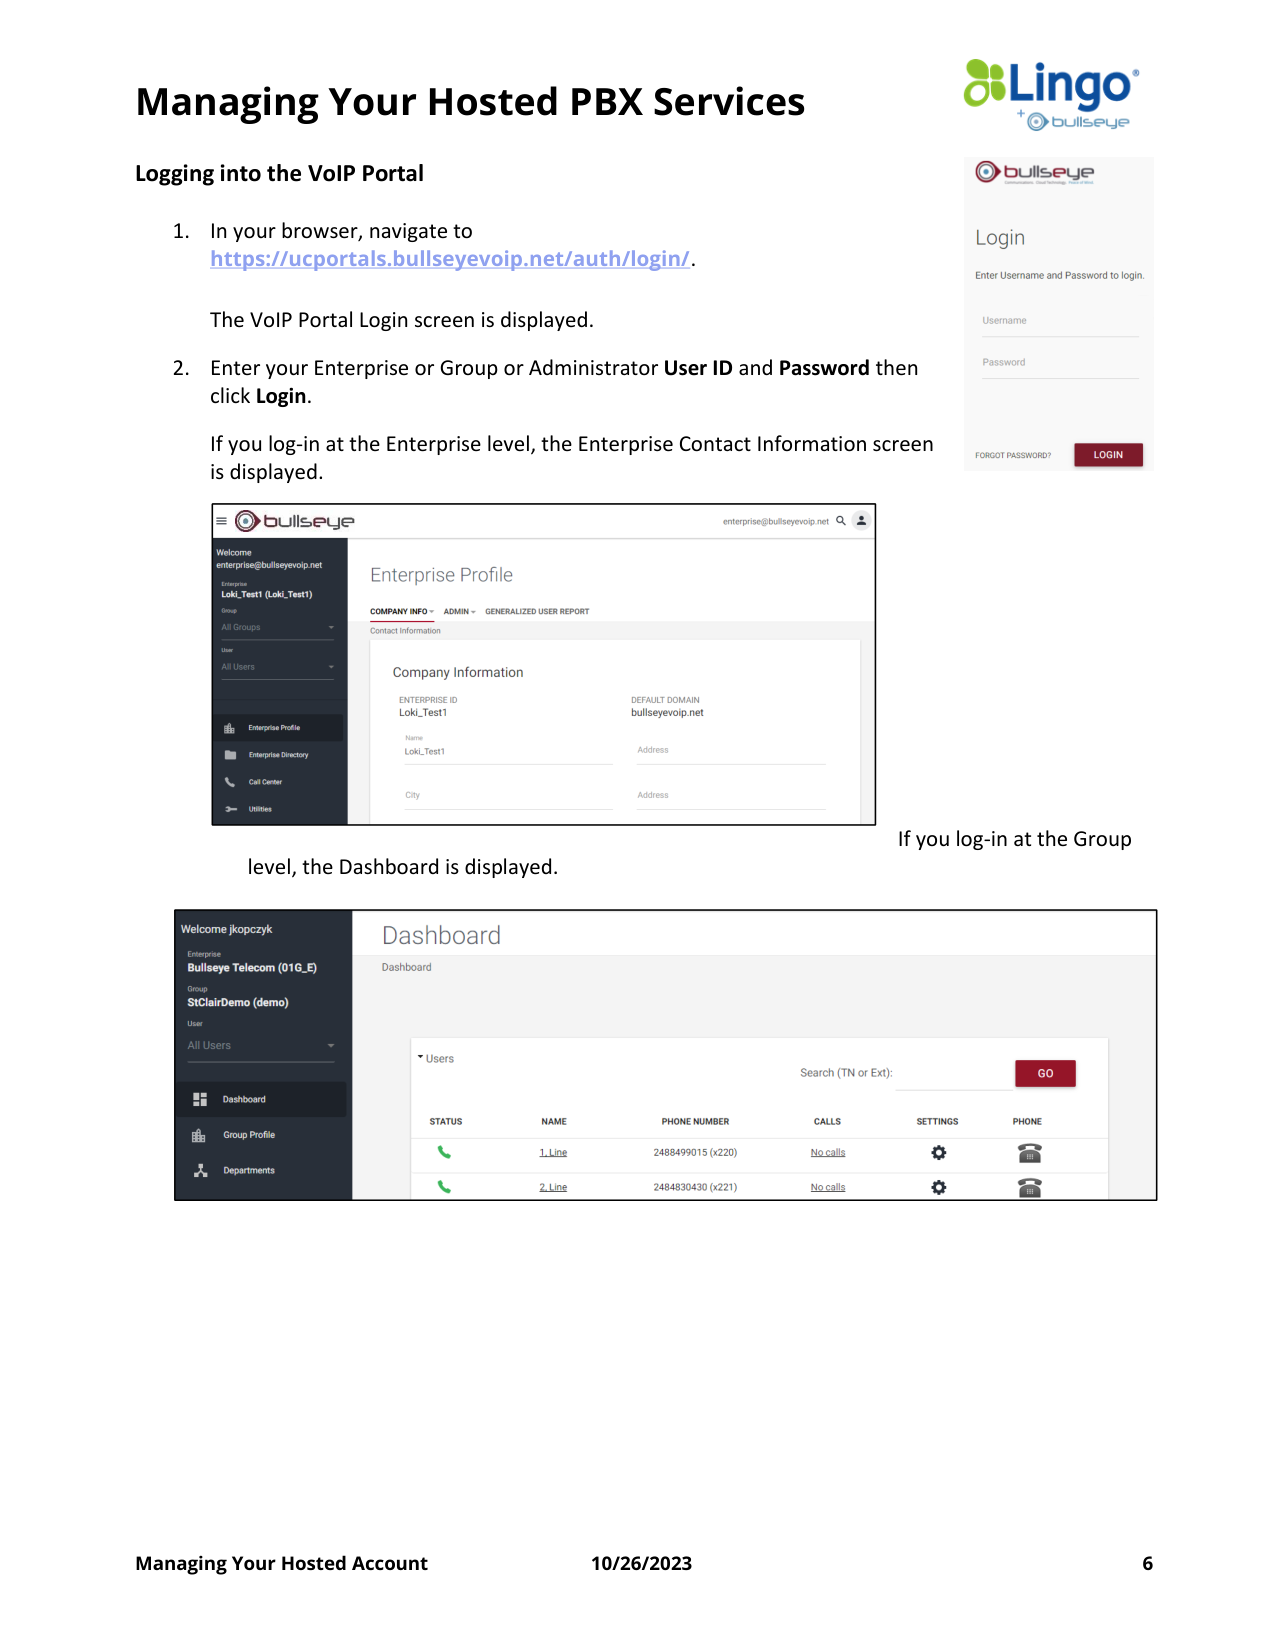
Logging into the VoIP Portal
1. In your browser, navigate to
https://ucportals.bullseyevoip.net/auth/login/.
The VoIP Portal Login screen is displayed.
2. Enter your Enterprise or Group or Administrator User ID and Password then
click Login.
If you log-in at the Enterprise level, the Enterprise Contact Information screen
is displayed.
If you log-in at the Group
level, the Dashboard is displayed.
Managing Your Hosted PBX Services
Managing Your Hosted Account
10/26/2023
7
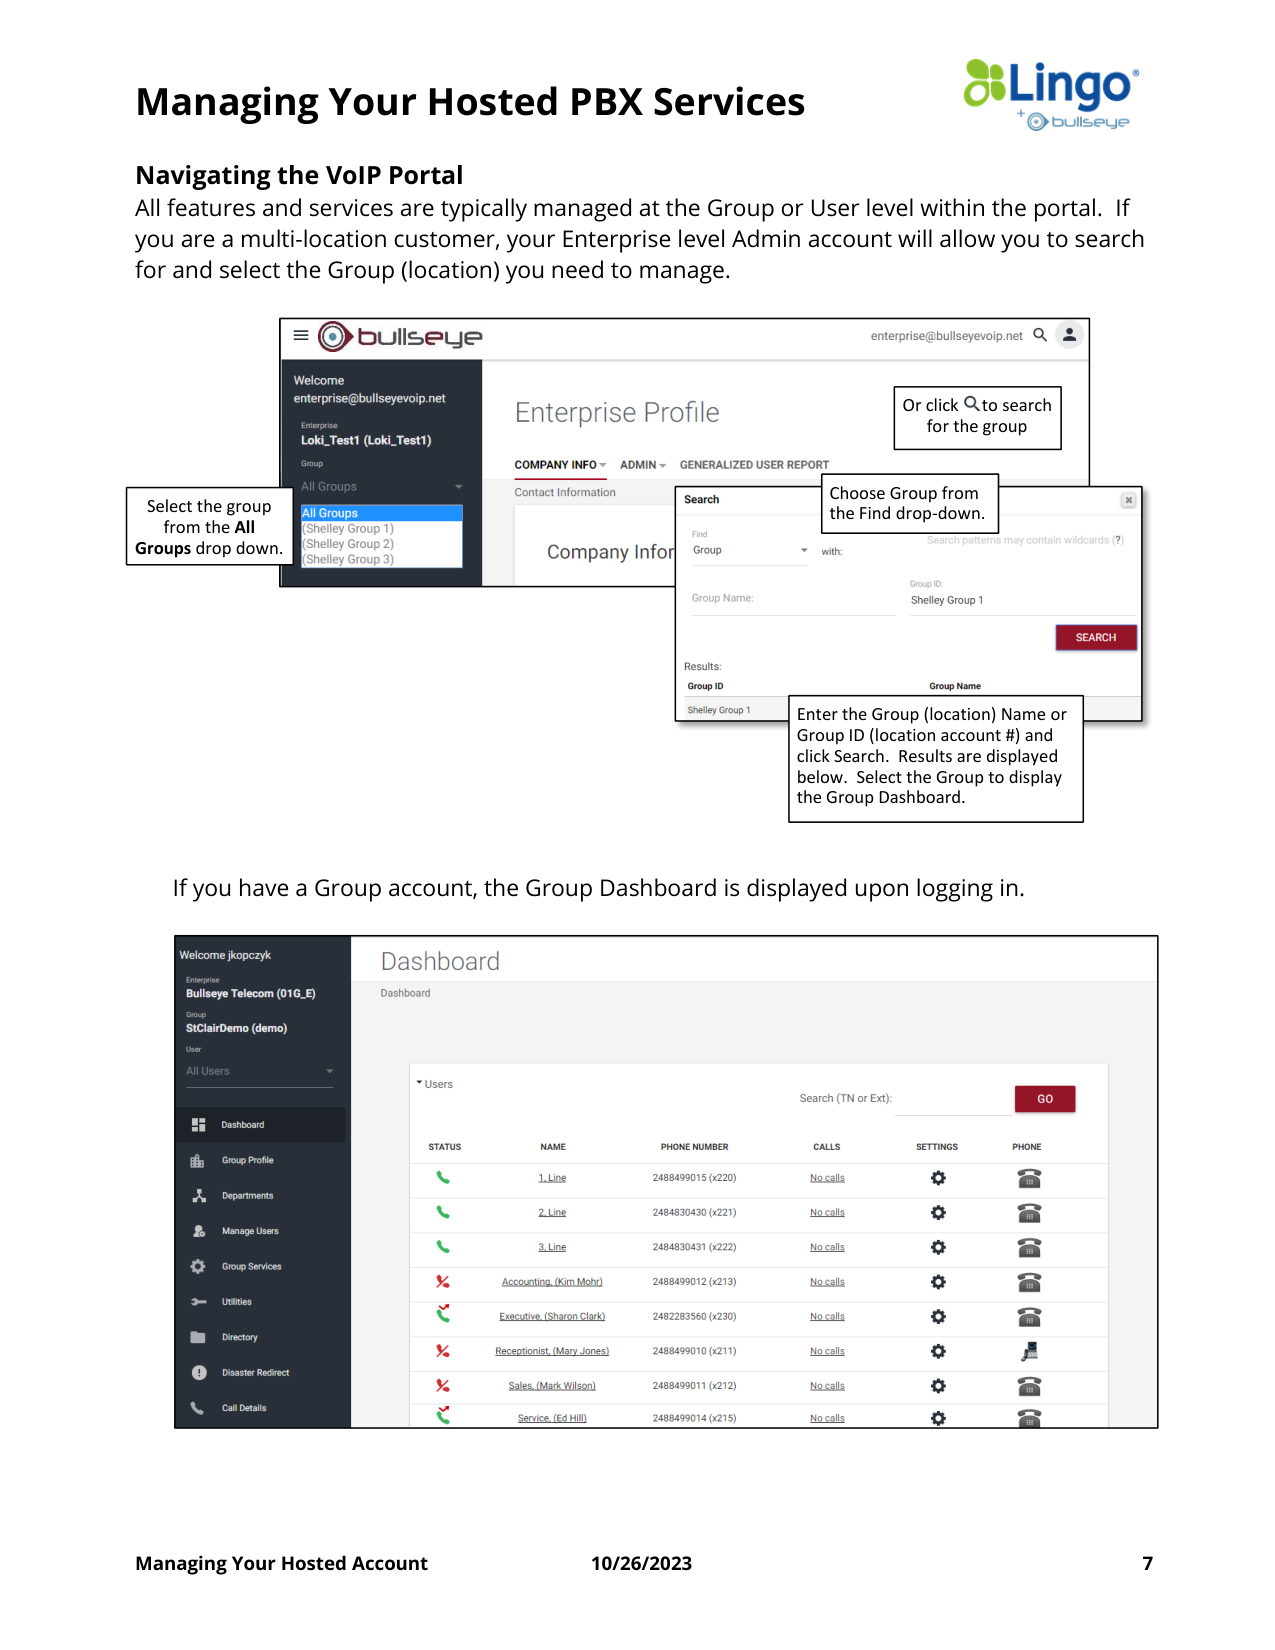
Navigating the VoIP Portal
All features and services are typically managed at the Group or User level within the portal. If
you are a multi-location customer, your Enterprise level Admin account will allow you to search
for and select the Group (location) you need to manage.
If you have a Group account, the Group Dashboard is displayed upon logging in.
Select the group
from the All
Groups drop down.
Or click
to search
for the group
Choose Group from
the Find drop-down.
Enter the Group (location) Name or
Group ID (location account #) and
click Search. Results are displayed
below. Select the Group to display
the Group Dashboard.
Managing Your Hosted PBX Services
Managing Your Hosted Account
10/26/2023
8
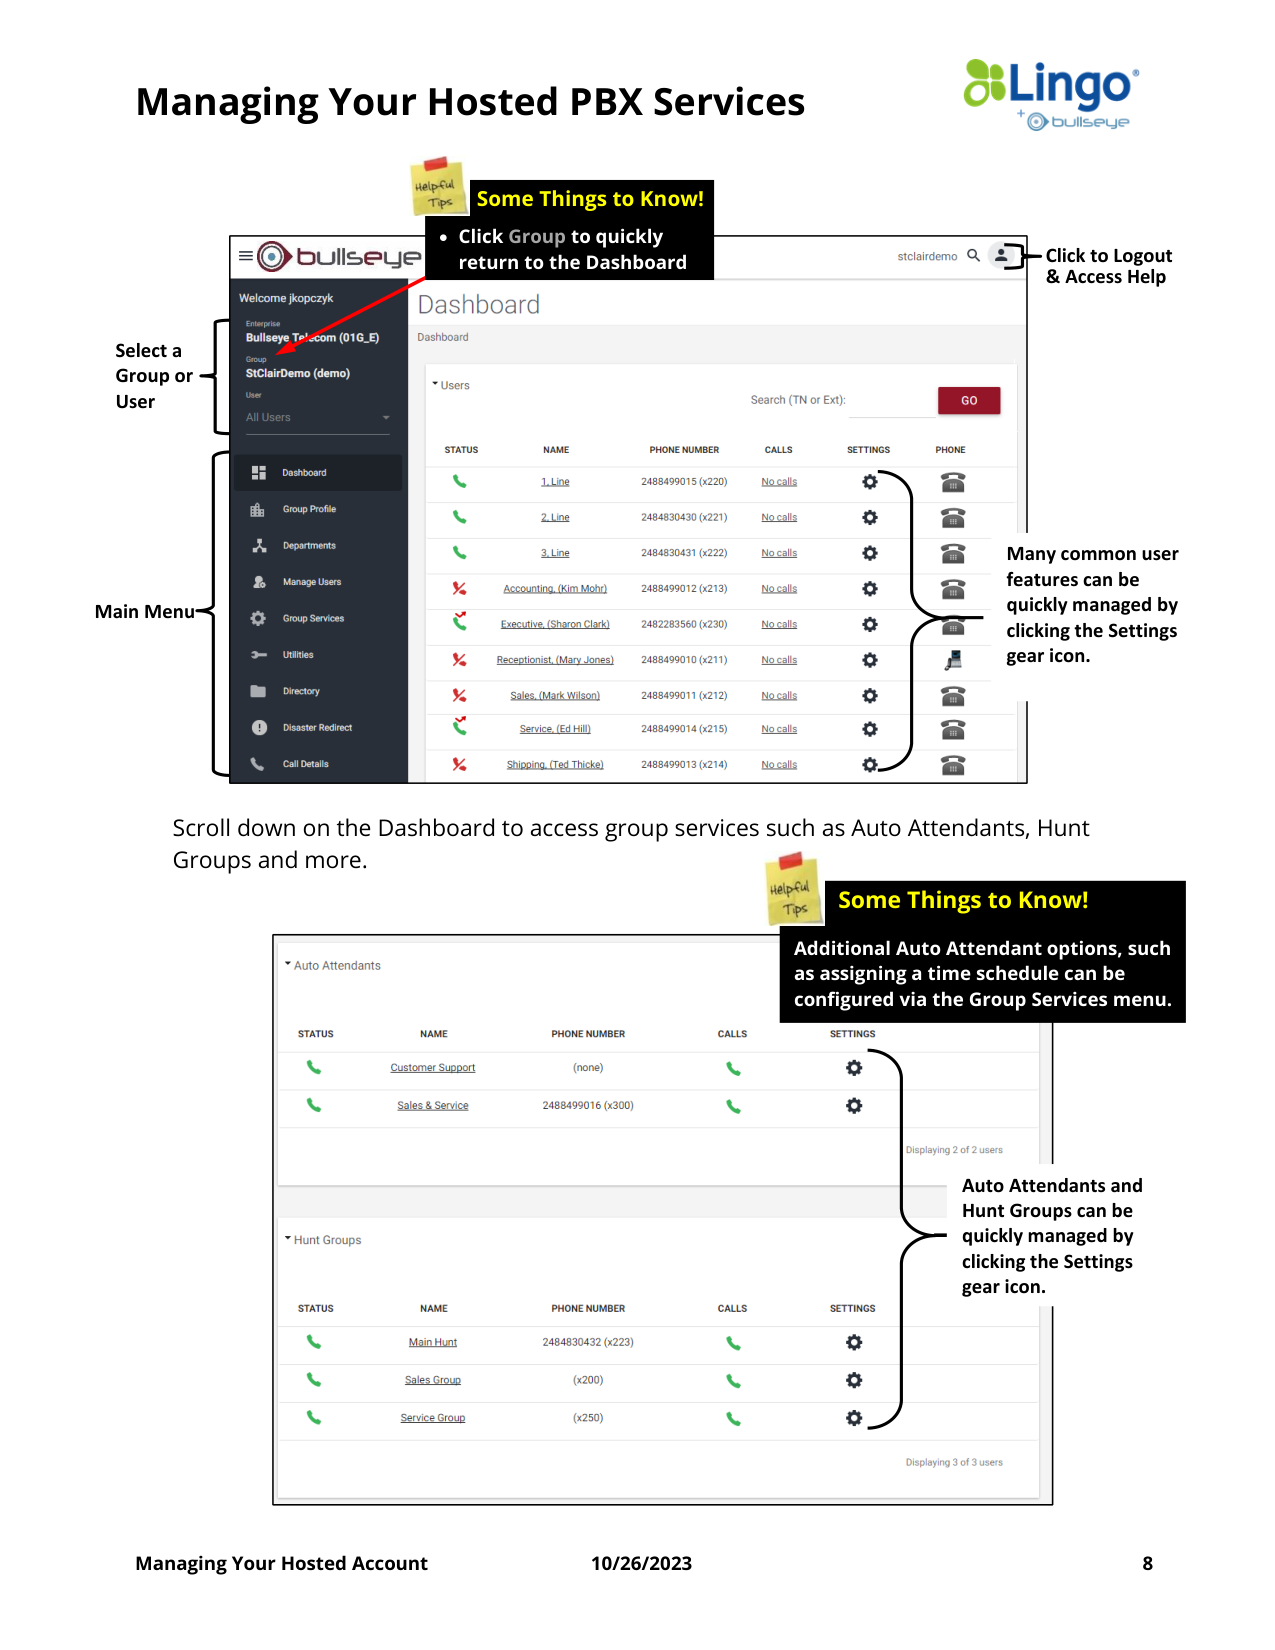
Scroll down on the Dashboard to access group services such as Auto Attendants, Hunt
Groups and more.
Select a
Group or
User
Click to Logout
& Access Help
Main Menu
Many common user
features can be
quickly managed by
clicking the Settings
gear icon.
Auto Attendants and
Hunt Groups can be
quickly managed by
clicking the Settings
gear icon.
• Click Group to quickly
return to the Dashboard
Some Things to Know!
Additional Auto Attendant options, such
as assigning a time schedule can be
configured via the Group Services menu.
Some Things to Know!
Managing Your Hosted PBX Services
Managing Your Hosted Account
10/26/2023
9
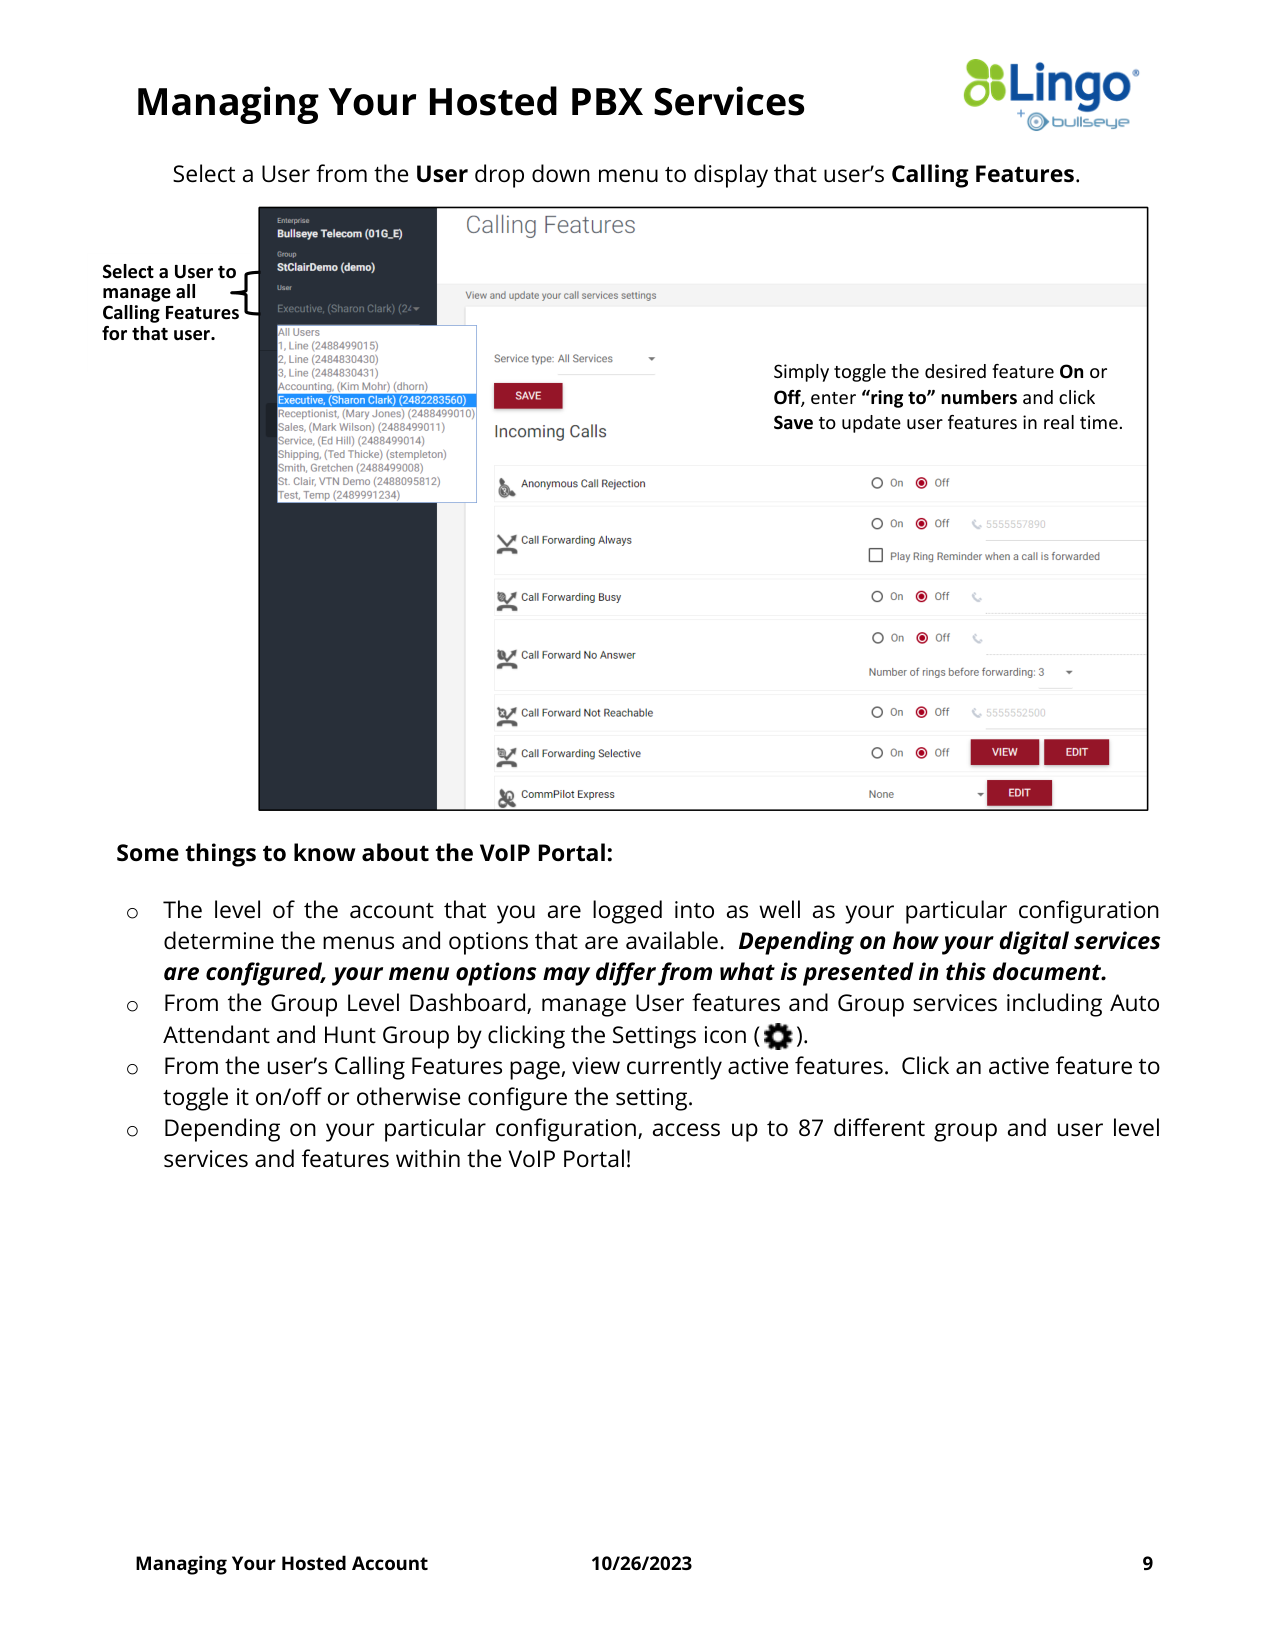
Select a User from the User drop down menu to display that user’s Calling Features.
Some things to know about the VoIP Portal:
o The level of the account that you are logged into as well as your particular configuration
determine the menus and options that are available. Depending on how your digital services
are configured, your menu options may differ from what is presented in this document.
o From the Group Level Dashboard, manage User features and Group services including Auto
Attendant and Hunt Group by clicking the Settings icon ( ).
o From the user’s Calling Features page, view currently active features. Click an active feature to
toggle it on/off or otherwise configure the setting.
o Depending on your particular configuration, access up to 87 different group and user level
services and features within the VoIP Portal!
Select a User to
manage all
Calling Features
for that user.
Simply toggle the desired feature On or
Off, enter “ring to” numbers and click
Save to update user features in real time.
Managing Your Hosted PBX Services
Managing Your Hosted Account
10/26/2023
10
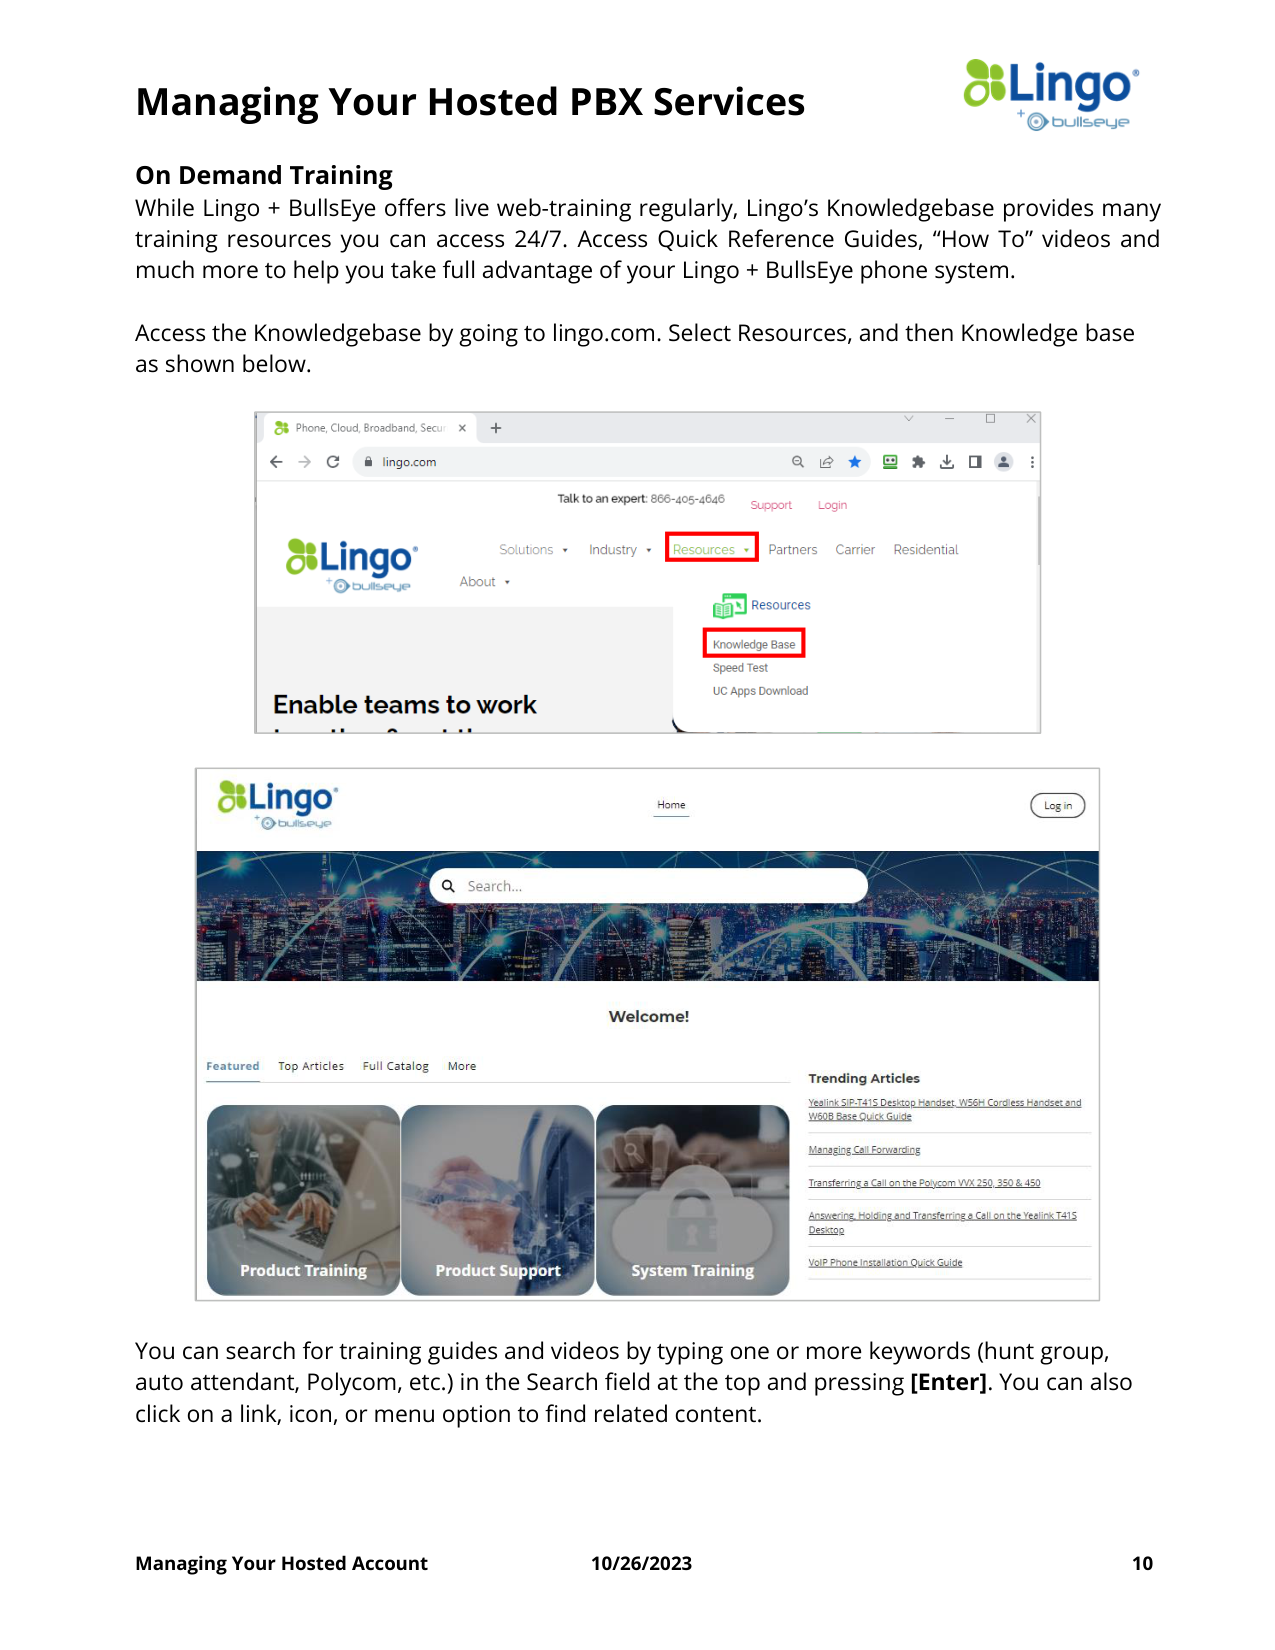
On Demand Training
While Lingo + BullsEye offers live web-training regularly, Lingo’s Knowledgebase provides many
training resources you can access 24/7. Access Quick Reference Guides, “How To” videos and
much more to help you take full advantage of your Lingo + BullsEye phone system.
Access the Knowledgebase by going to lingo.com. Select Resources, and then Knowledge base
as shown below.
You can search for training guides and videos by typing one or more keywords (hunt group,
auto attendant, Polycom, etc.) in the Search field at the top and pressing [Enter]. You can also
click on a link, icon, or menu option to find related content.
Managing Your Hosted PBX Services
Managing Your Hosted Account
10/26/2023
11
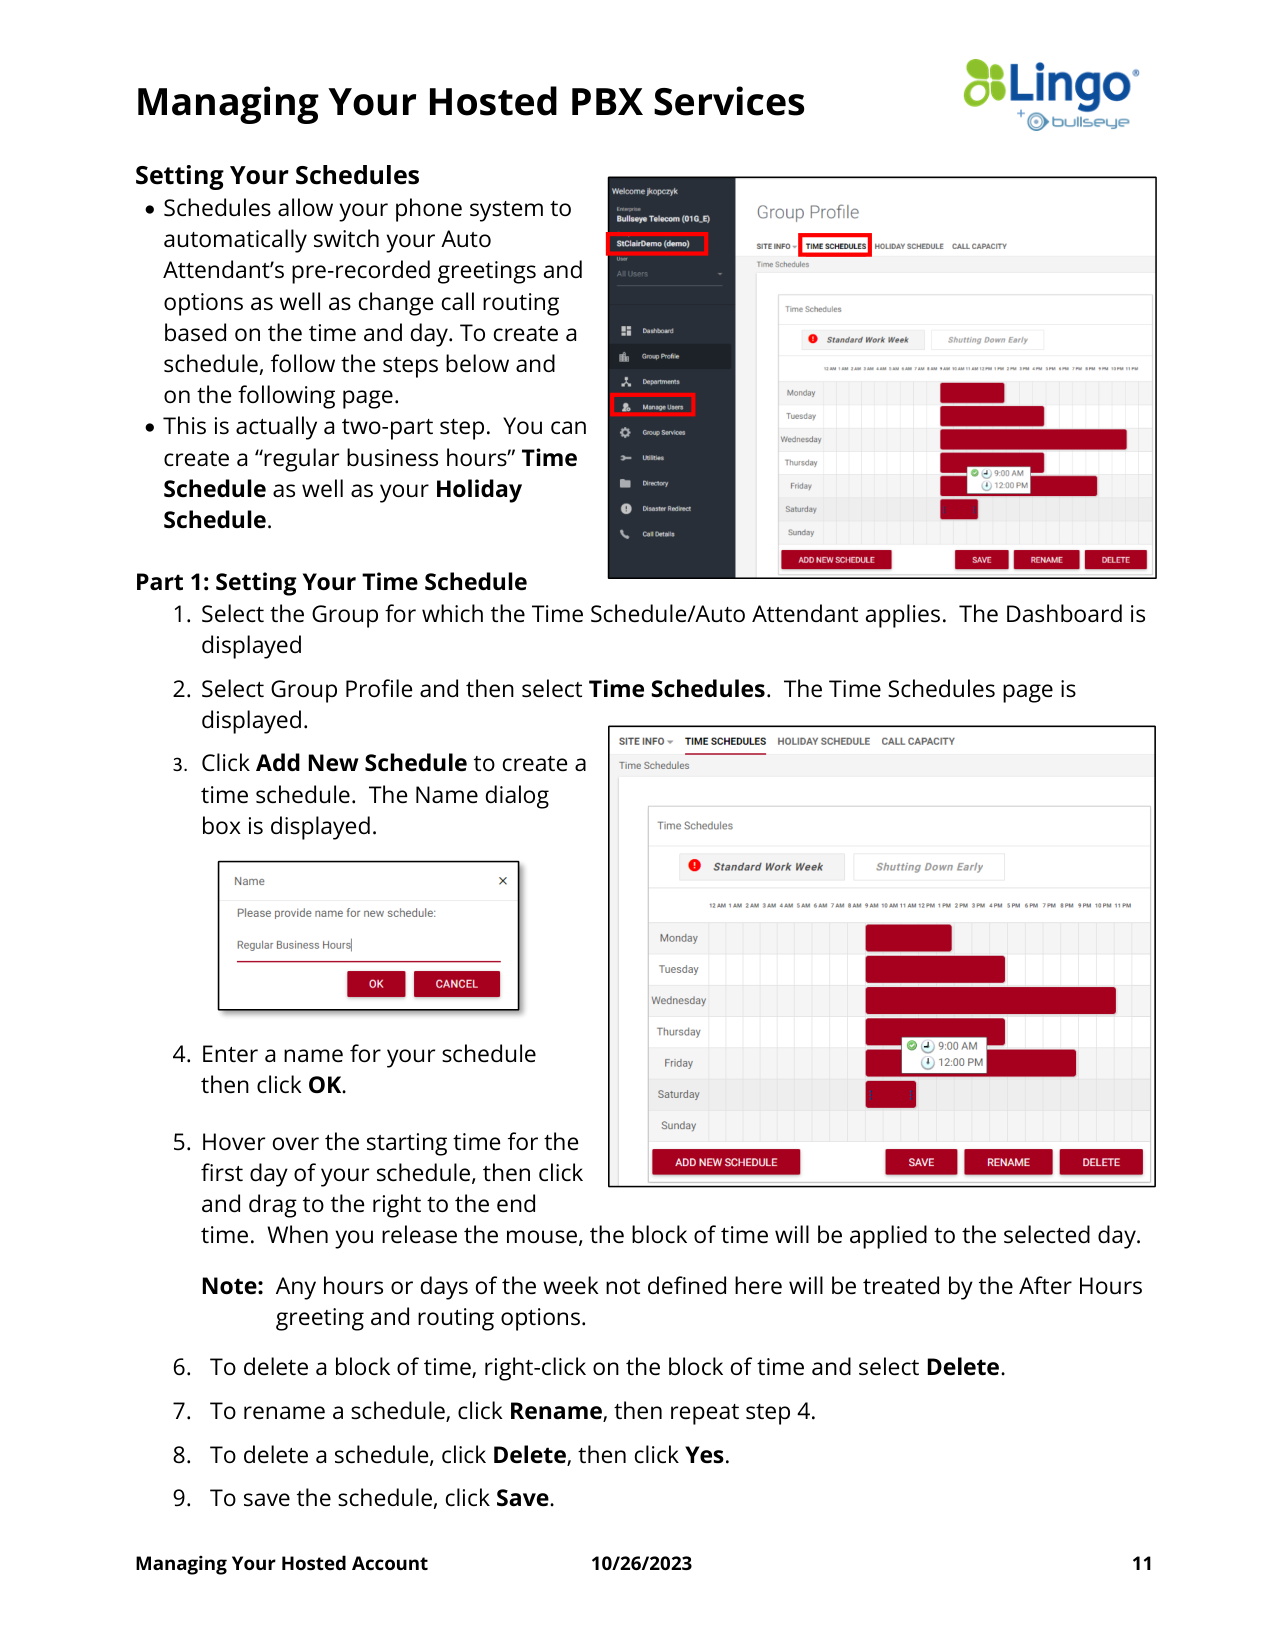
Setting Your Schedules
• Schedules allow your phone system to
automatically switch your Auto
Attendant’s pre-recorded greetings and
options as well as change call routing
based on the time and day. To create a
schedule, follow the steps below and
on the following page.
• This is actually a two-part step. You can
create a “regular business hours” Time
Schedule as well as your Holiday
Schedule.
Part 1: Setting Your Time Schedule
1. Select the Group for which the Time Schedule/Auto Attendant applies. The Dashboard is
displayed
2. Select Group Profile and then select Time Schedules. The Time Schedules page is
displayed.
3. Click Add New Schedule to create a
time schedule. The Name dialog
box is displayed.
4. Enter a name for your schedule
then click OK.
5. Hover over the starting time for the
first day of your schedule, then click
and drag to the right to the end
time. When you release the mouse, the block of time will be applied to the selected day.
Note: Any hours or days of the week not defined here will be treated by the After Hours
greeting and routing options.
6. To delete a block of time, right-click on the block of time and select Delete.
7. To rename a schedule, click Rename, then repeat step 4.
8. To delete a schedule, click Delete, then click Yes.
9. To save the schedule, click Save.
Managing Your Hosted PBX Services
Managing Your Hosted Account
10/26/2023
12
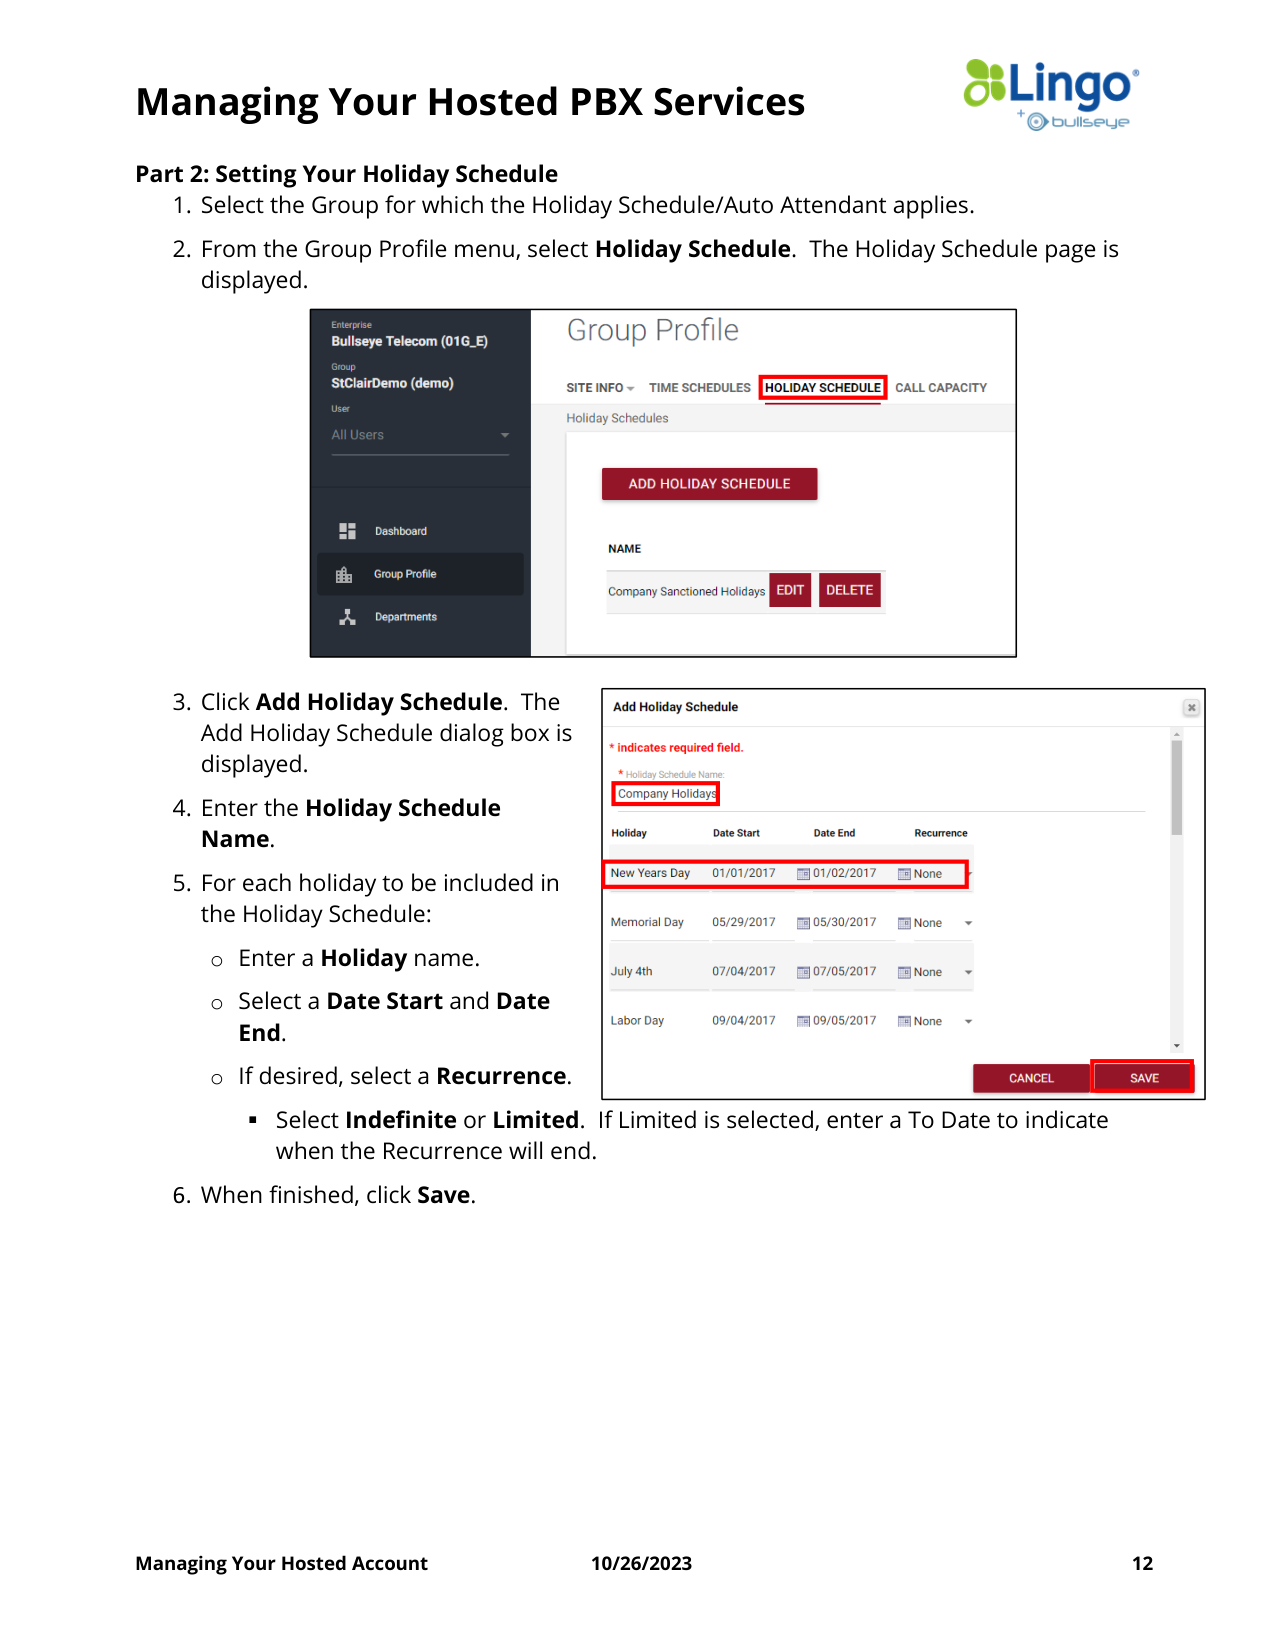
Part 2: Setting Your Holiday Schedule
1. Select the Group for which the Holiday Schedule/Auto Attendant applies.
2. From the Group Profile menu, select Holiday Schedule. The Holiday Schedule page is
displayed.
3. Click Add Holiday Schedule. The
Add Holiday Schedule dialog box is
displayed.
4. Enter the Holiday Schedule
Name.
5. For each holiday to be included in
the Holiday Schedule:
o Enter a Holiday name.
o Select a Date Start and Date
End.
o If desired, select a Recurrence.
▪ Select Indefinite or Limited. If Limited is selected, enter a To Date to indicate
when the Recurrence will end.
6. When finished, click Save.
Managing Your Hosted PBX Services
Managing Your Hosted Account
10/26/2023
13
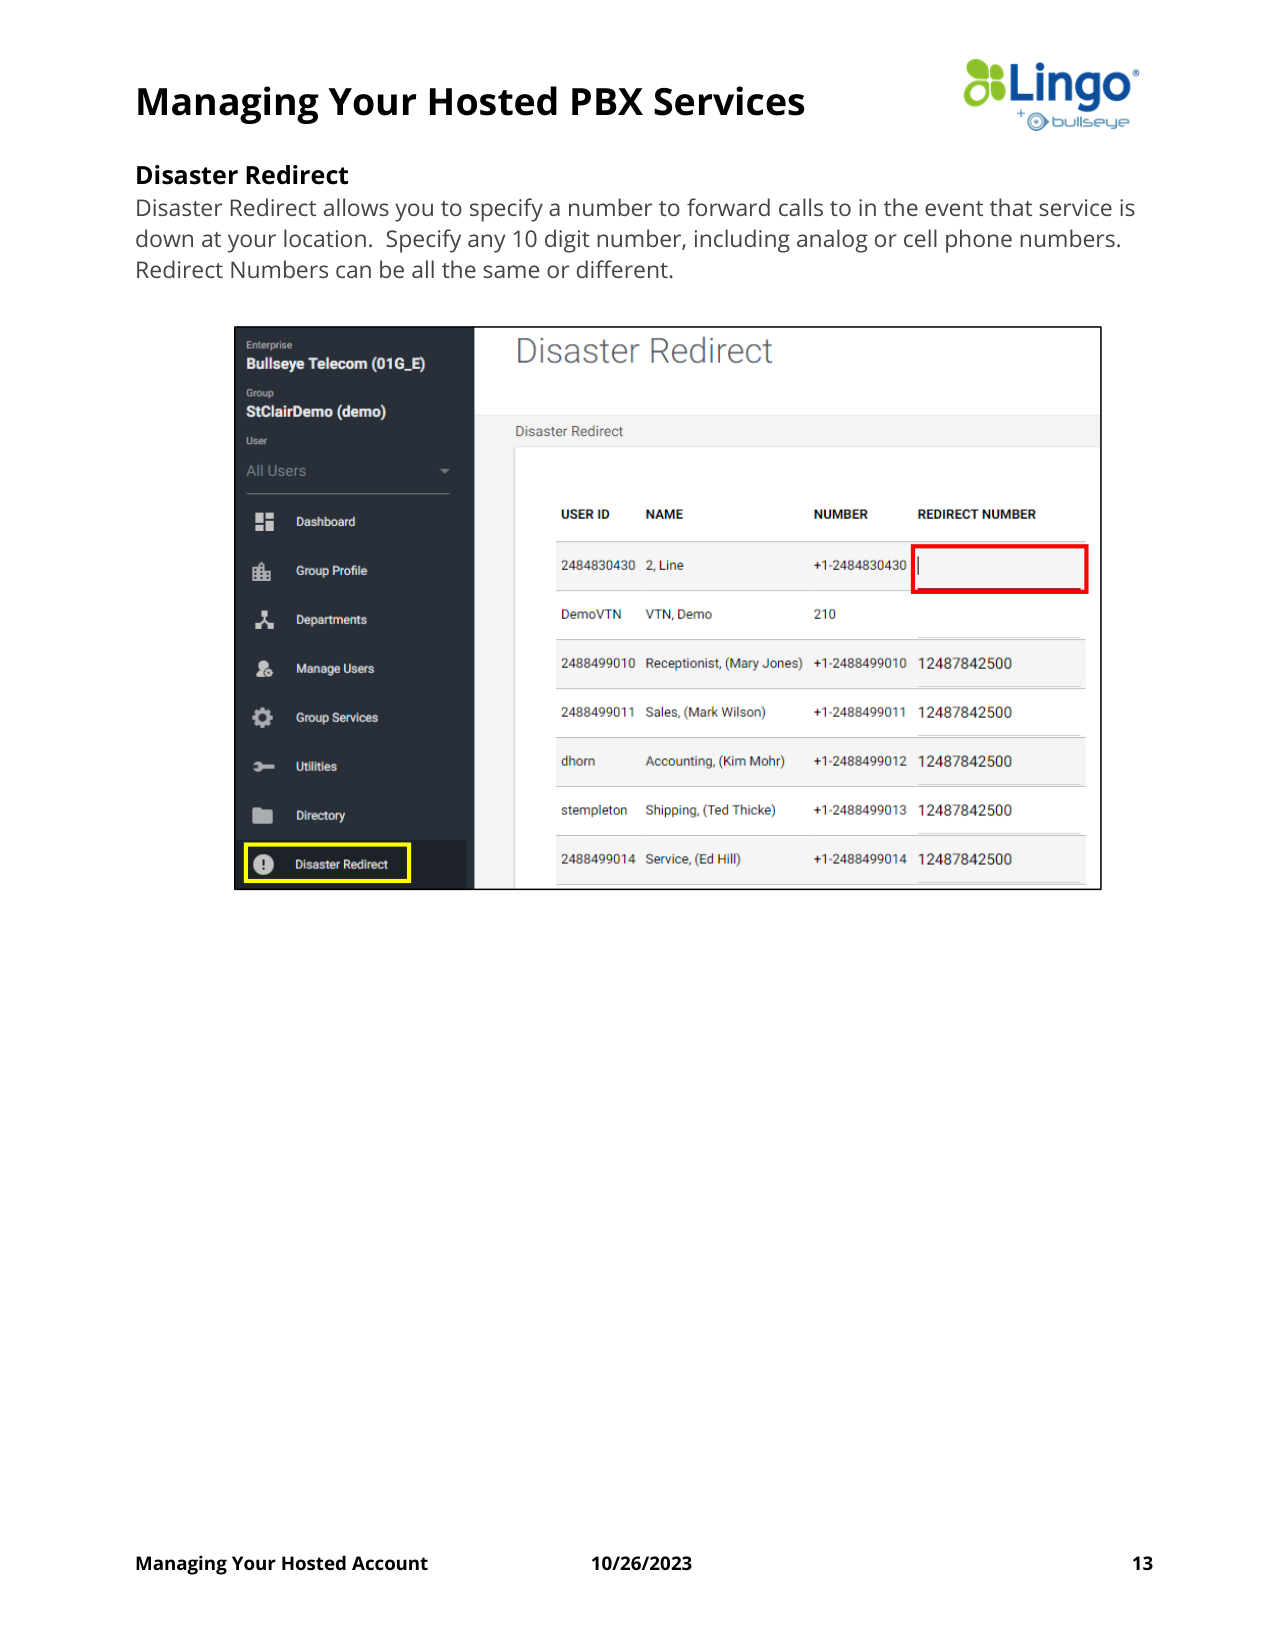
Disaster Redirect
Disaster Redirect allows you to specify a number to forward calls to in the event that service is
down at your location. Specify any 10 digit number, including analog or cell phone numbers.
Redirect Numbers can be all the same or different.
Managing Your Hosted PBX Services
Managing Your Hosted Account
10/26/2023
14
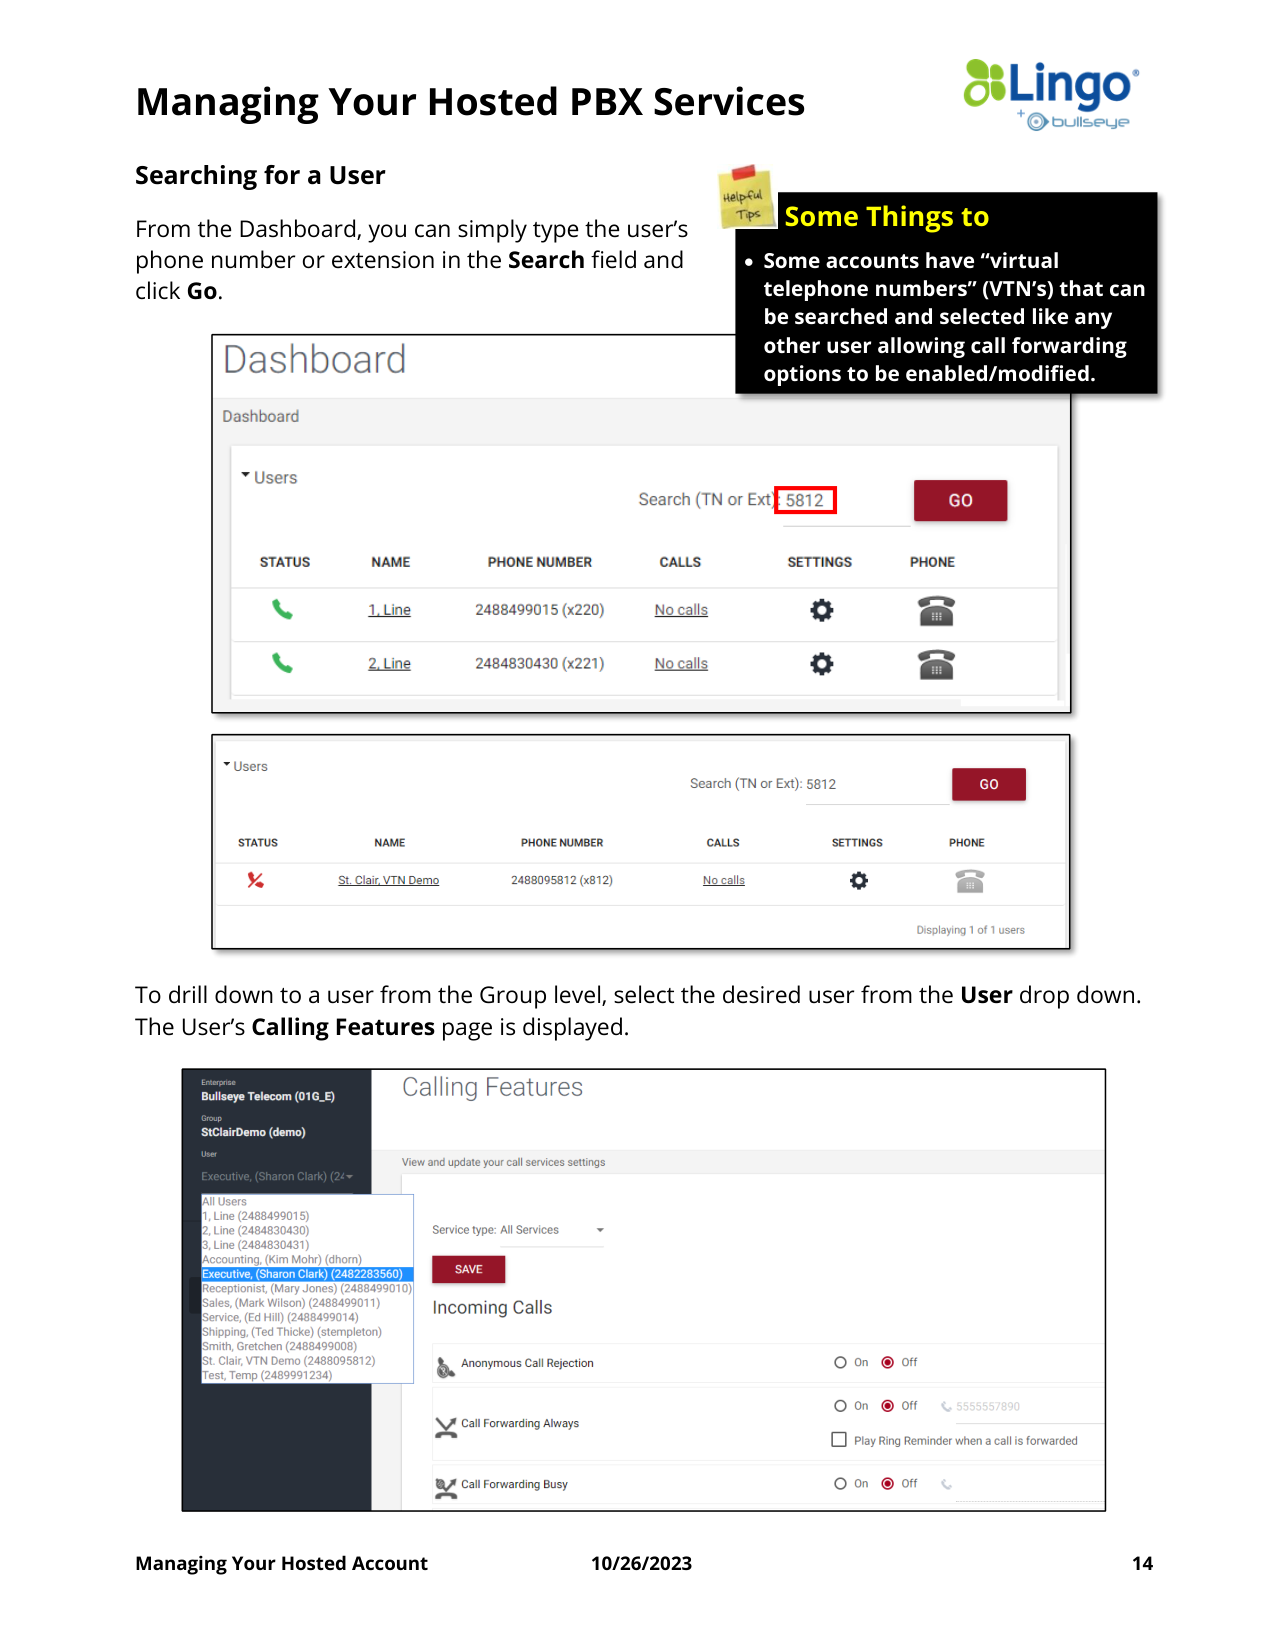
Searching for a User
From the Dashboard, you can simply type the user’s
phone number or extension in the Search field and
click Go.
To drill down to a user from the Group level, select the desired user from the User drop down.
The User’s Calling Features page is displayed.
Some Things to
• Some accounts have “virtual
telephone numbers” (VTN’s) that can
be searched and selected like any
other user allowing call forwarding
options to be enabled/modified.
Managing Your Hosted PBX Services
Managing Your Hosted Account
10/26/2023
15
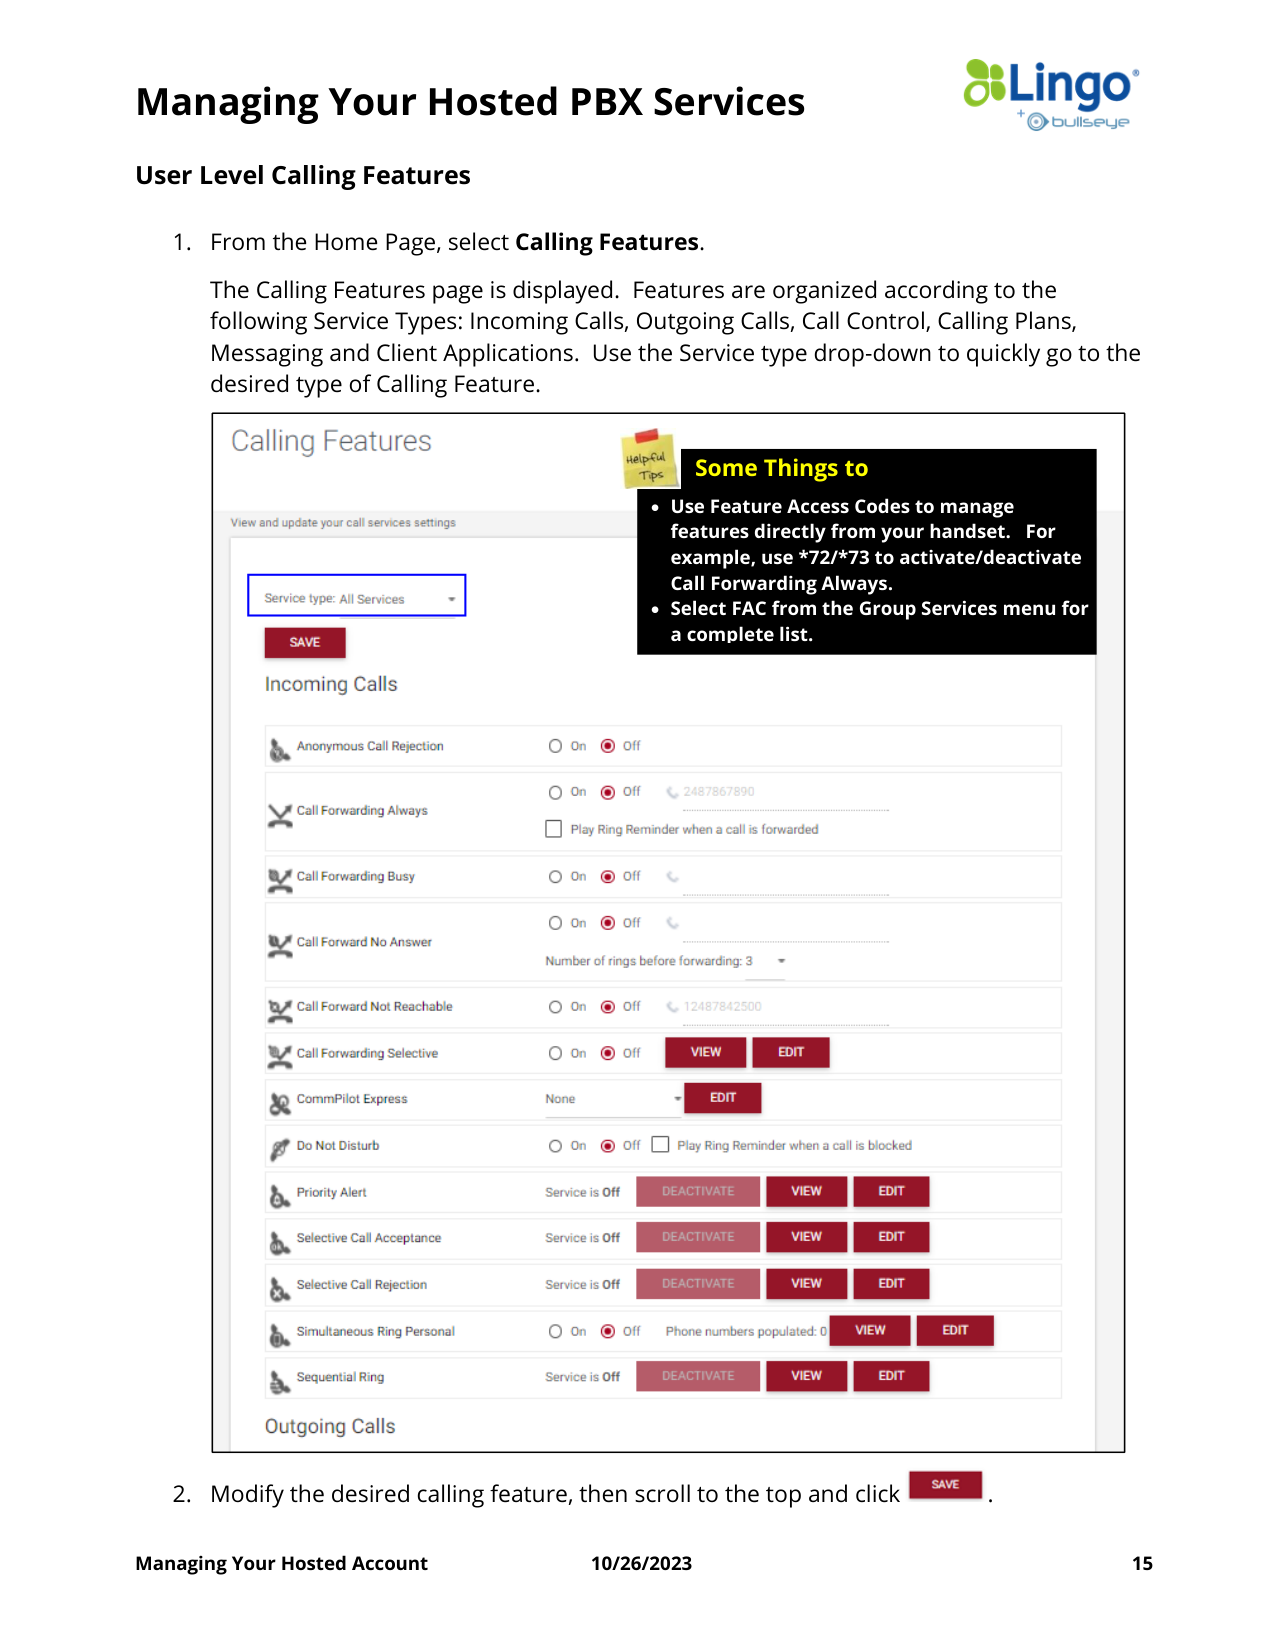
User Level Calling Features
1. From the Home Page, select Calling Features.
The Calling Features page is displayed. Features are organized according to the
following Service Types: Incoming Calls, Outgoing Calls, Call Control, Calling Plans,
Messaging and Client Applications. Use the Service type drop-down to quickly go to the
desired type of Calling Feature.
2. Modify the desired calling feature, then scroll to the top and click
.
• Use Feature Access Codes to manage
features directly from your handset. For
example, use *72/*73 to activate/deactivate
Call Forwarding Always.
• Select FAC from the Group Services menu for
a complete list.
Some Things to
Managing Your Hosted PBX Services
Managing Your Hosted Account
10/26/2023
16
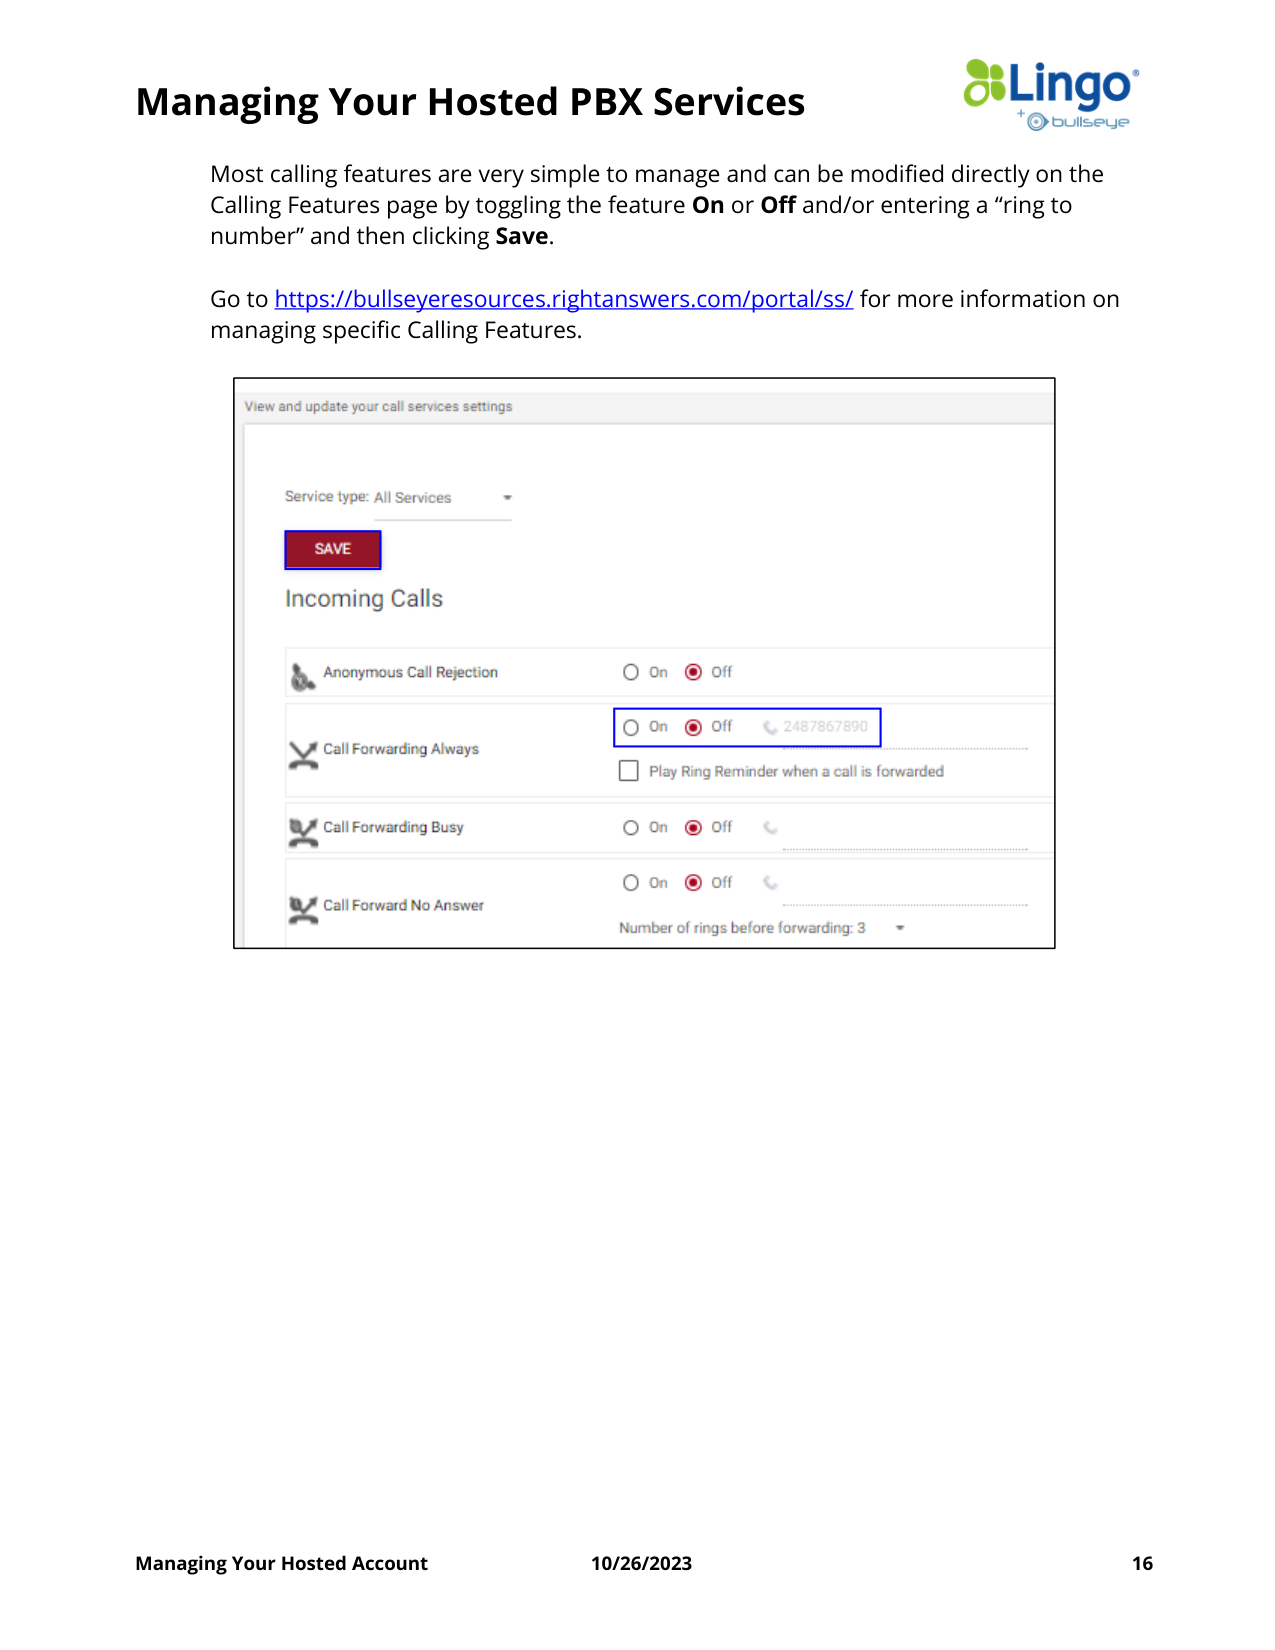
Most calling features are very simple to manage and can be modified directly on the
Calling Features page by toggling the feature On or Off and/or entering a “ring to
number” and then clicking Save.
Go to https://bullseyeresources.rightanswers.com/portal/ss/ for more information on
managing specific Calling Features.
Managing Your Hosted PBX Services
Managing Your Hosted Account
10/26/2023
17
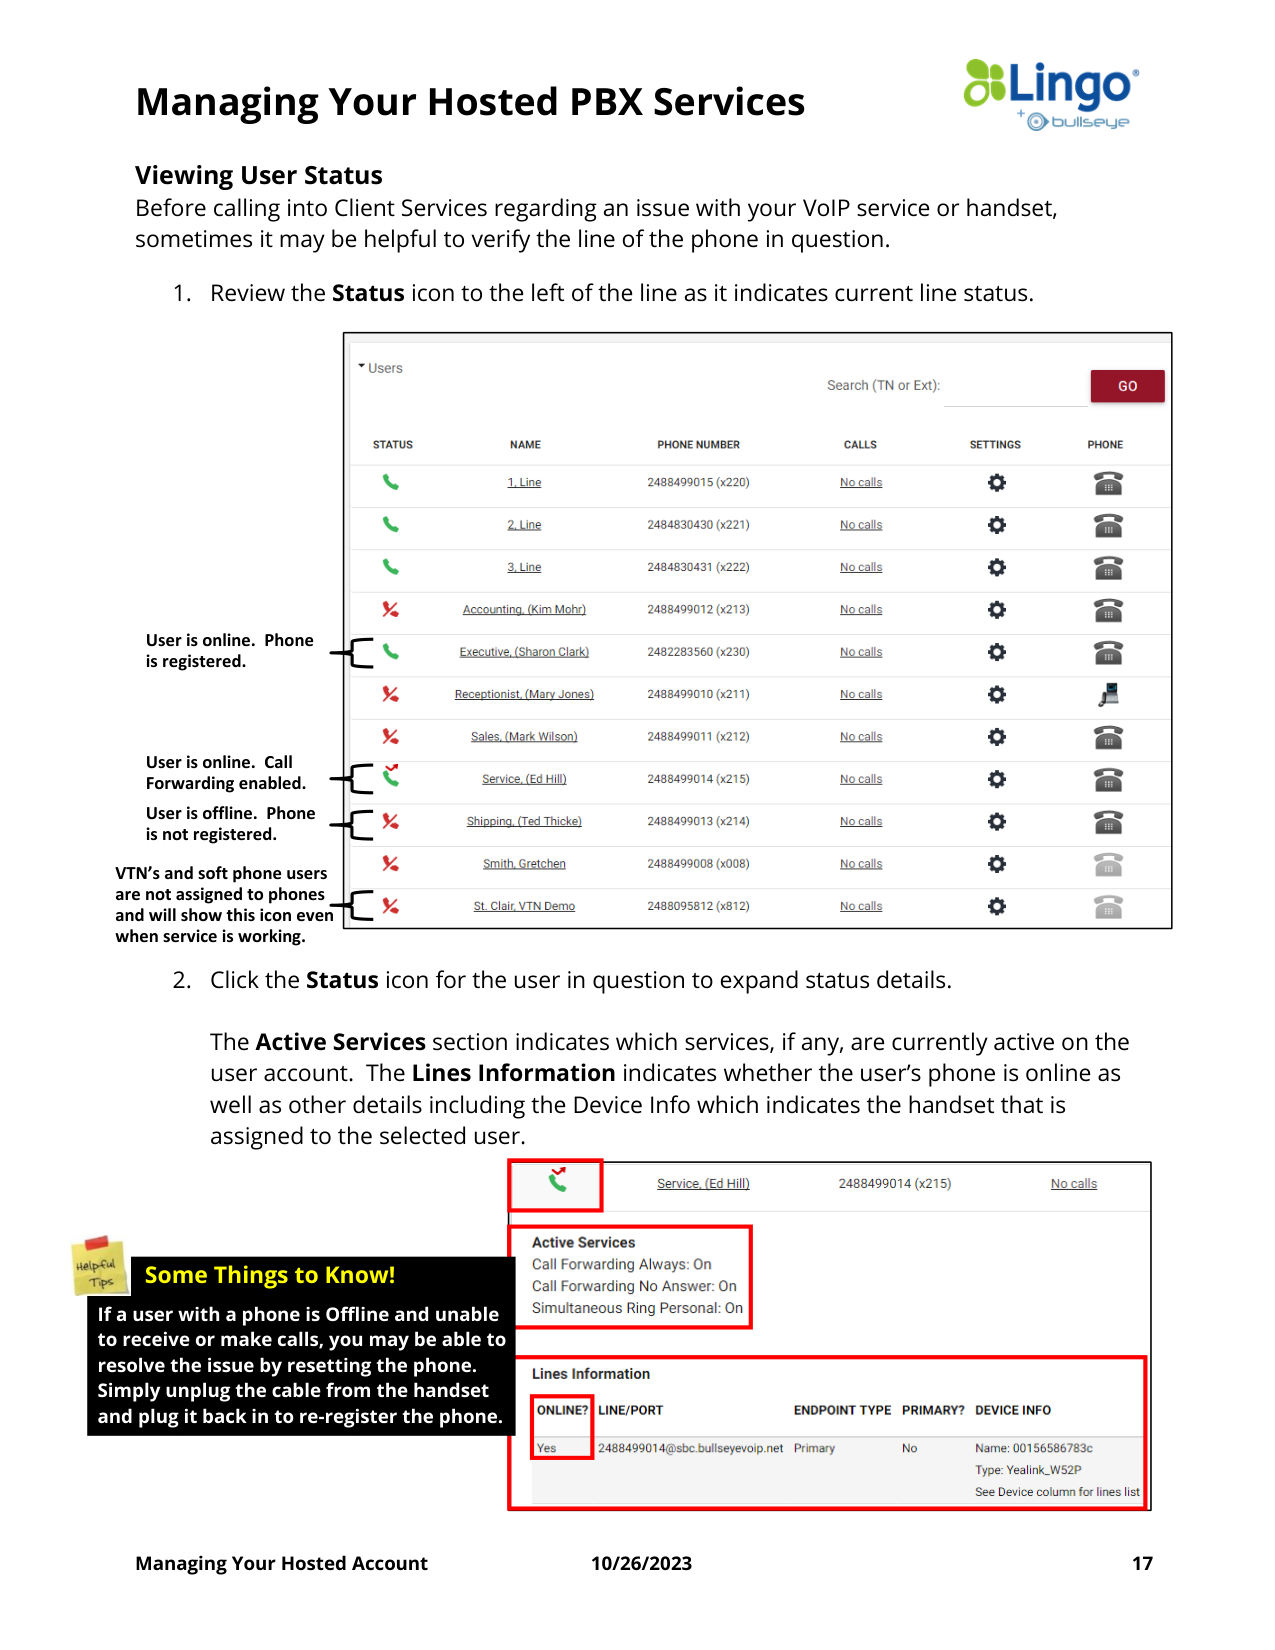
Viewing User Status
Before calling into Client Services regarding an issue with your VoIP service or handset,
sometimes it may be helpful to verify the line of the phone in question.
1. Review the Status icon to the left of the line as it indicates current line status.
2. Click the Status icon for the user in question to expand status details.
The Active Services section indicates which services, if any, are currently active on the
user account. The Lines Information indicates whether the user’s phone is online as
well as other details including the Device Info which indicates the handset that is
assigned to the selected user.
User is online. Phone
is registered.
User is offline. Phone
is not registered.
VTN’s and soft phone users
are not assigned to phones
and will show this icon even
when service is working.
User is online. Call
Forwarding enabled.
If a user with a phone is Offline and unable
to receive or make calls, you may be able to
resolve the issue by resetting the phone.
Simply unplug the cable from the handset
and plug it back in to re-register the phone.
Some Things to Know!
Managing Your Hosted PBX Services
Managing Your Hosted Account
10/26/2023
18
Managing Users
This section explains how to update the user name that the phone/service is assigned to as
well as resetting a User Password or Voice Messaging Passcode.
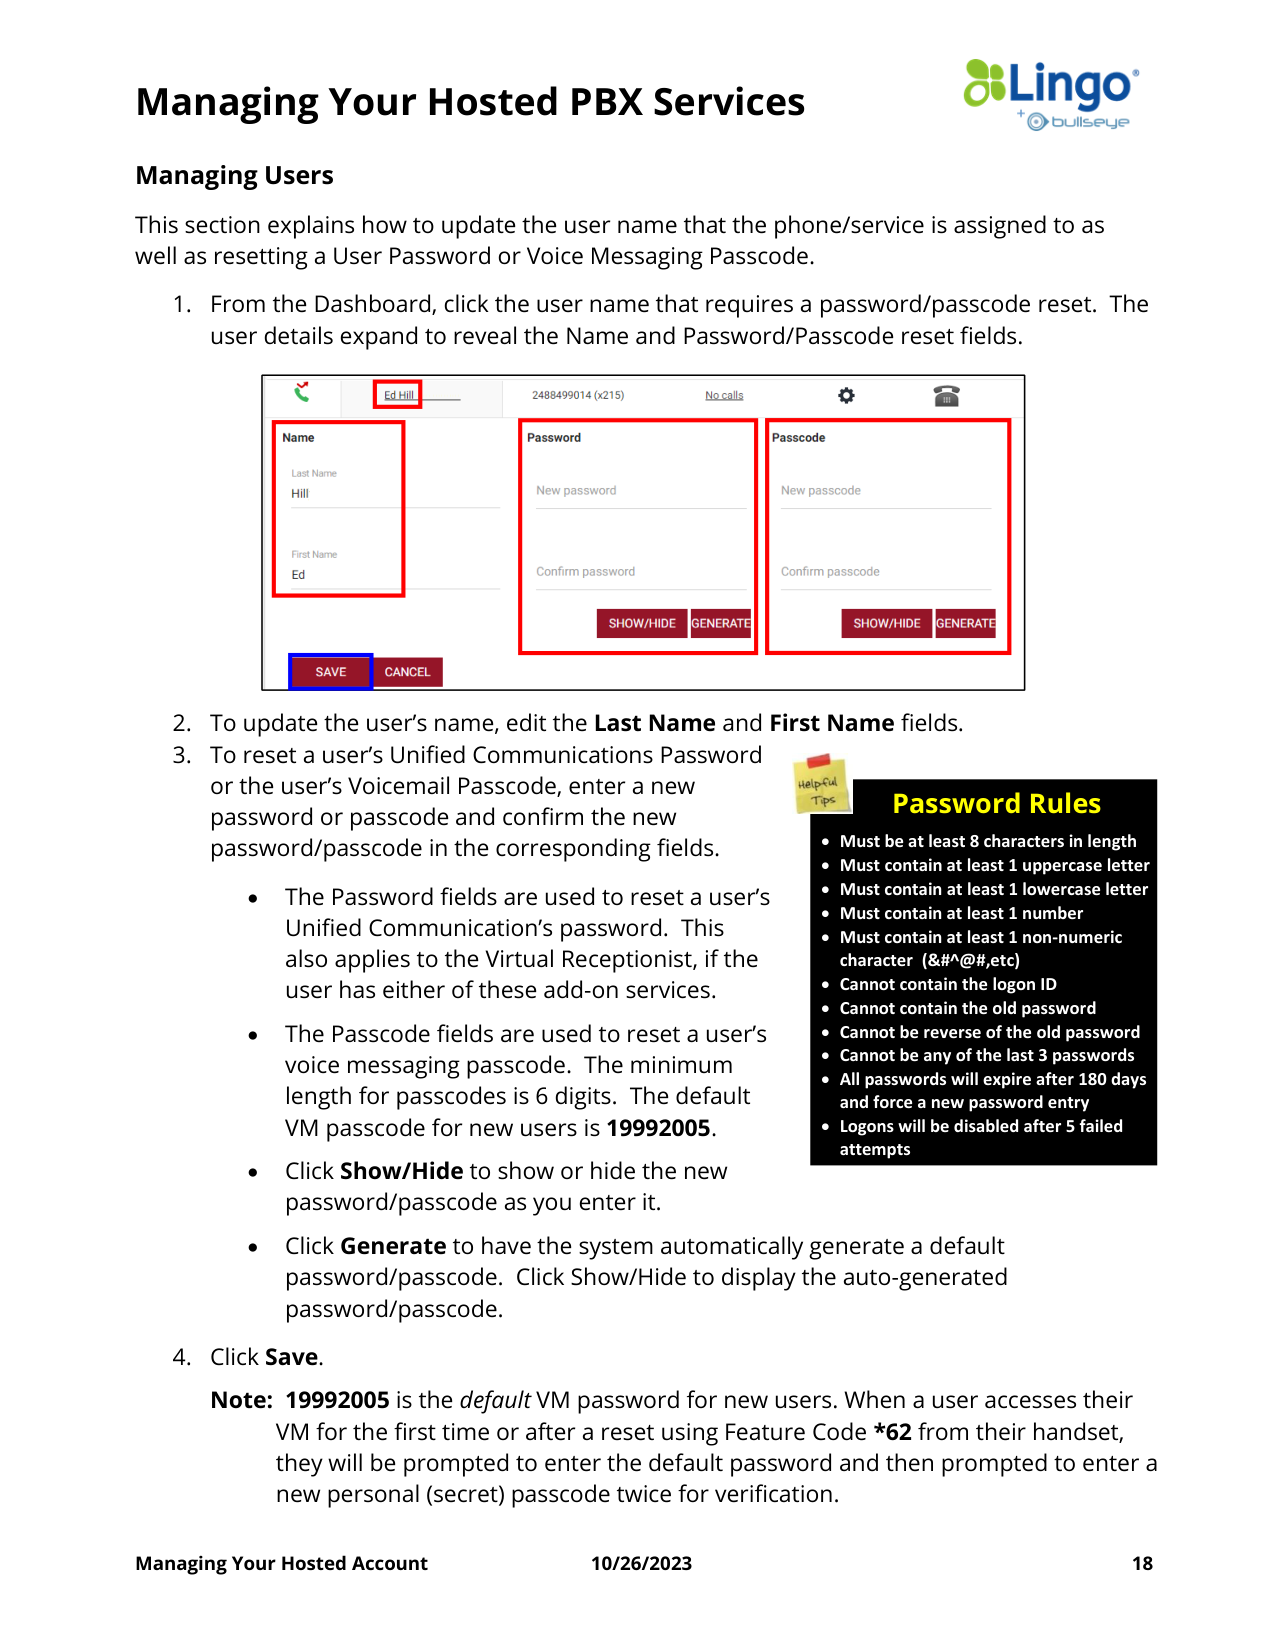
1. From the Dashboard, click the user name that requires a password/passcode reset. The
user details expand to reveal the Name and Password/Passcode reset fields.
2. To update the user’s name, edit the Last Name and First Name fields.
3. To reset a user’s Unified Communications Password
or the user’s Voicemail Passcode, enter a new
password or passcode and confirm the new
password/passcode in the corresponding fields.
•
The Password fields are used to reset a user’s
Unified Communication’s password. This
also applies to the Virtual Receptionist, if the
user has either of these add-on services.
•
The Passcode fields are used to reset a user’s
voice messaging passcode. The minimum
length for passcodes is 6 digits. The default
VM passcode for new users is 19992005.
•
Click Show/Hide to show or hide the new
password/passcode as you enter it.
•
Click Generate to have the system automatically generate a default
password/passcode. Click Show/Hide to display the auto-generated
password/passcode.
4. Click Save.
Note: 19992005 is the default VM password for new users. When a user accesses their
VM for the first time or after a reset using Feature Code *62 from their handset,
they will be prompted to enter the default password and then prompted to enter a
new personal (secret) passcode twice for verification.
Password Rules
• Must be at least 8 characters in length
• Must contain at least 1 uppercase letter
• Must contain at least 1 lowercase letter
• Must contain at least 1 number
• Must contain at least 1 non-numeric
character (&#^@#,etc)
• Cannot contain the logon ID
• Cannot contain the old password
• Cannot be reverse of the old password
• Cannot be any of the last 3 passwords
• All passwords will expire after 180 days
and force a new password entry
• Logons will be disabled after 5 failed
attempts
Managing Your Hosted PBX Services
Managing Your Hosted Account
10/26/2023
19
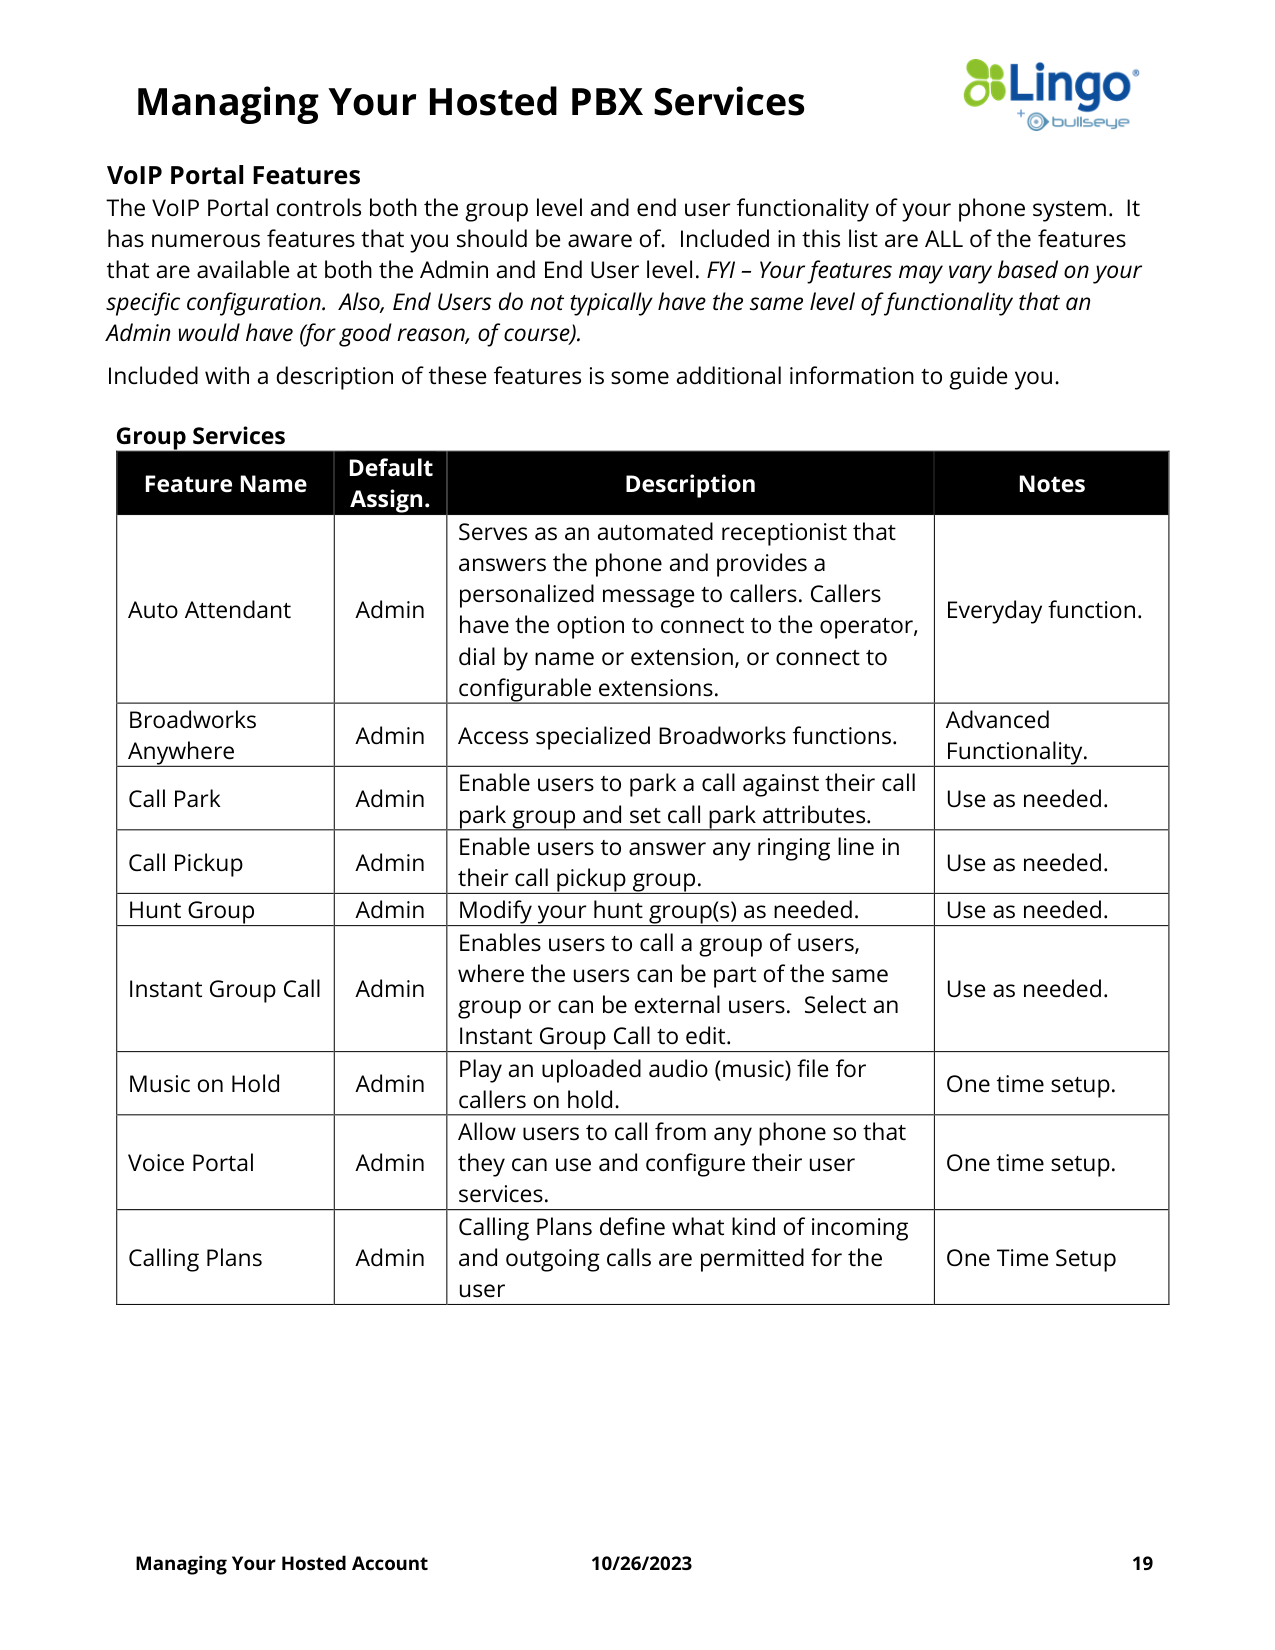
VoIP Portal Features
The VoIP Portal controls both the group level and end user functionality of your phone system. It
has numerous features that you should be aware of. Included in this list are ALL of the features
that are available at both the Admin and End User level. FYI – Your features may vary based on your
specific configuration. Also, End Users do not typically have the same level of functionality that an
Admin would have (for good reason, of course).
Included with a description of these features is some additional information to guide you.
Group Services
Feature Name
Default
Assign.
Description
Notes
Auto Attendant
Admin
Serves as an automated receptionist that
answers the phone and provides a
personalized message to callers. Callers
have the option to connect to the operator,
dial by name or extension, or connect to
configurable extensions.
Everyday function.
Broadworks
Anywhere
Admin
Access specialized Broadworks functions.
Advanced
Functionality.
Call Park
Admin
Enable users to park a call against their call
park group and set call park attributes.
Use as needed.
Call Pickup
Admin
Enable users to answer any ringing line in
their call pickup group.
Use as needed.
Hunt Group
Admin
Modify your hunt group(s) as needed.
Use as needed.
Instant Group Call
Admin
Enables users to call a group of users,
where the users can be part of the same
group or can be external users. Select an
Instant Group Call to edit.
Use as needed.
Music on Hold
Admin
Play an uploaded audio (music) file for
callers on hold.
One time setup.
Voice Portal
Admin
Allow users to call from any phone so that
they can use and configure their user
services.
One time setup.
Calling Plans
Admin
Calling Plans define what kind of incoming
and outgoing calls are permitted for the
user
One Time Setup
Managing Your Hosted PBX Services
Managing Your Hosted Account
10/26/2023
20
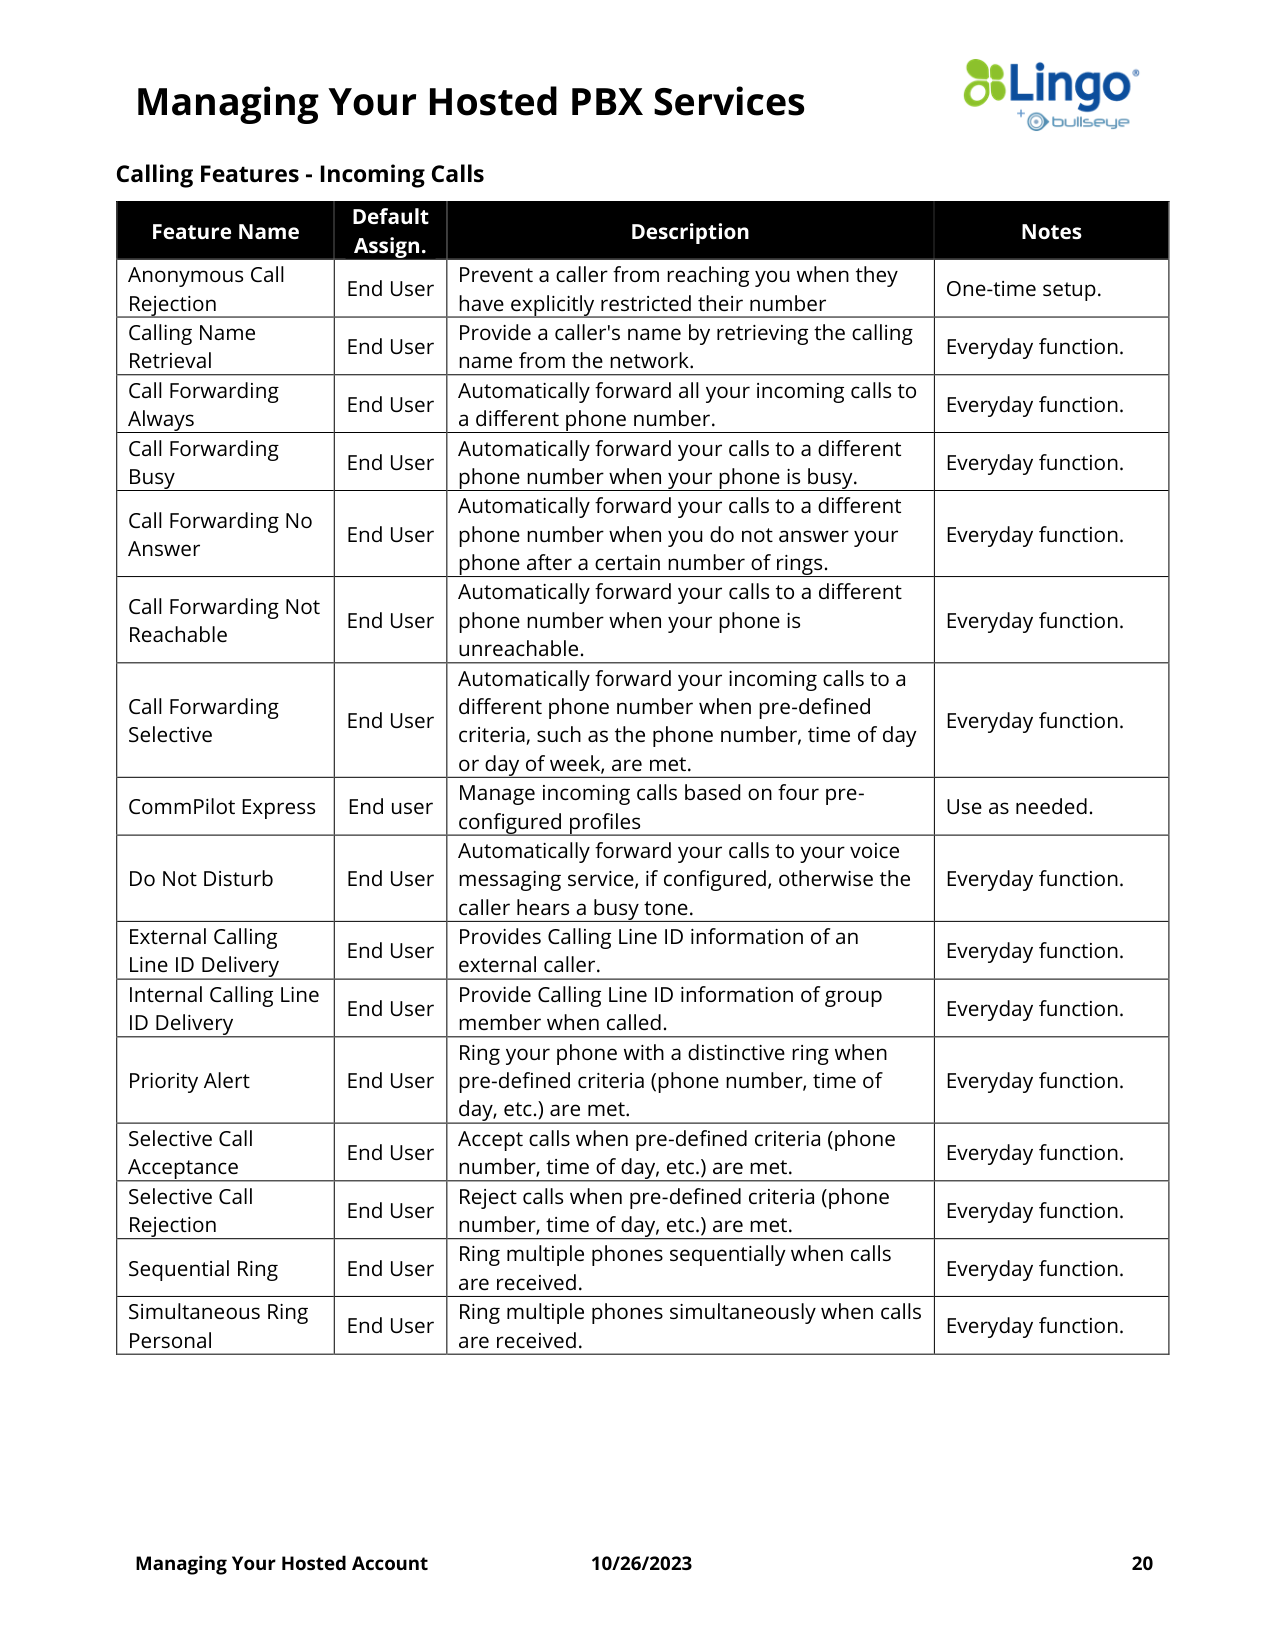
Calling Features - Incoming Calls
Feature Name
Default
Assign.
Description
Notes
Anonymous Call
Rejection
End User
Prevent a caller from reaching you when they
have explicitly restricted their number
One-time setup.
Calling Name
Retrieval
End User
Provide a caller's name by retrieving the calling
name from the network.
Everyday function.
Call Forwarding
Always
End User
Automatically forward all your incoming calls to
a different phone number.
Everyday function.
Call Forwarding
Busy
End User
Automatically forward your calls to a different
phone number when your phone is busy.
Everyday function.
Call Forwarding No
Answer
End User
Automatically forward your calls to a different
phone number when you do not answer your
phone after a certain number of rings.
Everyday function.
Call Forwarding Not
Reachable
End User
Automatically forward your calls to a different
phone number when your phone is
unreachable.
Everyday function.
Call Forwarding
Selective
End User
Automatically forward your incoming calls to a
different phone number when pre-defined
criteria, such as the phone number, time of day
or day of week, are met.
Everyday function.
CommPilot Express
End user
Manage incoming calls based on four pre-
configured profiles
Use as needed.
Do Not Disturb
End User
Automatically forward your calls to your voice
messaging service, if configured, otherwise the
caller hears a busy tone.
Everyday function.
External Calling
Line ID Delivery
End User
Provides Calling Line ID information of an
external caller.
Everyday function.
Internal Calling Line
ID Delivery
End User
Provide Calling Line ID information of group
member when called.
Everyday function.
Priority Alert
End User
Ring your phone with a distinctive ring when
pre-defined criteria (phone number, time of
day, etc.) are met.
Everyday function.
Selective Call
Acceptance
End User
Accept calls when pre-defined criteria (phone
number, time of day, etc.) are met.
Everyday function.
Selective Call
Rejection
End User
Reject calls when pre-defined criteria (phone
number, time of day, etc.) are met.
Everyday function.
Sequential Ring
End User
Ring multiple phones sequentially when calls
are received.
Everyday function.
Simultaneous Ring
Personal
End User
Ring multiple phones simultaneously when calls
are received.
Everyday function.
Managing Your Hosted PBX Services
Managing Your Hosted Account
10/26/2023
21
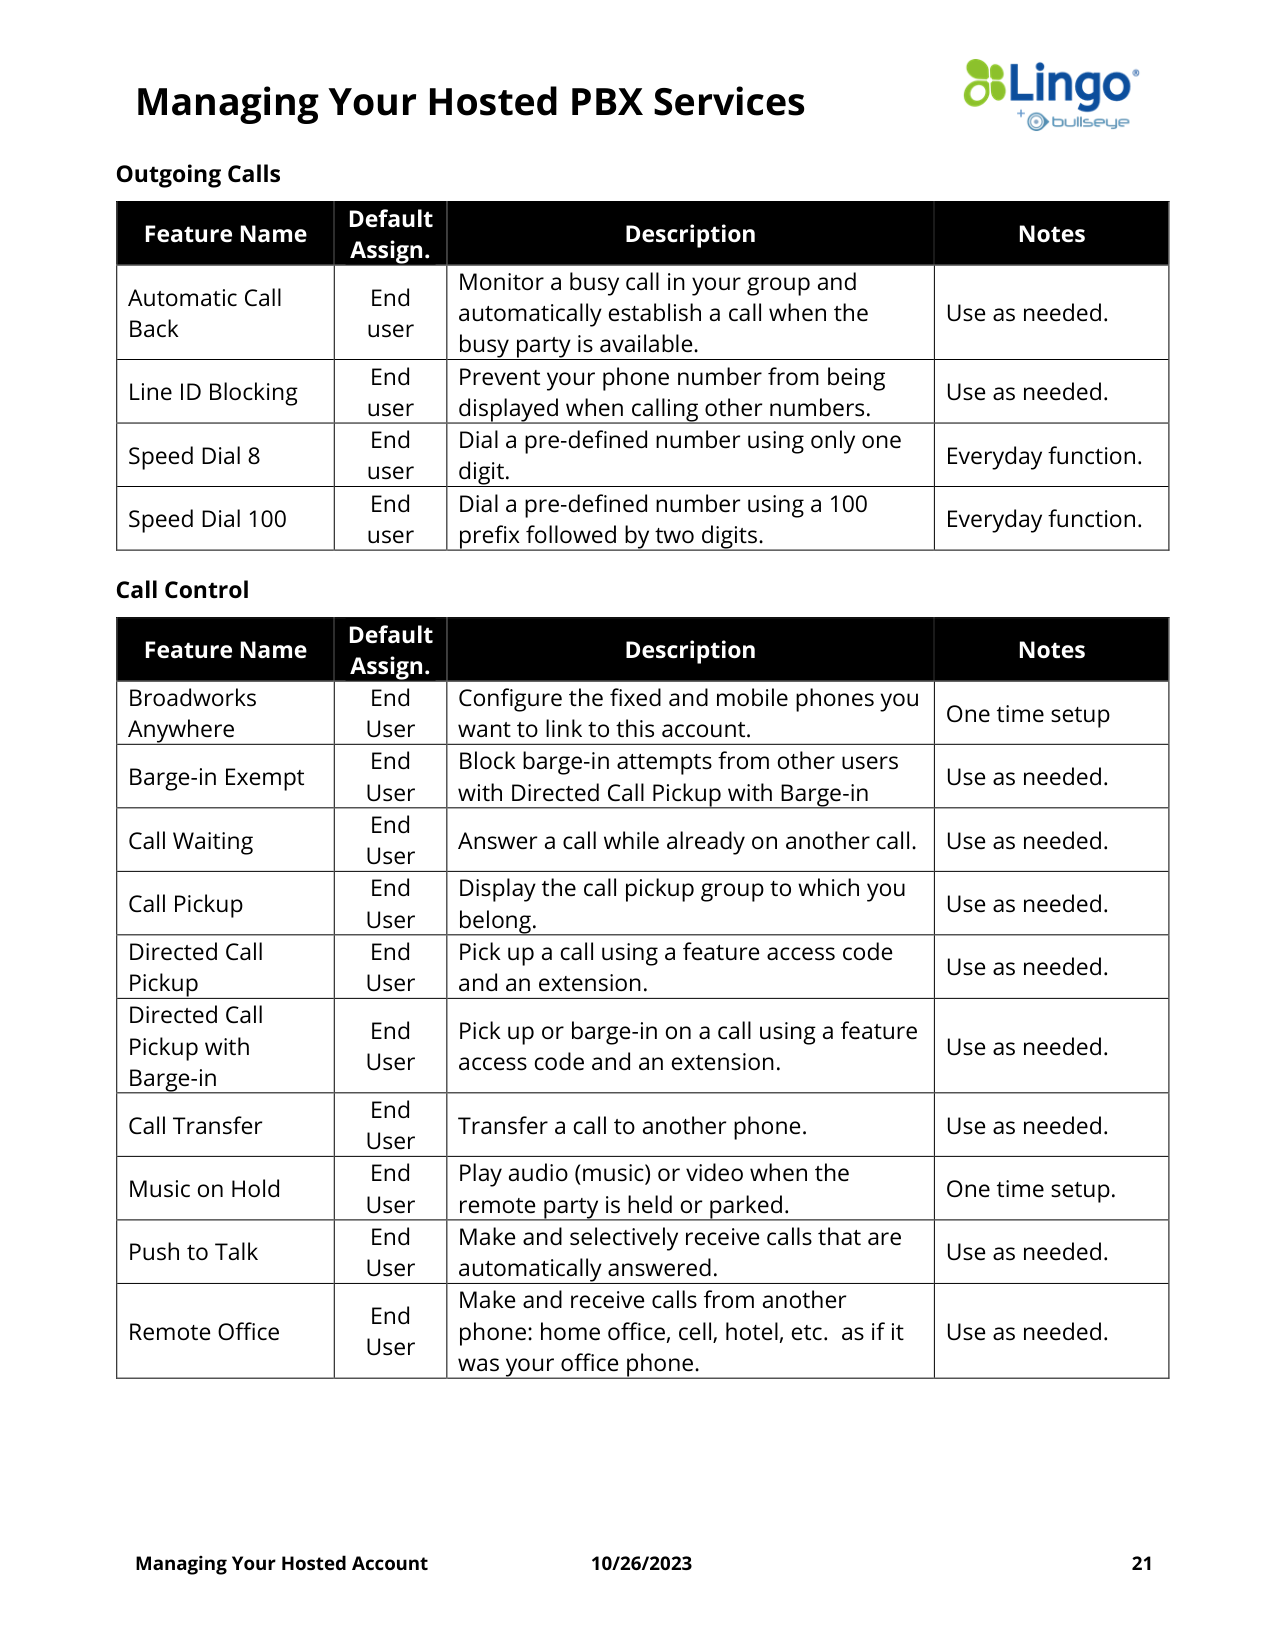
Outgoing Calls
Feature Name
Default
Assign.
Description
Notes
Automatic Call
Back
End
user
Monitor a busy call in your group and
automatically establish a call when the
busy party is available.
Use as needed.
Line ID Blocking
End
user
Prevent your phone number from being
displayed when calling other numbers.
Use as needed.
Speed Dial 8
End
user
Dial a pre-defined number using only one
digit.
Everyday function.
Speed Dial 100
End
user
Dial a pre-defined number using a 100
prefix followed by two digits.
Everyday function.
Call Control
Feature Name
Default
Assign.
Description
Notes
Broadworks
Anywhere
End
User
Configure the fixed and mobile phones you
want to link to this account.
One time setup
Barge-in Exempt
End
User
Block barge-in attempts from other users
with Directed Call Pickup with Barge-in
Use as needed.
Call Waiting
End
User
Answer a call while already on another call.
Use as needed.
Call Pickup
End
User
Display the call pickup group to which you
belong.
Use as needed.
Directed Call
Pickup
End
User
Pick up a call using a feature access code
and an extension.
Use as needed.
Directed Call
Pickup with
Barge-in
End
User
Pick up or barge-in on a call using a feature
access code and an extension.
Use as needed.
Call Transfer
End
User
Transfer a call to another phone.
Use as needed.
Music on Hold
End
User
Play audio (music) or video when the
remote party is held or parked.
One time setup.
Push to Talk
End
User
Make and selectively receive calls that are
automatically answered.
Use as needed.
Remote Office
End
User
Make and receive calls from another
phone: home office, cell, hotel, etc. as if it
was your office phone.
Use as needed.
Managing Your Hosted PBX Services
Managing Your Hosted Account
10/26/2023
22
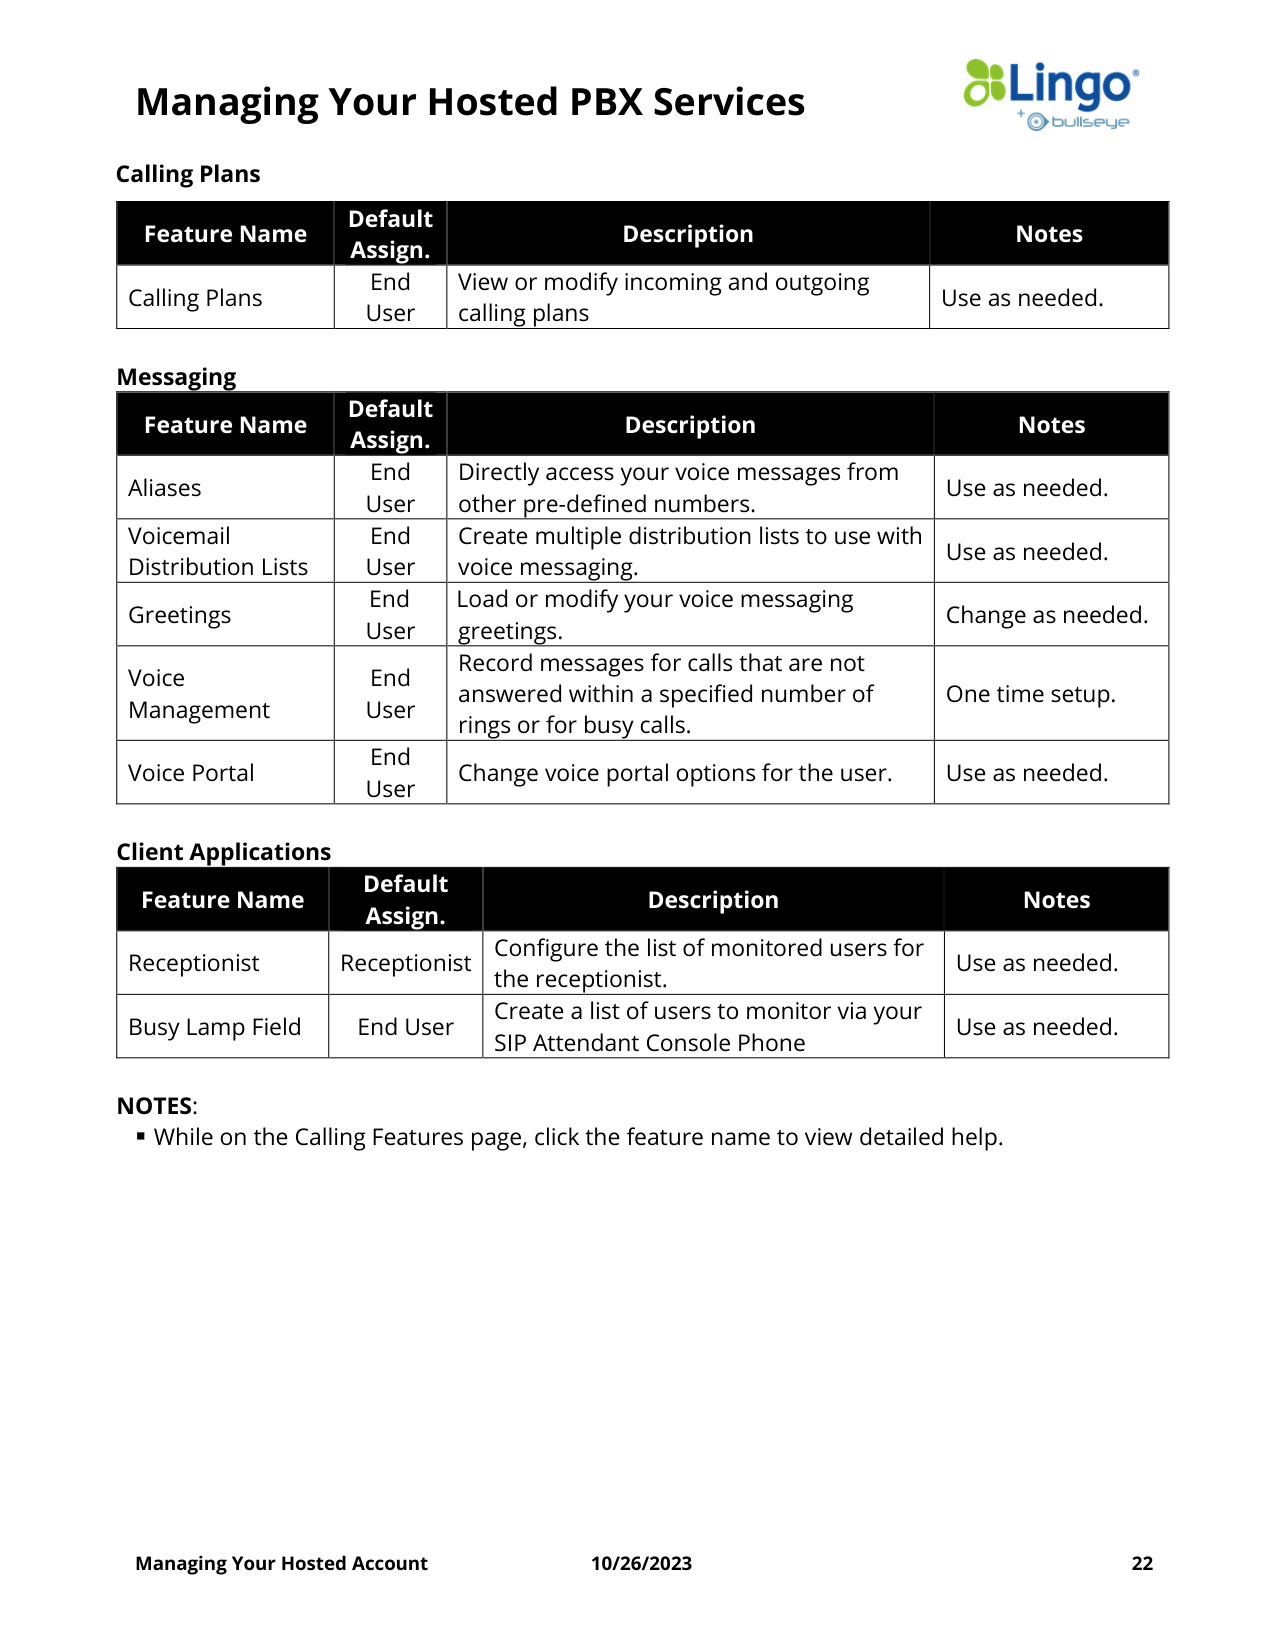
Calling Plans
Feature Name
Default
Assign.
Description
Notes
Calling Plans
End
User
View or modify incoming and outgoing
calling plans
Use as needed.
Messaging
Feature Name
Default
Assign.
Description
Notes
Aliases
End
User
Directly access your voice messages from
other pre-defined numbers.
Use as needed.
Voicemail
Distribution Lists
End
User
Create multiple distribution lists to use with
voice messaging.
Use as needed.
Greetings
End
User
Load or modify your voice messaging
greetings.
Change as needed.
Voice
Management
End
User
Record messages for calls that are not
answered within a specified number of
rings or for busy calls.
One time setup.
Voice Portal
End
User
Change voice portal options for the user.
Use as needed.
Client Applications
Feature Name
Default
Assign.
Description
Notes
Receptionist
Receptionist Configure the list of monitored users for
the receptionist.
Use as needed.
Busy Lamp Field
End User
Create a list of users to monitor via your
SIP Attendant Console Phone
Use as needed.
NOTES:
▪ While on the Calling Features page, click the feature name to view detailed help.
Managing Your Hosted PBX Services
Managing Your Hosted Account
10/26/2023
23
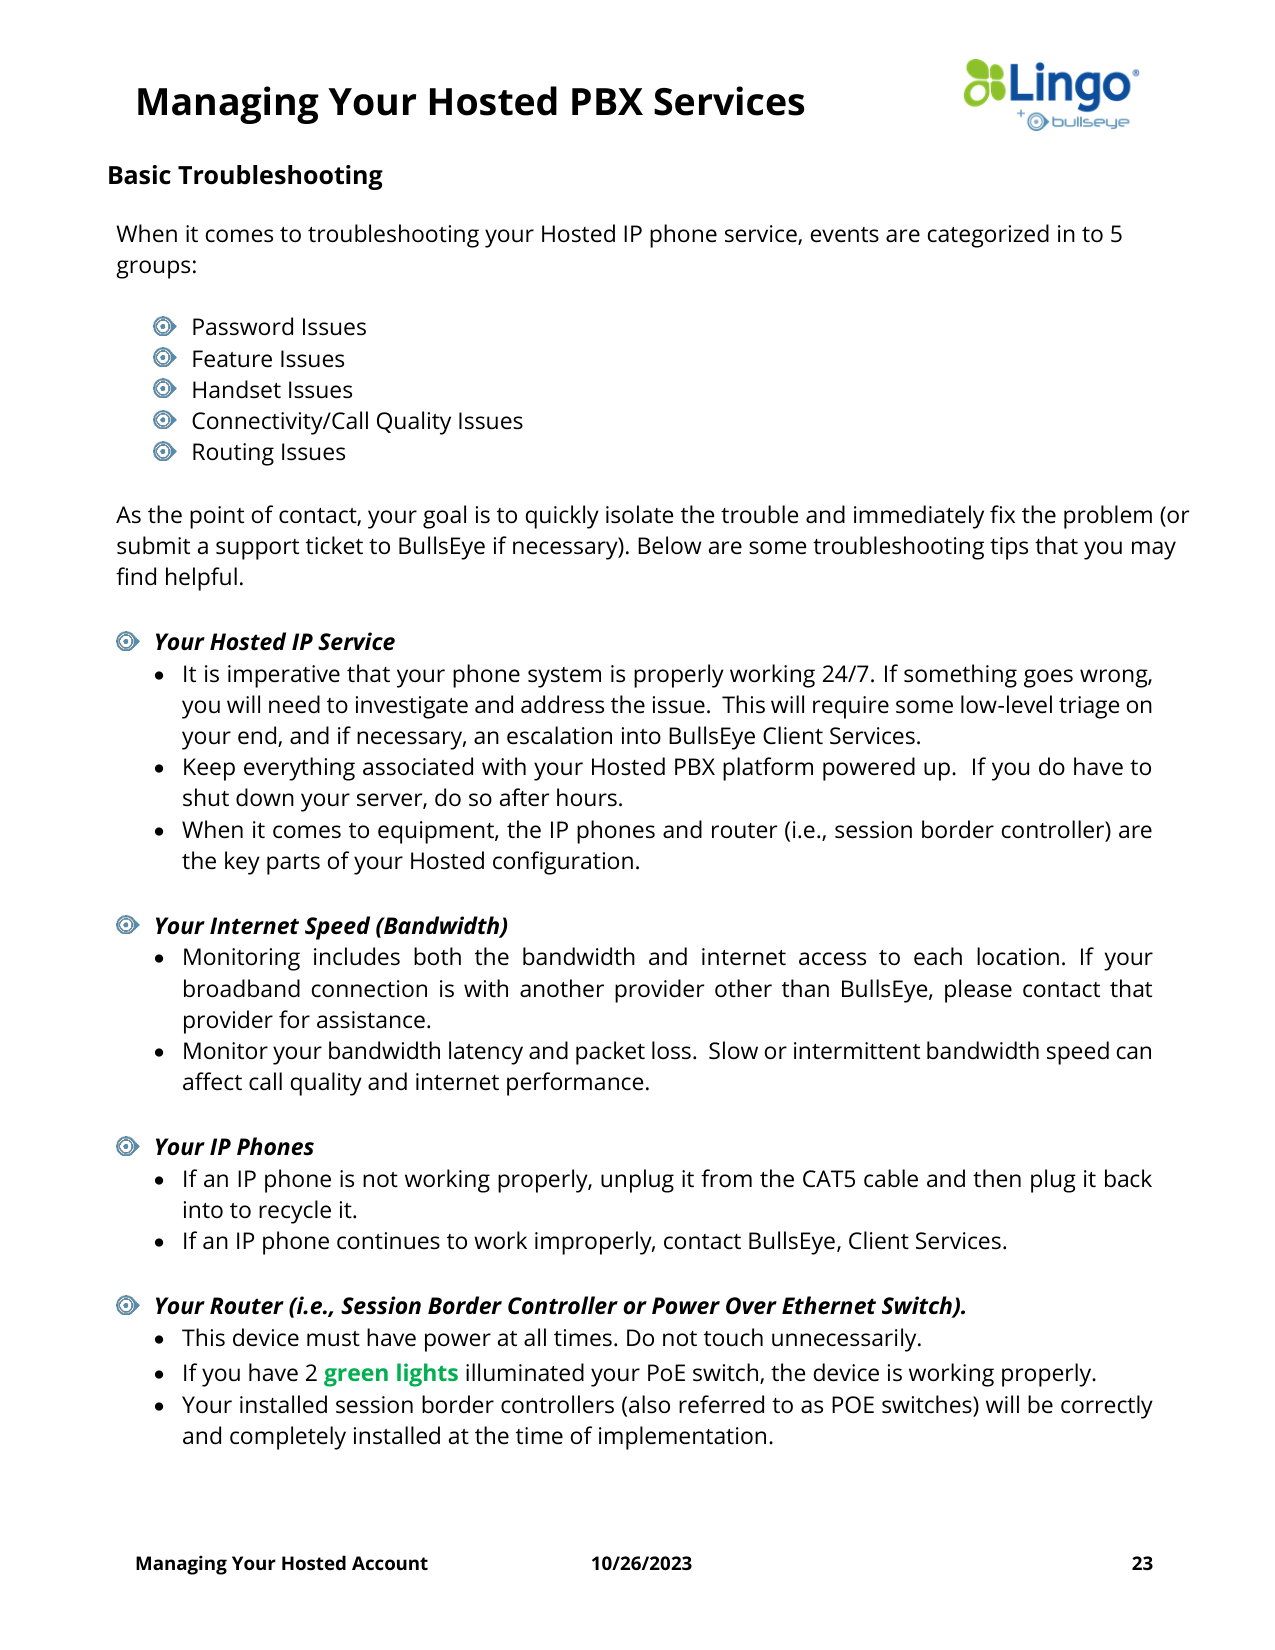
Basic Troubleshooting
When it comes to troubleshooting your Hosted IP phone service, events are categorized in to 5
groups:
Password Issues
Feature Issues
Handset Issues
Connectivity/Call Quality Issues
Routing Issues
As the point of contact, your goal is to quickly isolate the trouble and immediately fix the problem (or
submit a support ticket to BullsEye if necessary). Below are some troubleshooting tips that you may
find helpful.
Your Hosted IP Service
• It is imperative that your phone system is properly working 24/7. If something goes wrong,
you will need to investigate and address the issue. This will require some low-level triage on
your end, and if necessary, an escalation into BullsEye Client Services.
• Keep everything associated with your Hosted PBX platform powered up. If you do have to
shut down your server, do so after hours.
• When it comes to equipment, the IP phones and router (i.e., session border controller) are
the key parts of your Hosted configuration.
Your Internet Speed (Bandwidth)
• Monitoring includes both the bandwidth and internet access to each location. If your
broadband connection is with another provider other than BullsEye, please contact that
provider for assistance.
• Monitor your bandwidth latency and packet loss. Slow or intermittent bandwidth speed can
affect call quality and internet performance.
Your IP Phones
• If an IP phone is not working properly, unplug it from the CAT5 cable and then plug it back
into to recycle it.
• If an IP phone continues to work improperly, contact BullsEye, Client Services.
Your Router (i.e., Session Border Controller or Power Over Ethernet Switch).
• This device must have power at all times. Do not touch unnecessarily.
• If you have 2 green lights illuminated your PoE switch, the device is working properly.
• Your installed session border controllers (also referred to as POE switches) will be correctly
and completely installed at the time of implementation.
Managing Your Hosted PBX Services
Managing Your Hosted Account
10/26/2023
24
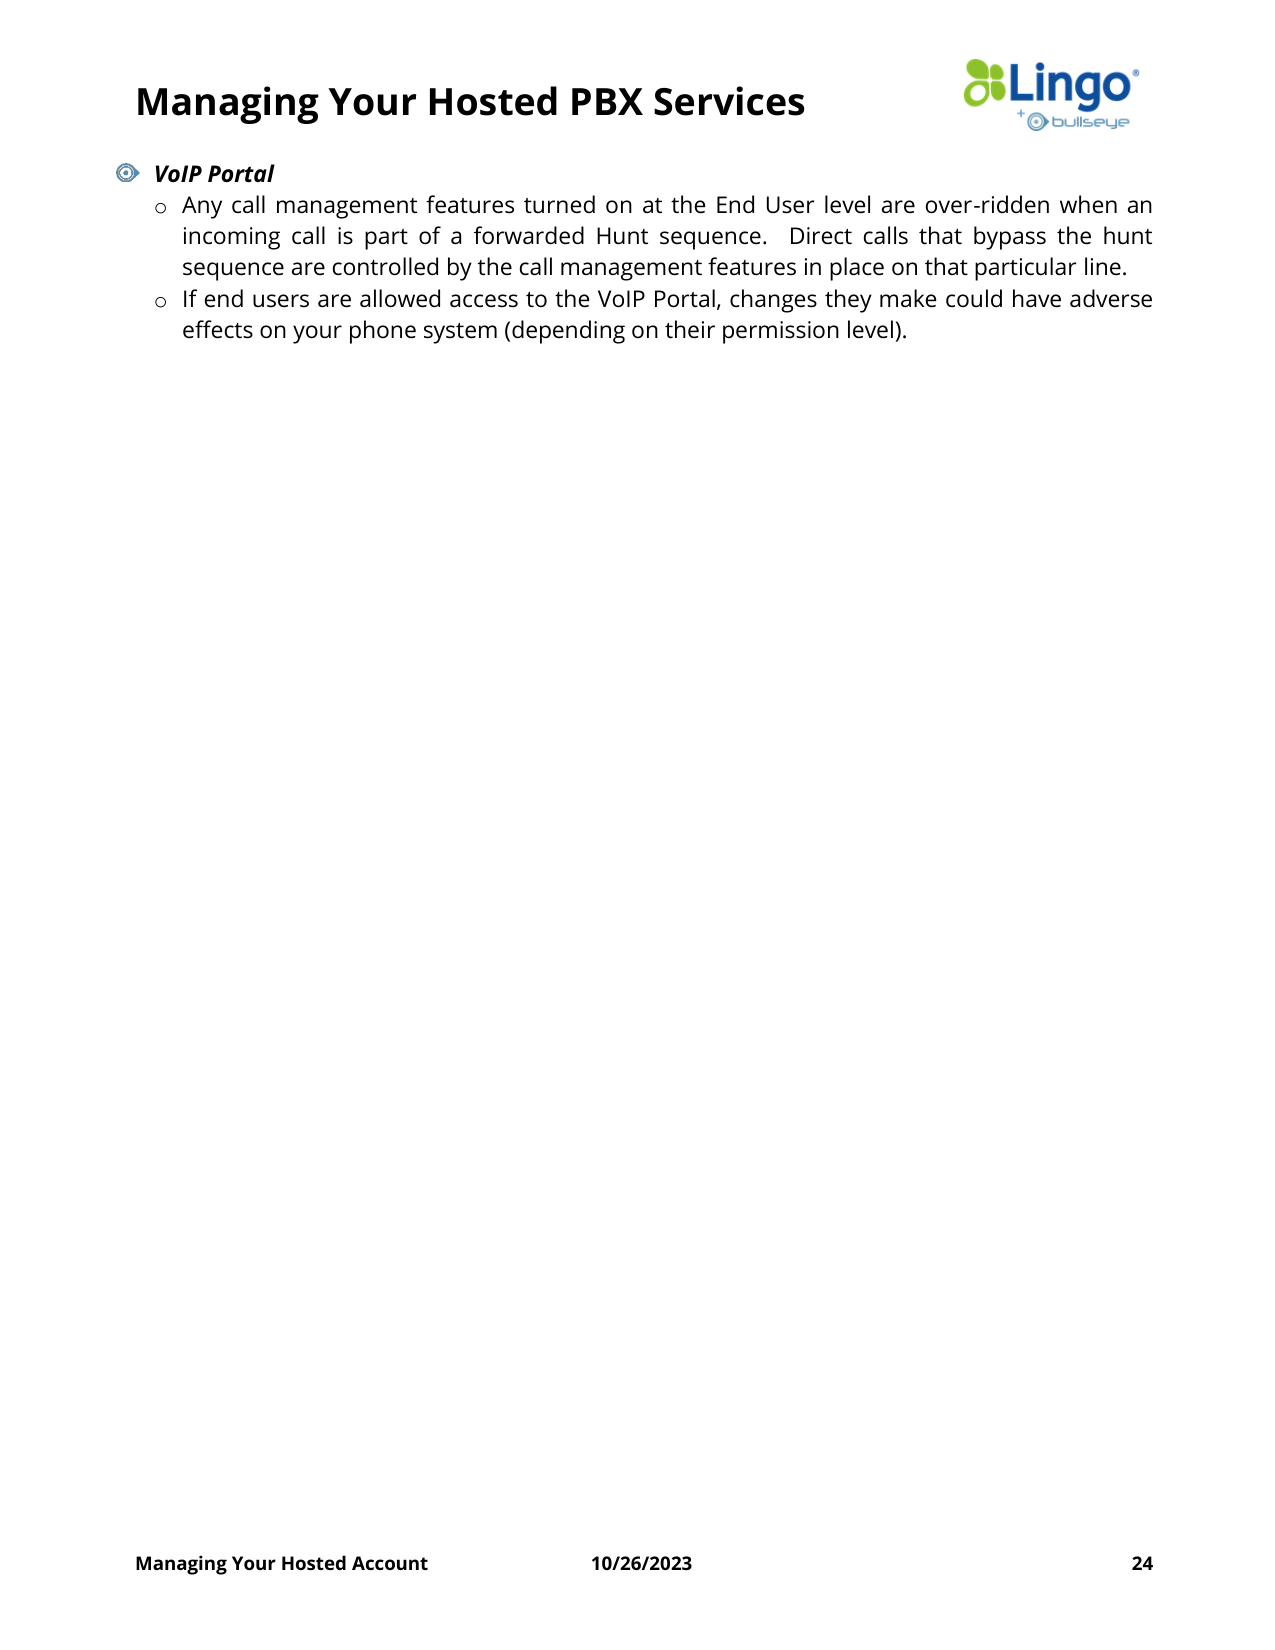
VoIP Portal
o Any call management features turned on at the End User level are over-ridden when an
incoming call is part of a forwarded Hunt sequence. Direct calls that bypass the hunt
sequence are controlled by the call management features in place on that particular line.
o If end users are allowed access to the VoIP Portal, changes they make could have adverse
effects on your phone system (depending on their permission level).
Managing Your Hosted PBX Services
Managing Your Hosted Account
10/26/2023
25
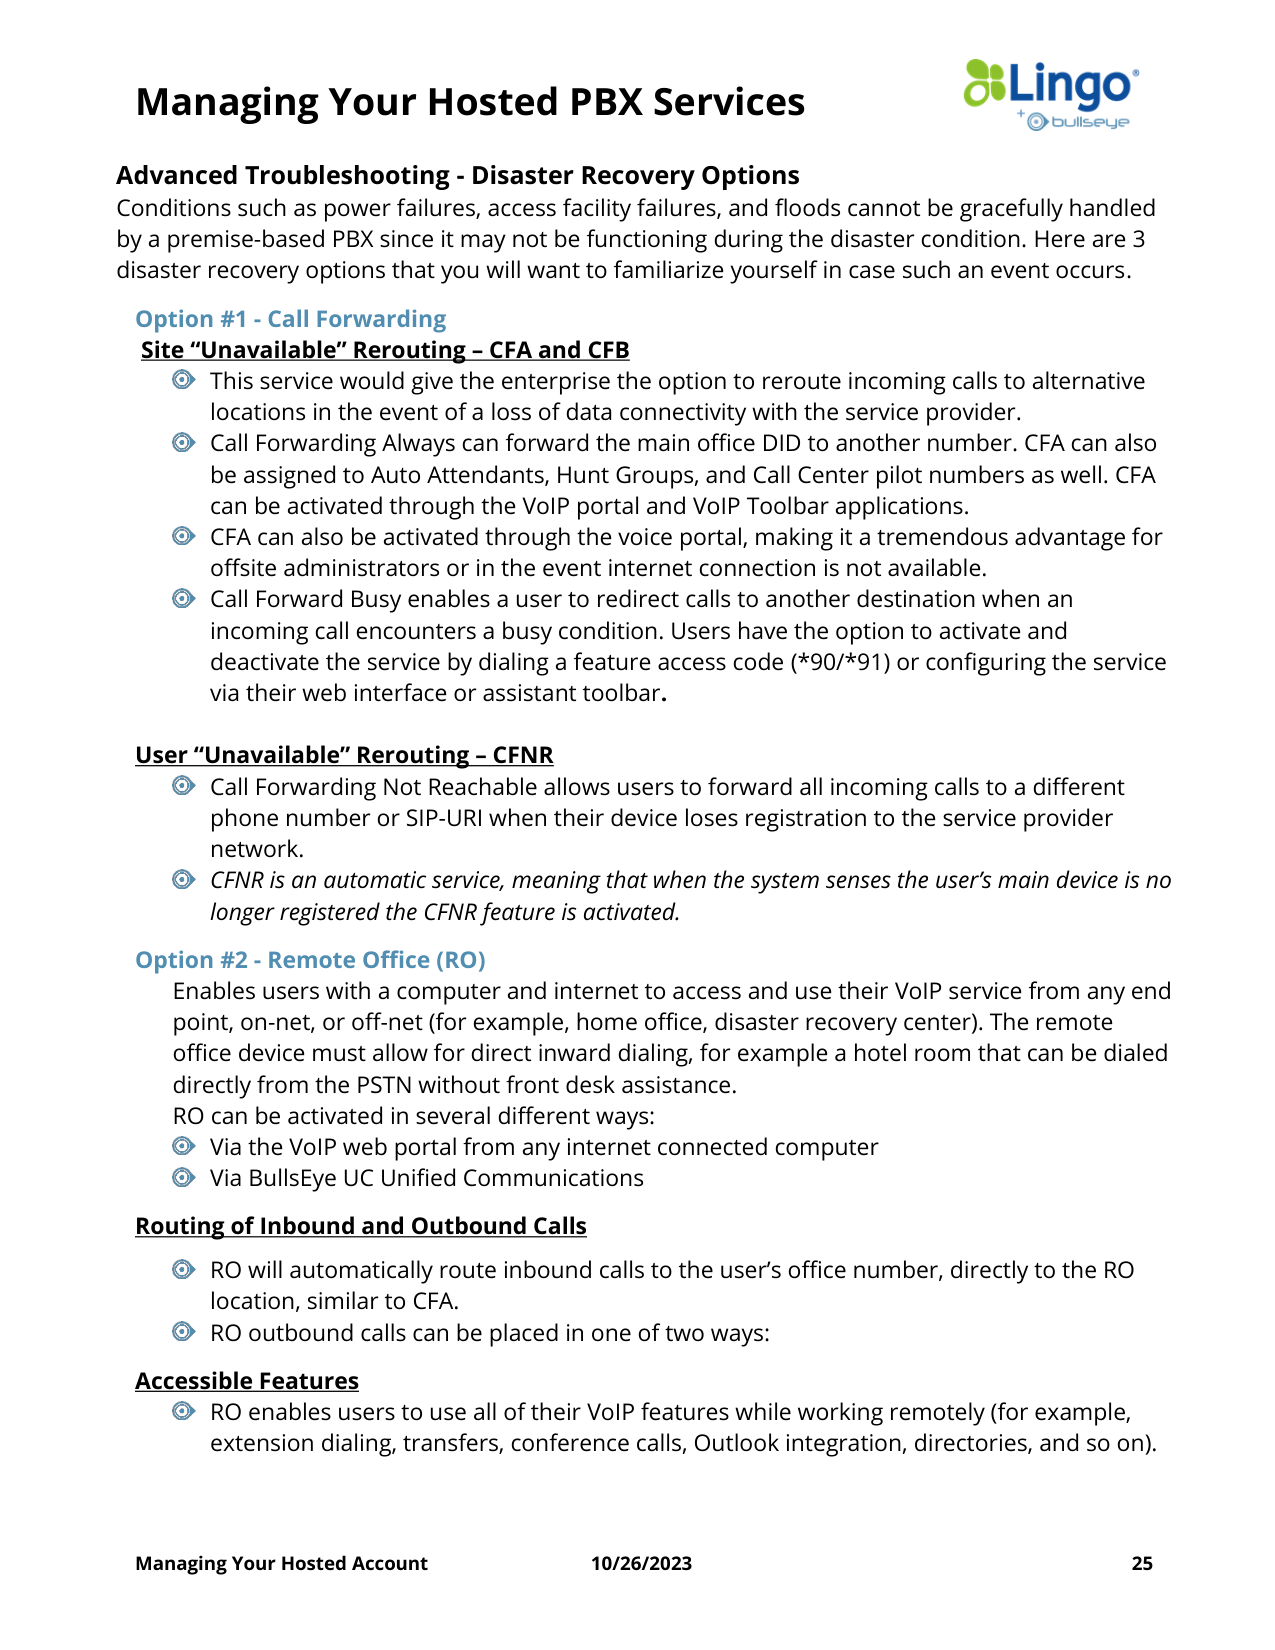
Advanced Troubleshooting - Disaster Recovery Options
Conditions such as power failures, access facility failures, and floods cannot be gracefully handled
by a premise-based PBX since it may not be functioning during the disaster condition. Here are 3
disaster recovery options that you will want to familiarize yourself in case such an event occurs.
Option #1 - Call Forwarding
Site “Unavailable” Rerouting – CFA and CFB
This service would give the enterprise the option to reroute incoming calls to alternative
locations in the event of a loss of data connectivity with the service provider.
Call Forwarding Always can forward the main office DID to another number. CFA can also
be assigned to Auto Attendants, Hunt Groups, and Call Center pilot numbers as well. CFA
can be activated through the VoIP portal and VoIP Toolbar applications.
CFA can also be activated through the voice portal, making it a tremendous advantage for
offsite administrators or in the event internet connection is not available.
Call Forward Busy enables a user to redirect calls to another destination when an
incoming call encounters a busy condition. Users have the option to activate and
deactivate the service by dialing a feature access code (*90/*91) or configuring the service
via their web interface or assistant toolbar.
User “Unavailable” Rerouting – CFNR
Call Forwarding Not Reachable allows users to forward all incoming calls to a different
phone number or SIP-URI when their device loses registration to the service provider
network.
CFNR is an automatic service, meaning that when the system senses the user’s main device is no
longer registered the CFNR feature is activated.
Option #2 - Remote Office (RO)
Enables users with a computer and internet to access and use their VoIP service from any end
point, on-net, or off-net (for example, home office, disaster recovery center). The remote
office device must allow for direct inward dialing, for example a hotel room that can be dialed
directly from the PSTN without front desk assistance.
RO can be activated in several different ways:
Via the VoIP web portal from any internet connected computer
Via BullsEye UC Unified Communications
Routing of Inbound and Outbound Calls
RO will automatically route inbound calls to the user’s office number, directly to the RO
location, similar to CFA.
RO outbound calls can be placed in one of two ways:
Accessible Features
RO enables users to use all of their VoIP features while working remotely (for example,
extension dialing, transfers, conference calls, Outlook integration, directories, and so on).
Managing Your Hosted PBX Services
Managing Your Hosted Account
10/26/2023
26
In addition, since calls are still originated from BullsEye, the service provides an easy
mechanism for separating personal and business phone expenses, as well as keeping
alternate phone numbers private. The called party will also see the user’s office calling line
identification, and not that of the RO device.
Option #3 – BullsEye UC (Unified Communications)
Enables users to link any device (mobile, tablet, desktop) to their main phone line. Unlike Remote
Office, which is typically used as an ‘on demand’ service, users with this service can use BullsEye
UC all day every day. Another differentiator is that users can add BullsEye UC to multiple devices,
providing similar inbound call alerting as the Simultaneous Ring feature. If you are interested in
adding BullsEye UC to your account, please contact your BullsEye Sales Representative, Account
Manager or Client Services for more information.
Other Important Things to Know
Because of the nature of Hosted PBX technology, 2 catastrophic events could possibly occur.
They are as follows:
1. Your phone system could be compromised
▪ Why? Because your phones are connected to the Internet, your network could get
hacked. This means that someone could gain access to your portal and make long
distance and international calls without you even knowing it. This could result in
thousands of dollars of charges against your account.
▪ Preventive Measures.
• Please make sure that you are following the strict password convention that we have in
place.
• If you are not going to be making any International calls, you should disable this
capability. Please contact your Implementation Specialist or Client Services to have this
done for you.
• If employees are terminated or leave the company, their passwords need to be
immediately changed.
2. You portal configuration settings could be lost
▪ Why? Unfortunately, the VoIP portal does not have a mechanism for saving/backing up
your custom configuration. Though it is highly unlikely, all of your portal settings (at all
levels, from Enterprise to the User level) could be lost. If this occurs, you will have to
rebuild all of your custom configurations.
▪ Preventive Measure. After your service is configured and working properly, you should
take a few minutes to take some screen captures of the various VoIP Portal screens (such
as your Profile, Hunt Group, and Auto Attendant features). This will be very useful if this
occurs and those functions need to be re-configured from scratch.